About Me
My hobbies are PSP.
I love helping my friends who are starting with PSP.
Any similarity or resemblance to any other tutorial is purely coincidental and unintentional. Pls do not recopy my tutorials anywhere. Many thanks Susan.


Credit

Blinkie created by Rabid Designz. She does some amazing work ! Thanks so much Melissa.

Blinkie created by my long time friend tweety here. Thanks so much my friend :)
My blog was designed By Alika's Scraps. Thanks so much. You did an amazing job !

Tuesday, May 31, 2011
 Beach Babe Tut
5:12 PM | Posted by
Shal |
 Edit Post

Feel free to use my tutorial as a guide and have fun giving it your own spin.
This tutorial assumes you have a working knowledge of PSP.
Needed Supplies :
Tube of Choice .. I am using the work of Nicole Brune which you must have a license to use. Please do not use her work without purchasing through CDO here.
I am licensed through CILM which is now closed.
Scrap Kit of Choice .. I have used a gorgeous PTU Kit from Rieneke Designs called Pelican Beach which can you can buy here.
Mask of Choice .. I have used WSL_Mask84 which can be downloaded here.
Font of Choice .. Paint Peel & TheNautiGal
Let's get started
New image 600x600 and floodfill with white. New raster layer, select all, paste into selection Paper 9. Select none. New mask layer from image, WSL_Mask84, invert transparency unchecked, and merge group. Layer duplicate & merge down both mask layers. Layer duplicate again and merge down both mask layers.
Copy and paste Element 35 & resize 65%. Using your magic wand, select the center portion of your frame, selections modify/expand 5. Copy and paste Paper 6 below your frame layer, resize 85%, selections invert and hit delete. Select none. Drop shadow your frame. I have used 2/2/40/4 throughout.
Copy and paste Element 57, resize 75% & drop shadow. Position along the top of your frame. Copy and paste Element 20, resize 75%, rotate left 25 & drop shadow. Position top left hand corner.
Copy and paste your tube & drop shadow.
Copy and paste Element 18, resize 75% & drop shadow. Position along the left hand side. Repeat with Element 46 and position on the right hand side. Repeat with Element 11 & position along the bottom toward the left hand side.
Copy and paste Element 47, resize 75%, rotate right 90 and drop shadow. Position along the bottom. Copy and paste Element 28 & drop shadow. Position on top of your shell string. Copy and paste Element 24, resize 75% & drop shadow. Position as well on the bottom toward the right hand side.
Copy and paste Element 97, resize 50% & drop shadow. Position on the left hand side.
Copy and paste Element 68, resize 75% & drop shadow. Position along the bottom on the right hand side.
Copy and paste Element 3, resize 25% & drop shadow. Position bottom left hand corner. Repeat with Element 48, resizing 35% and then position on the bottom right hand corner.
X out white background, merge visible. Open white background, resize to your liking (I have used 500x500).
Using PaintPeel, Size 36, color #3d2b2b, I have typed out Beach on the sign.
Add copyright and name on your tag. I have used TheNautiGal ROB, size 72, color #872959. I then added noise (adjust/add remove noise/random monochrome checked/50%) and then added a size 3 fat white gradient glow and then drop shadow.
Save and you are done.
I hope you have enjoyed my tutorial. Pls feel free to experiment and use my tutorial as a guide.
Thursday, May 26, 2011
Summer Themed Tagger Size Kits
11:33 PM | Posted by
Shal |
Edit Post
Summer is just around the corner !
Check out some of my Summer themed kits !


Available now at Twilight Scraps & Wilma4ever.
Floral Garden Tagger Size Kit
11:14 PM | Posted by
Shal |
Edit Post

Floral Garden Tagger Size Kit
This kit contains 24 papers (800x800 in size) & 78 elements. Elements include bows, buttons, doodles, flairs, frames, ribbons, strings and a gorgeous assortment of garden themed elements that include beautiful mixed flowers, greenery, baskets and watering can, benches, birds, eggs & nest, butterflies and a breathtaking poser.
A beautiful kit perfect and practical for all occasions.
A beautiful kit perfect and practical for all occasions.
Available now at Twilight Scraps & Wilma4ever.
Thursday, May 19, 2011
Welcome On Board Tut
8:24 PM | Posted by
Shal |
Edit Post
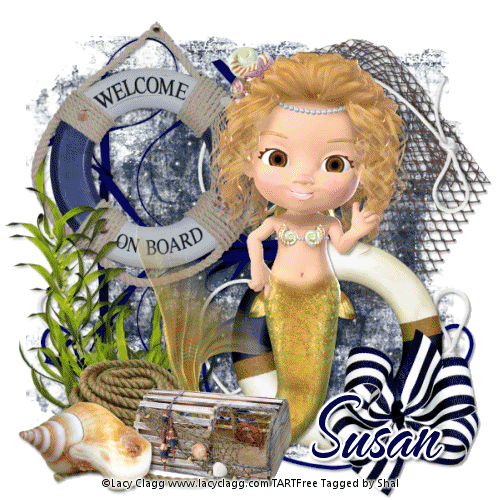
Feel free to use my tutorial as a guide and have fun giving it your own spin.
This tutorial assumes you have a working knowledge of PSP.
Needed Supplies :
Tube of Choice .. I am using the work of Lacy Clagg (www.lacyclagg.com) which you must have a license to use. Please do not use her work without purchasing through My Tag Art here.
The particular image I have used is FTU through My Tag Art. Please follow TOU if using these.
Scrap Kit of Choice .. I have used a gorgeous FTU Kit from Scrap Dimensions called Nautical Vibes which can be downloaded here.
Mask of Choice .. I have used WSL_Mask83 which can be downloaded here.
Font of Choice .. TheNautiGal
Filters of Choice .. Eye Candy/Water Drops
Let's get started
New image 600x600 and floodfill with white. Copy and paste Paper 10. New mask layer from image, WSL_Mask83, invert mask data unchecked, and merge group. Resize 105%.
Duplicate layer twice & rename Mask 1, 2 & 3. On your first Mask layer apply the following Eye Candy/Water Drops.

Apply the same Water Drops to your next Mask layer and hit random once. Apply again to your last Mask layer hitting random twice. Select none. If you decide not to animate your tag, then just skip the duplicate twice.
Copy and paste Net, resize 40% & drop shadow. I have used 2/2/40/4 throughout. Position top right hand corner.
Copy and paste Ribbon 3, resize 65% & drop shadow. Position bottom left hand corner. Layer duplicate, flip. Copy and paste String 2, resize 65%, rotate left 90 & drop shadow. Position along the bottom. Repeat with String 3. Layer duplicate, flip.
Copy and paste Life Ring 2, resize 65% & drop shadow. Position bottom right hand corner. Copy and paste Bow 1, resize 25% & drop shadow. Position at the bottom of your life ring.
Copy and paste Life Ring, resize 40% & drop shadow. Position top left hand corner. Copy and paste Sea Plant, resize 50% & drop shadow. Position bottom left hand corner.
Copy and paste Tube, mirror & drop shadow.
Copy and paste Rope, resize 35% & drop shadow. Position bottom left hand corner. Copy and paste Trap, resize 40% & drop shadow. Position next to your rope. Copy and paste Seashells 3, resize 20% & drop shadow. Position next to your trap.
Resize to your liking (I used 500x500).
Add copyright & Add your name. I used TheNautiGal size 72 color #00004b. I then added a size 3 fat white gradient glow and drop shadow as before. If you are choosing not to animate, then you can save your tag.
To animate, close off Mask layer 2 & 3 (the lil eye icon in your layer palette), Edit/Copy Merged and paste as new animation in Animation Shop. Close off Mask layer 1 and open Mask layer 2, Edit/Copy Merged and paste after current frame in AS. Close off Mask layer 2 and open Mask layer 3, Edit/Copy Merged and paste after current frame in AS.
If you like you can adjust the speed in AS, by select all/animation/frame properties and I set mine to 20. Save as a gif.
I hope you have enjoyed my tutorial.
Pls feel free to experiment and use my tutorial as a guide.
Please feel free to send me your results.
I'd love to see what you came up with.
Tuesday, May 17, 2011
Life's A Beach Tut
5:46 PM | Posted by
Shal |
Edit Post

Feel free to use my tutorial as a guide and have fun giving it your own spin.
This tutorial assumes you have a working knowledge of PSP.
Needed Supplies :
Tube of Choice .. I am using the work of Renee Lavoie (www.reneellavoie.com) which you must have a license to use. Please do not use her work without purchasing through My Tag Art here.
Scrap Kit of Choice .. I have used a gorgeous PTU Kit from Kim's Korner called "Life's A Beach" which you can purchase here.
Mask of Choice .. I have sinedotsfrill by Essex Girl which can be downloaded here.
Font of Choice .. TheNauticalGal ROB
Let's get started
New image 600x600 and floodfill with white. New raster layer, select all, paste into selection Paper 25. Select none. New mask layer from image, sinedots frill, invert transparency unchecked, and merge group. Resize 80%.
Repeat with Paper 28 and resizing 75% instead, then rotate right 45.
Copy and paste Lifesaver and resize 90%. Using your magic wand, select the center portion of your lifesaver, selections modify/expand 5. Copy and paste Paper 21 below your frame layer, resize 75%, selections invert and hit delete. Select none. Drop shadow your frame. I have used 2/2/40/4 throughout.
Copy and paste Sun, resize 40% & drop shadow. Position top left hand corner. Copy and paste Bow 3 & drop shadow. Position top centre of your lifesaver.
Copy and paste your tube & drop shadow. Copy and paste Sand, resize 50% & drop shadow. Position along the bottom. Copy and paste Grass 3, resize 75% & drop shadow. Position on the right hand side. Copy and paste Sandcastle, resize 50% & drop shadow. Position bottom right hand corner.
Copy and paste Grass 2 & drop shadow. Position bottom left hand corner. Copy and paste Flower 5, resize 65% & drop shadow. Position as well on the bottom left hand corner. Repeat with Flower 2. Copy and paste Grass 4, resize 65% & drop shadow. Position bottom left hand corner at the bottom of your other elements.
Copy and paste Flower 1, resize 40% & drop shadow. Position on top of your last grass element on the bottom left hand side. Copy and paste Shell large 3, resize 40% & drop shadow. Position next to your flower.
Copy and paste Tag 02, resize 65% & drop shadow. Position top right hand corner.
Copy and paste Dolphin, resize 40%, mirror and rotate right 30. Using your magic wand, select the blue portions of your dolphin and then adjust/add remove noise/uniform monochrome checked/50%. Select none and drop shadow. Position top right hand corner so it appears your tag is hanging from the dolphin.
X out white background, merge visible. Open white background, resize to your liking (I have used 500x500).
Add copyright and name on your tag. I have used TheNauticalGal ROB, size 72, color #1a86a2 and then added the same noise as used on the dolphin. I then added the following gradient glow and drop shadow.

Save and you are done.
I hope you have enjoyed my tutorial. Pls feel free to experiment and use my tutorial as a guide.
I hope you have enjoyed my tutorial. Pls feel free to experiment and use my tutorial as a guide.
Sunday, May 15, 2011
Making Waves Tut
5:07 PM | Posted by
Shal |
Edit Post

Feel free to use my tutorial as a guide and have fun giving it your own spin.
This tutorial assumes you have a working knowledge of PSP.
Needed Supplies :
Tube of Choice .. I am using the work of Maigan Lynn (www.maiganlynnart.blogspot.com) which you must have a license to use. Please do not use her work without purchasing through My Tag Art here.
Scrap Kit of Choice .. I have used a FTU Kit that I made exclusively for My Tag Art's MerMay celebration. The kit is available to My Tag Art forum members here and then just visit the Exclusive TART Freebies area.
Mask of Choice .. I have used WSL_Mask79 & WSL_Mask366 which can be downloaded here.
Word art of Choice .. I have used word art from Alegna Designs which you can download here.
Font of Choice .. TheNauticalGal ROB
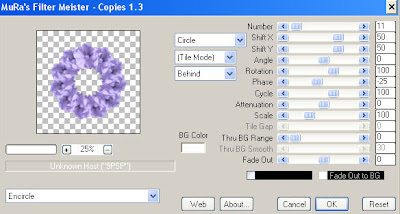
Filters of Choice .. Mura's Meister/Copies
Let's get started
New image 600x600 and floodfill with white. New raster layer, select all, paste into selection Paper 3. Select none. New mask layer from image, WSL_Mask79, invert transparency unchecked, and merge group. Resize 110%.
Repeat with Paper 2 and this time using mask WSL_Mask366. Resize 110%.
Copy and paste Splat 1 & resize 50%. Position top left hand corner. Layer duplicate and position bottom right hand corner. You may want to reposition these a bit once you have more layers on your tag.
Copy and paste Frame 3 & resize 55%. Using your magic wand, select the center portion of your first frame, selections modify/expand 5. Copy and paste Paper 7 below your frame layer, resize 65%, selections invert and hit delete. Select none. Drop shadow your frame. I have used 2/2/40/4 throughout.
Copy and paste Hibiscus 2 and resize 40%. Apply the following Mura's Meister/Copies setting and then drop shadow.
Copy and paste Element 16, resize 75% & drop shadow. Position on the right hand side of your frame. Repeat with Element 17, resizing 65% & position next to your other palm tree.
Copy and paste Element 14, resize 65% & drop shadow. Position at the base of your palm trees.
Copy and paste your tube and drop shadow. Position a lil to the left of your palm trees.
Copy and paste Ribbon 6, resize 65%, rotate right 90, mirror & drop shadow. Position on the bottom left hand side. Copy and paste Ribbon 7, resize 50%, rotate right 90 & drop shadow. Position on your other ribbon.
Copy and paste Element 5, resize 50% & drop shadow. Position bottom right hand corner. Repeat with Element 4 and position on your shells. Repeat with Element 19 and position top right hand corner flying over the palm trees.
Copy and paste Word art and resize 40% twice. Adjust color balance/manual color correction from black to #3c1e5d. Adjust/add remove noise/uniform monochrome checked/50%. I then added the following gradient glow & then drop shadow.
X out white background, merge visible. Open white background, resize to your liking (I have used 500x500).
Add copyright and name on your tag. I have used TheNauticalGal ROB, size 72, color #3c1e5d and then added the noise, gradient glow & drop shadow as with the word art.
Save and you are done.
I hope you have enjoyed my tutorial. Pls feel free to experiment and use my tutorial as a guide.
This tutorial assumes you have a working knowledge of PSP.
Needed Supplies :
Tube of Choice .. I am using the work of Maigan Lynn (www.maiganlynnart.blogspot.com) which you must have a license to use. Please do not use her work without purchasing through My Tag Art here.
Scrap Kit of Choice .. I have used a FTU Kit that I made exclusively for My Tag Art's MerMay celebration. The kit is available to My Tag Art forum members here and then just visit the Exclusive TART Freebies area.
Mask of Choice .. I have used WSL_Mask79 & WSL_Mask366 which can be downloaded here.
Word art of Choice .. I have used word art from Alegna Designs which you can download here.
Font of Choice .. TheNauticalGal ROB
Filters of Choice .. Mura's Meister/Copies
Let's get started
New image 600x600 and floodfill with white. New raster layer, select all, paste into selection Paper 3. Select none. New mask layer from image, WSL_Mask79, invert transparency unchecked, and merge group. Resize 110%.
Repeat with Paper 2 and this time using mask WSL_Mask366. Resize 110%.
Copy and paste Splat 1 & resize 50%. Position top left hand corner. Layer duplicate and position bottom right hand corner. You may want to reposition these a bit once you have more layers on your tag.
Copy and paste Frame 3 & resize 55%. Using your magic wand, select the center portion of your first frame, selections modify/expand 5. Copy and paste Paper 7 below your frame layer, resize 65%, selections invert and hit delete. Select none. Drop shadow your frame. I have used 2/2/40/4 throughout.
Copy and paste Hibiscus 2 and resize 40%. Apply the following Mura's Meister/Copies setting and then drop shadow.

Copy and paste Element 16, resize 75% & drop shadow. Position on the right hand side of your frame. Repeat with Element 17, resizing 65% & position next to your other palm tree.
Copy and paste Element 14, resize 65% & drop shadow. Position at the base of your palm trees.
Copy and paste your tube and drop shadow. Position a lil to the left of your palm trees.
Copy and paste Ribbon 6, resize 65%, rotate right 90, mirror & drop shadow. Position on the bottom left hand side. Copy and paste Ribbon 7, resize 50%, rotate right 90 & drop shadow. Position on your other ribbon.
Copy and paste Element 5, resize 50% & drop shadow. Position bottom right hand corner. Repeat with Element 4 and position on your shells. Repeat with Element 19 and position top right hand corner flying over the palm trees.
Copy and paste Word art and resize 40% twice. Adjust color balance/manual color correction from black to #3c1e5d. Adjust/add remove noise/uniform monochrome checked/50%. I then added the following gradient glow & then drop shadow.

X out white background, merge visible. Open white background, resize to your liking (I have used 500x500).
Add copyright and name on your tag. I have used TheNauticalGal ROB, size 72, color #3c1e5d and then added the noise, gradient glow & drop shadow as with the word art.
Save and you are done.
I hope you have enjoyed my tutorial. Pls feel free to experiment and use my tutorial as a guide.
Friday, May 13, 2011
Love of Fun Tut
6:03 PM | Posted by
Shal |
Edit Post

Feel free to use my tutorial as a guide and have fun giving it your own spin.
This tutorial assumes you have a working knowledge of PSP.
Needed Supplies:
Tube of Choice .. I am using the work of Jennifer Nilsson (http://www.jenniferlnilsson.com) which you must have a license to use. Please do not use her work without purchasing through My Tag Art here.
Scrap Kit of Choice .. I have used a gorgeous PTU Scrap kit by Heartfelt Perfections called "Love of Fun" which you can purchase here.
Mask of Choice .. I have used WSL_Mask84 which can be downloaded here.
Font of Choice .. Waterbrush ROB
Let's get started
New image 600x400 and floodfill with white. New raster layer, select all, paste into selection Paper 4. Select none. New mask layer from image, WSL_Mask84, invert transparency unchecked, and merge group. Layer duplicate and merge down both mask layers. Layer duplicate, merge down both mask layers & resize 110%.
Copy and paste String frame 2, resize 50%, flip & drop shadow. I have used 2/2/40/4 throughout. Position bottom left hand corner. Repeat with String and position next to your first one along the bottom.
Copy and paste Splat 2, resize 50% & drop shadow. Position bottom right hand corner. Layer duplicate, resize 75%, mirror & flip. Position top left hand corner.
Copy and paste Tri frame, resize 70% & rotate left 90. Using your magic wand, select the center portion of your first frame, selections modify/expand 5. Copy and paste Paper 2 below your frame layer, selections invert and hit delete. Copy and paste your first tube, hit delete and select none. Drop shadow your tube.
Repeat for your 2nd frame using Paper 7 and a different tube and then for your 3rd frame using Paper 3 and again a different tube. Once you are done drop shadow your frame.
Copy and paste Love word art, resize 70%, add a size 5 fat white gradient glow & then drop shadow. Position along the top of your frame.
Copy and paste Mixed Hearts, resize 50% twice & drop shadow. Position bottom right hand corner. Repeat with Hearts and position bottom left hand corner.
Copy and paste Flower 4, resize 50%, rotate left 90 & drop shadow. Position along the bottom of your frame.
Copy and paste Word Art, resize 50% twice, add the same gradient glow & drop shadow as before. Position top right hand corner.
X out white background, merge visible. Open white background, resize to your liking (I have used a width of 550).
Add copyright and name on your tag. I have used Waterbrush ROB, size 60, color #e884b9 and then added the same gradient glow & drop shadow as used on the word art.
Save and you are done.
I hope you have enjoyed my tutorial. Pls feel free to experiment and use my tutorial as a guide.
Tuesday, May 10, 2011
Birthday Bash at Twilights Scraps !
10:42 PM | Posted by
Shal |
Edit Post

Simply shop through the store to find some great Specials, and awesome Hidden Freebies from our Twilight Scraps Designers. Customers who complete a purchase will go into the draw to win the following door prizes from May 9th till midnight May 14th 2011.
JosDZigns: Birthday Script Bundle Pack
Creative Intentionz: 3 CU PSP Scripts of Choice (1 per customer)
Gothique Starr: 2 Licensed Tubes (1 per customer) PTE Licensed Artist
Alika Scraps: 2 Scrapkits & 2 CU Items of Choice (1 per customer)
Shal's World: 5x $5.00 Gift Certificates courtesy of My Tag Art (1 per customer)
Candylicious: 2 Scrapkits (1 per customer)
Sam's Scraps: 2 CU & 2 PU Products (1 per customer)
Busyscrappin: 1 CU4CU License and 2 Poser Sets & 1 PU Item (1 per customer)
Darq Illusions: 3 Products of Choice (1 per customer)
Athena Designs: 1 CU Product & 1 PU Product of Choice (1 per customer)
Heartfelt Perfections: 1 CU Product & 1 PU Product of choice (1 per customer)
Scraps & Tubes: 1x $5.00 Gift Certificate
Puddicat Creations: 1 CU Product & 1 PU Product of Choice (1 per customer)
Bello Scarto: 2 Scrap Kits (1 per customer)
Digiscrapations: 1 x $5.00 Gift Certificate
P&A Designz: 1 Scrap Kit of Choice
Schnegge: Sexy Thing Bundle, Sweet Violet, Rose CU Tubes, Jaqueline
TaggingAngels: 1 CU4CU License & 5 Resell Poser Sets
Wicked Princess: 1 CU Product & 1 PU Product of Choice (1 per customer)
Mystical Illusionz: 5 CU Poser Packs (1 per customer)
Grunge&Glitter/Toxic Desirez: Exclusive Collab Kit
Dnscraps: 1 x $5.00 Gift Certificate
On top of all the fabulous prizes, sales and freebie giveaways i am giving 2 LUCKY customers the chance to get there order completely refunded so you can spend on even MORE goodies in store, Here is how it will work. Everyone who makes a purchase during the sales event from 9th May till midnight 14th May will go into the draw o win a coupon for the same amount as your order.
Good luck everyone and Thank You for supporting Twilight Scraps!
Monday, May 9, 2011
Ongoing Mother's Day & NSD sale !
6:51 PM | Posted by
Shal |
Edit Post

Continuing all this week is my 60% off Mother's Day & NSD sale
Sale is on until May 15th and is available in all stores
So stop by your favorite spot !
Currently available at My Tag Art, The Creativity Box, Twilight Scraps, Wilma4ever & Your Scrap Addiction.
Sunday, May 8, 2011
Tuts using my "Easterific" & "Lil Boys/Lil Girls Are" kits
10:09 PM | Posted by
Shal |
Edit Post

My dearest friend tweety has again wrote some tutorials for me,
this first one using one of my latest kits "Easterific".
Just gorgeous as always !
Tutorial can be found here.

The second one uses my "Lil Boys/Lil Girls Are" kit. Just adorable !
Thanks so much my dear friend. Tutorial can be found here.
Saturday, May 7, 2011
Beauty Tut
10:02 PM | Posted by
Shal |
Edit Post

Feel free to use my tutorial as a guide and have fun giving it your own spin.
This tutorial assumes you have a working knowledge of PSP.
Needed Supplies :
Tube of Choice .. I am using the work of Emily White (www.darklingtreasures.com) which you must have a license to use. Please do not use her work without purchasing through My Tag Art here.
The particular image I have used is FTU through My Tag Art. Please follow TOU if using these.
Scrap Kit of Choice .. I have used a gorgeous FTU Kit from Scrap Dimensions called Fading Summer which can be downloaded here.
Mask of Choice .. I have used WSL_Mask223 which can be downloaded here.
Template of Choice .. I have used Template 58 by Yvette which can be downloaded here.
Font of Choice .. 2 Peas Airplane & Waterbrush ROB
Filters of Choice .. Alien Skin Eye Candy 5 Impact/Glass
Let's get started
Open your template in PSP & delete credits layer. Resize canvas size 650x450 and floodfill background layer with white.
New raster layer just above your background layer. Select all, copy and paste into selection Paper 6. Select none. New mask layer from image, WSL_Mask223, invert transparency unchecked. Merge group. Resize 110%.
Copy and paste Doodle 1 & resize 50%. Add a size 5 fat white gradient glow & then drop shadow. I have used 2/2/40/4 throughout. Position top left hand side. Repeat with Doodle 2 and mirror.
Select Rectangle Layer, select all/float/defloat, copy and paste Paper 7, selections invert and hit delete. Select none and delete original Rectangle layer. Add the same gradient glow & drop shadow as before.
Select Dotted Heart Layer, adjust color balance/manual color correction/from black to #b7913b and then drop shadow.
Select Big Heart Layer, select all/float/defloat, copy and paste Paper 10, selections invert and hit delete. Select none and delete original Big Heart layer.
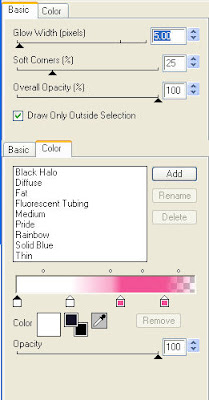
I then added the following Impact/Glass effect. If you are having trouble with it, go to your settings tab & select factory default, then return to the basic tab. I then changed the bevel width to 30 and the glass color to white.

Repeat with Small Hearts Layer using Paper 8 resized 75%.
Copy and paste Sun, resize 40% & drop shadow. Postion top left hand corner.
Copy and paste Branch, resize 50% & drop shadow. Position on top of your left hand side heart. Layer duplicate & mirror.
Copy and paste Bird 2, resize 30% twice & drop shadow. Position top right hand corner.
Copy and paste Grass 1, resize 30% & drop shadow. Position bottom right hand corner. Copy and paste Flower 7, resize 20% & drop shadow. Position on your grass. Layer duplicate and move just a bit over.
X out white background, merge visible. Open white background, resize to your liking (I have used a width of 550).
I used 2 Peas Airplane, Size 48, Color #94cb3f to type out "Beauty". I then added a noise effect .. adjust/add remove noise/uniform monochrome checked/50% followed by the same glass effect as earlier but changing the bevel width to 15. I then added a size 3 fat white gradient glow & drop shadow.
Add copyright and name on your tag. I have used Waterbrush ROB, Size 60, color #eebc4f and then added the same gradient glow & drop shadow as on the word art.
Save and you are done.
I hope you have enjoyed my tutorial. Pls feel free to experiment and use my tutorial as a guide.
This tutorial assumes you have a working knowledge of PSP.
Needed Supplies :
Tube of Choice .. I am using the work of Emily White (www.darklingtreasures.com) which you must have a license to use. Please do not use her work without purchasing through My Tag Art here.
The particular image I have used is FTU through My Tag Art. Please follow TOU if using these.
Scrap Kit of Choice .. I have used a gorgeous FTU Kit from Scrap Dimensions called Fading Summer which can be downloaded here.
Mask of Choice .. I have used WSL_Mask223 which can be downloaded here.
Template of Choice .. I have used Template 58 by Yvette which can be downloaded here.
Font of Choice .. 2 Peas Airplane & Waterbrush ROB
Filters of Choice .. Alien Skin Eye Candy 5 Impact/Glass
Let's get started
Open your template in PSP & delete credits layer. Resize canvas size 650x450 and floodfill background layer with white.
New raster layer just above your background layer. Select all, copy and paste into selection Paper 6. Select none. New mask layer from image, WSL_Mask223, invert transparency unchecked. Merge group. Resize 110%.
Copy and paste Doodle 1 & resize 50%. Add a size 5 fat white gradient glow & then drop shadow. I have used 2/2/40/4 throughout. Position top left hand side. Repeat with Doodle 2 and mirror.
Select Rectangle Layer, select all/float/defloat, copy and paste Paper 7, selections invert and hit delete. Select none and delete original Rectangle layer. Add the same gradient glow & drop shadow as before.
Select Dotted Heart Layer, adjust color balance/manual color correction/from black to #b7913b and then drop shadow.
Select Big Heart Layer, select all/float/defloat, copy and paste Paper 10, selections invert and hit delete. Select none and delete original Big Heart layer.
I then added the following Impact/Glass effect. If you are having trouble with it, go to your settings tab & select factory default, then return to the basic tab. I then changed the bevel width to 30 and the glass color to white.

Repeat with Small Hearts Layer using Paper 8 resized 75%.
Copy and paste Sun, resize 40% & drop shadow. Postion top left hand corner.
Copy and paste Branch, resize 50% & drop shadow. Position on top of your left hand side heart. Layer duplicate & mirror.
Copy and paste Bird 2, resize 30% twice & drop shadow. Position top right hand corner.
Copy and paste Grass 1, resize 30% & drop shadow. Position bottom right hand corner. Copy and paste Flower 7, resize 20% & drop shadow. Position on your grass. Layer duplicate and move just a bit over.
X out white background, merge visible. Open white background, resize to your liking (I have used a width of 550).
I used 2 Peas Airplane, Size 48, Color #94cb3f to type out "Beauty". I then added a noise effect .. adjust/add remove noise/uniform monochrome checked/50% followed by the same glass effect as earlier but changing the bevel width to 15. I then added a size 3 fat white gradient glow & drop shadow.
Add copyright and name on your tag. I have used Waterbrush ROB, Size 60, color #eebc4f and then added the same gradient glow & drop shadow as on the word art.
Save and you are done.
I hope you have enjoyed my tutorial. Pls feel free to experiment and use my tutorial as a guide.
Friday, May 6, 2011
My Backyard Tut
9:59 PM | Posted by
Shal |
Edit Post

Feel free to use my tutorial as a guide and have fun giving it your own spin.
This tutorial assumes you have a working knowledge of PSP.
Needed Supplies :
Tube of Choice .. I am using the work of Caron Vinson which you must have a license to use. Please do not use her work without purchasing through CDO here.
Scrap Kit of Choice .. I have used a gorgeous PTU from Creation by Grazy called My Backyard which can be purchased here.
Mask of Choice .. I have used WSL_Mask226 which can be downloaded here.
Font of Choice .. Pointed Brush
Let's get started
New image 600x600 and floodfill with white. New raster layer, select all, paste into selection Paper 1. Select none. New mask layer from image WSL_Mask226, invert transparency unchecked, and merge group. Layer duplicate and merge down both mask layers. Resize 110%.
Copy and paste Element 70 & resize 35%. Using your magic wand, select the center portion of your frame, selections modify/expand 3. Copy and paste Paper 6 below your frame layer, resize 20%, selections invert and hit delete. Select none and then drop shadow your frame.
I have used 2/2/40/4 throughout.
Copy and paste Element 61, resize 35% and then 40% & drop shadow.
Copy and paste Element 7, resize 50% twice & drop shadow. Position on the left hand side of your frames. Repeat with Element 26, resizing 35% twice. Repeat with Element 35 and position on the right hand side.
Copy and paste your tube and resize as necessary.
Copy and paste Element 55, resize 35% & then 40%, image flip & drop shadow. Position along the bottom of your frames. Layer duplicate and image mirror.
Copy and paste Element 60, resize 40% twice, rotate right 45 & drop shadow. Position bottom right hand corner of your frames. If you like, trim the bottom of your stem.
Copy and paste Element 59, resize 25% twice & drop shadow. Position bottom right hand corner.
Copy and paste Element 47, resize 35% twice, mirror & drop shadow. Position bottom right hand corner as well.
Copy and paste Element 50, resize 40% twice & drop shadow. Position bottom left hand corner of your frames. Repeat with Element 4.
Copy and paste Element 11, resize 40% twice, rotate right 15 & drop shadow. Position top right hand corner.
X out white background, merge visible. Open white background, resize to your liking (I have used 500x500).
Add copyright and your name. I have used Pointed Brush, Size 60, Color #e2c553. I then added a size 5 fat color #a4d2cb gradient glow & then drop shadow.
Save and you are done.
I hope you have enjoyed my tutorial. Pls feel free to experiment and use my tutorial as a guide.
Please feel free to send me your results. I'd love to see what you came up with.
Thursday, May 5, 2011
Sticky Sweet Tut
9:37 PM | Posted by
Shal |
Edit Post

Feel free to use my tutorial as a guide and have fun giving it your own spin.
This tutorial assumes you have a working knowledge of PSP.
Needed Supplies :
Tube of Choice .. I am using the work of Pinuptoons which you must have a license to use. Please do not use this work without purchasing through CDO here. I am licensed through CILM which is now closed.
Scrap Kit of Choice .. I have used a gorgeous PTU from Toxic Desirez called Sticky Sweet which can be purchased here.
Mask of Choice .. I have used Vix_Mask363 which can be downloaded here.
Font of Choice .. Pointed Brush
Let's get started
New image 600x600 and floodfill with white. New raster layer, select all, paste into selection Paper 6. Select none. New mask layer from image Vix_Mask363, invert transparency unchecked, and merge group.
Copy and paste Splatter, resize 50% & drop shadow. I have used 2/2/40/4 throughout. Position top left hand corner. Layer duplicate and move to bottom right hand corner.
Copy and paste Heart border, mirror & drop shadow.
Copy and paste Frame 1 and resize 60%. Using your magic wand, select the center portion of your frame, selections modify/expand 3. Copy and paste Paper 18 below your frame layer, selections invert and hit delete. Select none and then drop shadow your frame.
Copy and paste Bow 1, resize 60% & drop shadow. Position top centre of your frame.
Copy and paste Flower 1, resize 75% & drop shadow. Position on the right hand side of your frame.
Copy and paste your tube and drop shadow.
Copy and paste String, resize 65% & drop shadow. Position along the bottom. Repeat with Ribbon.
Copy and paste Beaded string, resize 60% & drop shadow. Position hanging down the left hand side of your frame. Copy and paste Glitter Bee, resize 40% & drop shadow. Position at the top of your bead string.
Copy and paste Cupcake, resize 40% & drop shadow. Position bottom right hand corner. Repeat with Candy and position next to your cupcake.
Copy and paste Heart Charm, resize 65% & drop shadow. Position bottom left hand corner.
Copy and paste Word Art, resize 65%, add a size 5 fat white gradient glow & then drop shadow. Position top left hand corner.
X out white background, merge visible. Open white background, resize to your liking (I have used 500x500).
Add copyright and your name. I have used Pointed Brush, Size 60, Color #eb6bb4. I then added the same gradient glow & drop drop shadow as on the word art.
Save and you are done.
I hope you have enjoyed my tutorial. Pls feel free to experiment and use my tutorial as a guide.
Please feel free to send me your results. I'd love to see what you came up with.
Subscribe to:
Posts (Atom)
Kits & Tuts


Blogs I Love


