About Me
My hobbies are PSP.
I love helping my friends who are starting with PSP.
Any similarity or resemblance to any other tutorial is purely coincidental and unintentional. Pls do not recopy my tutorials anywhere. Many thanks Susan.


Credit

Blinkie created by Rabid Designz. She does some amazing work ! Thanks so much Melissa.

Blinkie created by my long time friend tweety here. Thanks so much my friend :)
My blog was designed By Alika's Scraps. Thanks so much. You did an amazing job !
Leave Me A Message
Followers
My Blog List
Thursday, July 30, 2009
 Another 3 tags using my Tuts
2:31 AM | Posted by
Shal |
 Edit Post
My good friend Peggy had a try at 3 of my tutorials. I'm so proud of her. She still considers herself new at PSP but I think she did a great job trying these ones out ! I'm glad to see that a self proclaimed novice PSPer had a try at this and did such a fabulous job !
Way to go Peggy .. keep up the good work !!!
Using my Rac Stalker Tut !

 Rac Stalker Forum has moved !
12:03 AM | Posted by
Shal |
 Edit Post
In case you didn't receive the newsletter from AMI .. here is the new site addy for the Stalker forum !
http://racstalkers.com/Forum
http://racstalkers.com/Forum
Sunday, July 26, 2009
 2 more Tags from my tuts
6:17 PM | Posted by
Shal |
 Edit Post
How exciting ! First using my Seeing Stars tutorial is this gorgeous creation from KiwiSuz from the Stalkers forum.

Also from the Stalkers forum, here is my Rac Stalker tut by Jenni ! Awesome job !

Thanks so much ladies !

Also from the Stalkers forum, here is my Rac Stalker tut by Jenni ! Awesome job !

Thanks so much ladies !
Saturday, July 25, 2009
 Tags from my Rac Stalker Tut
10:11 PM | Posted by
Shal |
 Edit Post
How exciting !!! Dolly from the Rac Stalkers forum and my good friend Cheryl have tried out my lil tut and I'm happy to show off their results. Thanks so much for trying this out ! You both did an amazing job !!!!


 Rac Stalker Tut
6:41 PM | Posted by
Shal |
 Edit Post
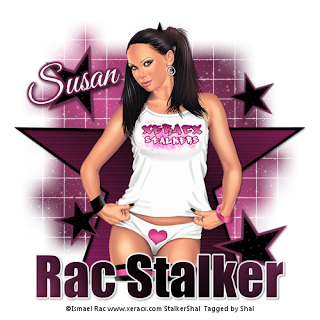
Feel free to use my tutorial as a guide and
have fun giving it your own spin.
This tutorial assumes you have a working knowledge of PSP.
Needed Supplies :
Tube of Choice .. I am using the work of Ismael Rac which you must have a license to use. I am licensed through Artistic Minds Inc. but they are now closed. You can now find Ismael's artwork licensed through his own store. Pls do not use his work without purchasing through here.
Mask of Choice .. I have used WSL_84 which can be downloaded from weescotslass here. http://weescotslasscreations.blogspot.com/
Font of Choice .. I am using Impact which you should have in PSP & Good Vibrations which is a pay font. Any nice script type font will work well.
Let's get started !
Open your mask in PSP. Open new transparent image 600x600. Floodfill with white.
New Raster Layer. Floodfill with your choice of color. I have used a gradient combination of 2 colors from my tube.
New mask layer from image, WSL_84, invert mask data unchecked, and merge group.
Optional: Effects Xenofex/Constellation. The settings I like to use are 2/10/1/1/100/92/Keep Original image checked.
In your preset shapes/symmetric shape, select star shape, solid line style width 6, and color black in foreground. Draw out a nice size star shape about the size of your mask layer.
Object align/centre in camvas/convert to raster layer.
Using your magic wand, select the middle of your star shape, select/modify/expand by 2, new raster layer and floodfill with gradient or color of your choice. Move this layer below your star frame layer.
Effects/texture/blinds, Width 3/Opacity 30/both boxes ticked. You will need to use a color that contrasts well with the color or gradient you used for your star fill.
Drop shadow your star frame layer. I use 2/2/40/4 throughout.
Now we will repeat the steps we have just taken to create our large star in order to create a few smaller ones. Repeat the steps and create a smaller star. I have switched my colors up for contrast and have chosen to use a different texture.
I used effects/texture/weave, Gap 2/Width 15/Opacity 3 /Fill Gaps Checked. I have used the same color I used in the frame of my small star.
You may create as many stars as you like, using different color combinations and different textures. Position them around your bigger star and rotate a bit. Experiment a bit with your textures.
Copy and paste your tube, resize as required and dropshadow.
For your wording, I have selected to use Impact font Size 85 still using same gradient but any chunky font will work.
Type out the saying you want. Object/Align/Horizontal Center and position along the bottom. See my tag for referance. Convert to raster layer.
Effects/3d effects/Inner Bevel. Select your favorite bevel .. I have used Bevel 2/Width 19/25/3/8/0/Angle 315/30/50.
Effects/Eye Candy/Gradient Glow Glow Width 3/Fat/White. Drop Shadow.
X out white background, merge visible. Open white background, resize to your liking (I used 500x500). Add copyright.
Add your name .. I used Good Vibrations Rob, Size 48 in White and added a gradient glow with a matching color and positioned over one of the stars.
Save and you are done.
I hope you have enjoyed my tutorial.
Please feel free to send me your results.
I'd love to see what you came up with.
 Xerac Stalkers is open
5:31 PM | Posted by
Shal |
 Edit Post
If you haven't stopped by yet, pls do so ! What a great place and run by some great ppl ! I can just see all the great things coming from there ! I been there all day .. guess I'm wearing the Stalker name today lol.
Friday, July 24, 2009
 Xerac Stalkers Grand Opening
11:46 PM | Posted by
Shal |
 Edit Post
How exciting !!! I just received an AMI newsletter !! With the following information.
| XERACX Stalkers Grand Opening!!!!! |
 It is finally here, the grand opening of the official Ismael Rac Fan Forum! The XERACX Stalkers! There are a ton of incentives to joining the group. Exclusive freebie tubes, special promotions and contests and even chances to become a XERACX Pin Up yourself! You can go ahead and join, the official opening is in the AM. Chat with Ismael tomorrow in the Stalkers Den at 7pm EST/4pm PDT (12am UK). Ismael is there all the time, and it is the best place to hang with fellow Rac lovers and tag.. Period! Come and join, be a Stalker too!  |
Thursday, July 23, 2009
 Seeing Stars Tut
8:16 PM | Posted by
Shal |
 Edit Post
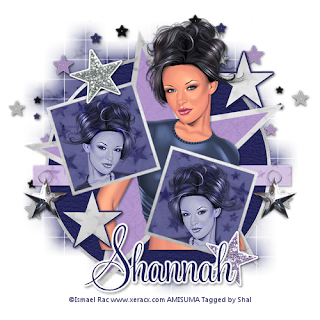 Feel free to use my tutorial as a guide and
have fun giving it your own spin.
This tutorial assumes you have a working knowledge of PSP.
Needed Supplies :
Tube of Choice .. I am using the work of Ismael Rac which you must have a license to use. I am licensed through Artistic Minds Inc. but they are now closed. You can now find Ismael's artwork licensed through his own store. Pls do not use his work without purchasing through here.
Scrap Kit of Choice .. I have used a gorgeous FTU kit by Shannah called Seeing Stars, which can be downloaded on her blog here.
Template of Choice .. I have used a great template by Melissa Template #35, which can be downloaded on her blog here.
Mask of Choice .. I have used WSL_84 which can be downloaded from weescotslass here.
Font of Choice .. I am using Feel Script which is a pay font. Any nice script type font will work well.
Let's get started !
Open your mask and template in PSP. On your template Image/Canvas Size 600x600. New Raster layer, floodfill with white and move to the bottom.
Open BlueStars.jpg. Copy and paste as a new layer. New mask layer from image, WSL_84, invert mask data unchecked, and merge group.
Now we will start filling our template layers. This is the part where you can play with different papers but the technique is the same.
Select Raster layer 5, Select All, Float, Defloat. Open Blue Star Paper.jpg from your kit. Copy and paste as new layer on your project. Selections/invert/ and hit delete. Selections/None and delete Raster 5.
Select Raster layer 4, Select All, Float, Defloat. Open Silver Star Paper.jpg from your kit. Copy and paste as new layer on your project. Selections/invert/ and hit delete. Selections/None and delete Raster 4. Drop shadow frame, I am using 2/2/40/5 throughout.
Select Raster layer 7, Select All, Float, Defloat. Open PurpleStars.jpg from your kit. Copy and paste as new layer on your project. Selections/invert/ and hit delete. Selections/None and delete Raster 7. Drop shadow.
Select Raster layer 3, Select All, Float, Defloat. Open Purple Star Paper.jpg from your kit. Copy and paste as new layer on your project. Selections/invert/ and hit delete. Selections/None and delete Raster 3.
Select Raster layer 2, Select All, Float, Defloat. Open Silver Star Paper.jpg from your kit. Copy and paste as new layer on your project. Selections/invert/ and hit delete. Selections/None and delete Raster 2. Drop shadow.
Select Raster layer 1, Select All, Float, Defloat. Open BlueStars.jpg from your kit. Copy and paste as new layer on your project. Selections/invert and hit detele. DO NOT DESELECT.
Copy and paste a tube you would like to use. Resize and position in the box. Selections/invert and hit delete. Change blend mode to luminance. Repeat for the other box
Select Merged Layer, Select All, Float, Defloat. Open Silver Star Paper.jpg from your kit. Copy and paste as new layer on your project. Selections/invert/ and hit delete. Selections/None and delete Merged Layer. Drop shadow.
Repeat the same for Raster Layer 6 and Copy of Raster Layer 6 (Stars), but do not drop shadow. Add the following to both stars .. Effects/Eye Candy/Gradient with these settings Basic: Width 6 Color: #2d2d5f. Now you can drop shadow.
Copy and paste full size version of your tut. Dropshadow. Resize as required and position just above the large star. Depending on the tube you have chosen to use you prob will need to fiddle with positioning and resizing.
Copy and paste MultiStarCluster.png just above your mask layer and position to the top left. Drop shadow. See my tag for placement. Layer duplicate and image/mirror.
Add elements as you like from the kit. I have chosen to add some of the beautiful stars.
X out white background, merge visible. Open white background, resize to your liking (I used 500x500).
Add copyright. Add your name .. I used Feel Script, Size 48 and color #252557, with gradient glow and drop shadow.
Save and you are done.
I hope you have enjoyed my tutorial. It's dedicated to my friend Shannah who was the creature of this gorgeous scrapkit. Thanks so much for taking the time to get this blog up and going.
Please feel free to send me your results.
 Bloo Berry Bliss Tut
3:36 PM | Posted by
Shal |
 Edit Post
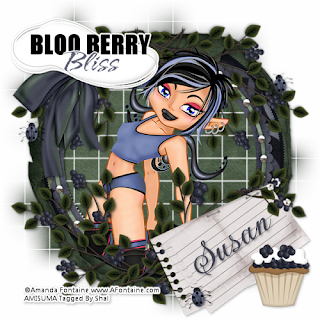
Feel free to use my tutorial as a guide and
have fun giving it your own spin.
This tutorial assumes you have a working knowledge of PSP.
Needed Supplies :
have fun giving it your own spin.
This tutorial assumes you have a working knowledge of PSP.
Needed Supplies :
Mask of Choice .. I have used WSL_84 which can be downloaded from weescotslass here.
Scrap Kit of Choice .. I have a gorgeous PTU Kit by Amanda Fontaine called Bloo Berry Bliss, which can be purchased here.
Tube of Choice .. I am using the work of Amanda Fontaine which you must have a license to use. Please do not use her work without purchasing through Artistic Minds Inc. here.
Font of Choice .. I am using Gwendolyn Bold Rob which is a pay font. Any nice script type font will work well.
Let's get started !
Open your mask & paper of choice in PSP.
Open a transparent image 600x600 and floodfill with white.
Select all, new raster layer, paste into selection Paper_7, select none.
New mask layer from image, WSL_84, invert mask data unchecked, and merge group. I've resized mine 110%.
Open frame_1.pspimage, copy, paste as new layer, add subtle drop shadow of your choice (i use 2-2-50-5 throughout)
Open frame_4.pspimage, copy, paste as new layer, resize 85%, add drop shadow.
Open Blueberry_bush_2.pspimage, copy, paste as new layer, resize 65%, add drop shadow, position on top right of the frame layers. See my tag for placement.
Duplicate blueberry layer, image mirror. Duplicate again, image flip.
Add your tube of choice, resize and position accordingly, drop shadow. I positioned mine below the lower left layer of blueberries.
Open Blueberry_bush.pspimage, copy, paste as a new layer, resize 65%, add drop shadow, position on lower right of the frame layers. See my tag for placement.
Open note_with_berries.pspimage, copy, paste as a new layer, resize 65%, add drop shadow, position on lower right. Image rotate left 25.
Open blueberry_cupcake.pspimage copy, paste as a new layer, resize 65%, add drop shadow, position on lower right over the note paper.
Open pin_bow_3.pspimage, paste as a new layer, add drop shadow, position on the top left of the frame.
Open ladybug_blue.pspimage, paste as a new layer. Add drop shadow. Move around to your liking. Duplicate as many as you like and position to your liking.
Open wordart_2.pspimage, paste as a new layer, resize 65%, position top left, Effects Eye Candy/Gradient Glow .. I have used the following settings :
Basic/Glow Width 3 & Color/Fat/White, and then drop shadow
X out your white background, merge visible
open white background, resize to your liking (I used 500x500).
add copyright
Add your name .. I used Gwendolyn Bold Rob, Size 48 and color #404250, drop shadow.
Save and you are done.
I hope you have enjoyed my tutorial.
Please feel free to send me your results.
I'd love to see what you came up with.
 With Love Tut
1:48 PM | Posted by
Shal |
 Edit Post
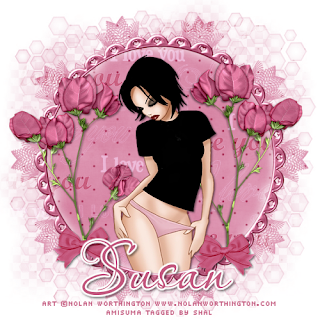
Feel free to use my tutorial as a guide and
have fun giving it your own spin.
This tutorial assumes you have a working knowledge of PSP.
Needed Supplies :
Mask of Choice .. I have used Honeycomb lace Frame which can be downloaded from Essex Girl here.
Scrap Kit of Choice .. I have a gorgeous FTU Kit by MxPimptress called With Love, which can be downloaded here.
Tube of Choice .. I am using the work of Nolan Worthington which you must have a license to use. Please do not use his work without purchasing through Artistic Minds Inc. here.
Font of Choice .. I am using Passions Conflict Rob which is a pay font. Any nice script type font will work well.
Let's get started !
Open your mask & paper of choice in PSP.
Open a transparent image 600x600 and floodfill with white.
Select all, new raster layer, paste into selection paper 7, select none.
New mask layer from image, sg_honeycomb_lace_frame, invert mask data unchecked, and merge group.
Open circle-scalloped frame, copy, paste as new layer, resize 85%, add subtle drop shadow of your choice (i use 2-2-50-5 throughout)
Open pink-rose.png, copy and paste as new layer, resize 50%, position to the left of your frame, drop shadow.
Layer duplicate, image mirror.
Open lil-bow03, copy, paste as layer, resize 50%, drop shadow.
Position bow at the bottom of your stem of roses.
Layer duplicate and position at the bottom of your other stem of roses.
Add any other elements that you would like.
Open tube, copy and paste as new layer, depending on the size of your tube, resize accordingly so it sits nicely within your frame, drop shadow.
X out your mask layer and white background, merge visible
open mask layer and white background, resize to your liking (I used 500x500).
add copyright
Add your name .. I used Passions Conflict Rob, Size 72 and color #c3587d and a added a gradient glow (width 3.0, fat, white), drop shadow.
If you are not adding an animated background, save and you are done.
If you are animating
Duplicate your mask layer twice.
On your first mask layer, effects, dsb flux, bright noise, 30, ok
Repeat on your 2nd mask layer, hit mix twice
Repeat on your 3rd mask layer, hit mix three times
Open AS
X out mask layer 2-3, copy merged, paste in AS as new animation
x out mask layer 1, open mask layer 2, copy merged, paste in AS after current frame
x out mask layer 2, open mask layer 3, copy merged, paste in AS after current frame
Save as gif.
I hope you have enjoyed my tutorial.
Please feel free to send me your results.
I'd love to see what you came up with.
Wednesday, July 22, 2009
 Hello everyone !
10:01 PM | Posted by
Shal |
 Edit Post
It's been a while but I've finally decided to tackle my blog. As most of you know I've been psping for a while and have put off tutorials for a while. But PSP time has greatly increased lately and am hoping to put some of that to the test here. I hope you enjoy it.
Subscribe to:
Posts (Atom)
Labels
- 1$ Mini Kits (4)
- Angela Newman (7)
- Awards (10)
- Blog Trains (6)
- Caron Vinson (1)
- CU Items (8)
- Elias (3)
- Extras (6)
- FTU Scrap Kits (22)
- FTU Tutorials (39)
- Halloween (1)
- Irish Bitch Designs (2)
- KatNKDA (28)
- KiwiFire Storm (1)
- Maigan Lynn (6)
- Misc (1)
- News (98)
- Pinup Toons (1)
- PTU Scrap Kits (79)
- PTU Tutorials (245)
- Sweet Dream Scraps (3)
- Tags Using my Scraps (10)
- Tags Using My Tuts (13)
- Tuts Using My Kits; (63)
- Tuts Using My Kits; Tags Using my Scraps (3)
- verymany (2)
- Wicked Princess Scraps (3)


