About Me
My hobbies are PSP.
I love helping my friends who are starting with PSP.
Any similarity or resemblance to any other tutorial is purely coincidental and unintentional. Pls do not recopy my tutorials anywhere. Many thanks Susan.


Credit

Blinkie created by Rabid Designz. She does some amazing work ! Thanks so much Melissa.

Blinkie created by my long time friend tweety here. Thanks so much my friend :)
My blog was designed By Alika's Scraps. Thanks so much. You did an amazing job !

Monday, August 29, 2011
 Naughty Tut
8:54 PM | Posted by
Shal |
 Edit Post

Feel free to use my tutorial as a guide and have fun giving it your own spin.
This tutorial assumes you have a working knowledge of PSP.
Needed Supplies :
Tube of Choice .. I am using the work of Fetch Art which you must have a license to use. Please do not use this work without purchasing through SNC here.
Scrap Kit of Choice .. I have used my own PTU Kit called "EMOtionally Yours" which can be purchased here.
Mask of Choice .. I have used WSL_Mask84 which can be downloaded here.
Template of Choice .. I have used one of Tamie's Templates which can be downloaded here.
Font of Choice .. Cutie Pop
Let's get started
Open your template in PSP & delete credits layer. As well I deleted Raster layers 6, 9 & copy of 9.
New raster layer just above your background layer. Select all, copy and paste into selection Paper 16. Select none. New mask layer from image, WSL_Mask84, invert transparency unchecked. Merge group & resize 110%.
Copy and paste Frame 1, resize 85% & drop shadow. I have used 2/2/40/4 throughout.
Select Raster layer 8, adjust color balance/manual color correction from #ff40ff to black.
Select Raster layer 7, select all/float/defloat, copy and paste Paper 6, selections invert and hit delete. Selections invert and then added the following xenofex/constellation effect. Select none and delete original Raster layer 6. Drop shadow. Repeat with Raster layer 12, using Paper 10.

Copy and paste Splat 1, drop shadow & position top right hand corner.
Select Raster layer 1, adjust color balance/manual color correction from white to black.
Select Raster layer 10, select all/float/defloat, copy and paste Paper 11, selections invert and hit delete. Select none and delete original Raster layer 10. Drop shadow.
Select Raster layer 2, adjust color balance/manual color correction from #f7b1f9 to black. Adjust/add remove noise/add noise uniform monochrome checked/50%. I then added the following gradient glow and then drop shadow.

Select Raster layer 5, select all/float/defloat, copy and paste Paper 15, selections invert and hit delete. Select none and delete original Raster layer 5. Drop shadow.
Select Copy of Raster layer 4, adjust color balance//manual color correction from white to #ab64fe & then drop shadow. Repeat with Raster layer 4 using color #f94fa5.
Select Raster layer 3, select all/float/defloat, copy and paste Paper 20, selections invert and hit delete. Select none and delete original Raster layer 3. Repeat with Copy of Raster layer 3 and using Paper 16.
Copy and paste Bead String 1 & drop shadow. Position at the top of your top square. Copy and paste Splat 5, drop shadow & position bottom left hand corner.
Copy and paste String 1, mirror, drop shadow and position along the bottom.
Copy and paste your tube, resize as necessary & drop shadow.
Copy and paste Element 10, resize 50% & drop shadow. Position bottom right hand corner. Copy and paste Lolly 5, drop shadow & position on the left hand side.
Select Copy of Raster layer 8 and drop shadow.
Select Copy of Raster layer 1. Using your selection tool or your magic wand, select only the naughty part of your word art. Adjust color balance/manual color correction from #ff40ff to #f94fa5. Select none and then use the same noise effect as before.
X out white background, merge visible. Open white background, resize to your liking (I have used a width of 500).
Add copyright and name on your tag. I used Cutie Pop, Size 60, Color white and then added the a size 6 fat black gradient glow and then drop shadow.
Save and you are done.
I hope you have enjoyed my tutorial. Pls feel free to experiment and use my tutorial as a guide.
Sunday, August 28, 2011
Cirque De Royal Tut
8:13 PM | Posted by
Shal |
Edit Post

Feel free to use my tutorial as a guide and have fun giving it your own spin.
This tutorial assumes you have a working knowledge of PSP.
Needed Supplies :
Tube of Choice .. I am using the work of Michi Art which you must have a license to use. Please do not use this work without purchasing through SNC here.
Scrap Kit of Choice .. I have used a gorgeous PTU Kit from Aussie Scraps called "Cirque de Royale" which can be purchased here.
Mask of Choice .. I have used WSL_Mask84 & WSL_Mask221 which can be downloaded here.
Font of Choice .. Carnavale Freakshow
Let's get started
New image 600x600 and floodfill with white. New raster layer, select all, paste into selection Paper 2. Select none. New mask layer from image, WSL_Mask84, invert transparency unchecked, and merge group.
Repeat with Paper 4, this time using WSL_Mask221.
Copy and paste Vine 2 & drop shadow. Position bottom left hand corner. Layer duplicate, mirror & flip. Copy and paste Vine 1, mirror & drop shadow. Position top left hand corner.
Copy and paste Circus Flags, resize 85% & drop shadow. I have used 2/2/40/4 throughout. Copy and paste Metal Frame 2 & drop shadow. Copy and paste Circus Frame & drop shadow. Copy and paste your tube, resize as necessary, drop shadow and position in front of your Circus Frame or standing on the pedestal part, whichever you think looks better.
Copy and paste Circus Cane, resize 75% or as required & drop shadow. Position so it appears your tube's hand is holding it.
Copy and paste Circus Hoop with flame, resize 65% & drop shadow. Position bottom right hand corner. Copy and paste Megaphone, resize 20% & drop shadow. Position at the base of your hoop.
Copy and paste Elephant, resize 65% & drop shadow. Position bottom left hand corner.
Copy and paste Tag 2, resize 40% & drop shadow. Position top right hand corner.
X out white background, merge visible. Open white background, resize to your liking (I have used 500x500).
Add copyright and name on your tag. I have used Carnavale Freakshow, Size 60, color #140c07 and add the following Xenofex/Constellation Effect, followed by this gradient glow effect and then drop shadow.


Save and you are done.
I hope you have enjoyed my tutorial.
Pls feel free to experiment and use my tutorial as a guide.
I hope you have enjoyed my tutorial.
Pls feel free to experiment and use my tutorial as a guide.
Friday, August 26, 2011
Steampunk Beauty Tut
11:59 PM | Posted by
Shal |
Edit Post

Feel free to use my tutorial as a guide and have fun giving it your own spin.
This tutorial assumes you have a working knowledge of PSP.
Needed Supplies :
Tube of Choice .. I am using the work of Michi Art which you must have a license to use. Please do not use this work without purchasing through SNC here.
Scrap Kit of Choice .. I have used a gorgeous PTU Kit from Bello Scarto called "Miss Mercy Lynch" which can be purchased here.
Mask of Choice .. I have used WSL_Mask222 which can be downloaded here.
Template of Choice .. I have used Steampunk 1 by Peachy Keen Scrapity Scrap which can be downloaded here.
Font of Choice .. Steampunk
Let's get started
Open your template in PSP & delete credits layer. Resize canvas size 600x600 and floodfill background layer with white.
New raster layer just above your background layer. Select all, copy and paste into selection Paper 11. Select none. New mask layer from image, WSL_Mask222, invert transparency unchecked. Merge group.
Repeat with Paper 7, rotate right 45 & resize 90%.
Select Back Shape Layer, select all/float/defloat, copy and paste Paper 26, selections invert and hit delete. Select none and delete original Back Shape layer. Add drop shadow. I have used 2/2/40/4 throughout.
Select Large Gear Left Layer, select all/float/defloat, copy and paste Paper 5, selections invert and hit delete. Select none and delete original Large Gear Left layer. I then added the following gradient glow & then drop shadow.

Repeat with Large Gear Right Layer.
Copy and paste Element 11, resize 50% & drop shadow. Position top left hand corner of your left hand side gear. Layer duplicate and mirror.
Select Bottom Scrolls Layer, adjust color balance/manual color correction from #b4886a to #3f2c23. Adjust/add remove noise/add noise/uniform & monochrome checked/50%.
Select Rectangle Left Layer, adjust color balance/manual color correction from #2c1e1e to #3f2c23. Select all/float/defloat, copy and paste your tube closeup, selections invert and hit delete. Select none. Change blend mode for your tube layer to Luminance. Merge down your tube and rectangle layer and then add the same gradient glow and drop shadow as before.
Repeat with Rectangle Right Layer, mirroring your tube.
Select Small Gear Left Layer, adjust color balance/manual color correction from #472e1d to #445171. Add the same noise effect as used before followed by gradient glow & drop shadow. Repeat for Small Gear Right Layer. Depending on your close up tube used, you might need to move these gears down a bit.
Delete Rectangle Top Layer.
Select Top Scrolls Layer, adjust color balance/manual color correction from #493737 to #445171. Add noise effect.
Copy and paste your tube, resize as necessary & drop shadow.
Copy and paste Element 19, resize 50% & drop shadow. Position bottom right hand corner. Repeat with Element 40, resizing 65% & position bottom left hand corner.
Repeat with Element 42, resizing 50% and position bottom centre.
X out white background, merge visible. Open white background, resize to your liking (I have used 500x500).
Add copyright and name on your tag. I used Steampunk Font, Size 60, Color #445171 and then added the same noise effect, gradient glow & drop shadow as used before.
Save and you are done.
I hope you have enjoyed my tutorial. Pls feel free to experiment and use my tutorial as a guide.
Golden Fae Tut
1:52 AM | Posted by
Shal |
Edit Post

Feel free to use my tutorial as a guide and have fun giving it your own spin.
This tutorial assumes you have a working knowledge of PSP.
Needed Supplies :
This tutorial assumes you have a working knowledge of PSP.
Needed Supplies :
Tube of Choice .. I am using the work of Caron Vinson which you must have a license to use. Please do not use her work without purchasing through CDO here. I am licensed through CILM which is now closed.
Scrap Kit of Choice .. I have used a gorgeous PTU Kit from Scrappers Delight called "Dragonfly" which can be purchased here.
Mask of Choice .. I haved used Vix_Mask363 which can be downloaded here.
Font of Choice .. Cutie Pop
Let's get started
New image 600x600 and floodfill with white. New raster layer, select all, paste into selection Paper 15. Select none. New mask layer from image, Vix_Mask363, invert transparency unchecked, and merge group. Repeat with Paper 5, resize 85% & mirror.
Copy and paste Element 82 & resize 75%. Using your magic wand, select the center portion of your frame, selections modify/expand 5. Copy and paste Paper 1 below your frame layer, resize 75%, selections invert and hit delete. Select none & drop shadow your frame.
I have used 2/2/40/4 throughout.
Copy and paste Element 87, resize 60% & drop shadow. Position along the bottom. Copy and paste Element 48, resize 45% & drop shadow.
Copy and paste Element 80, resize 50%, mirror & drop shadow. Copy and paste Element 44, resize 65% & drop shadow. Position along the top of your frame. Copy and paste Element 41, resize 50%, flip & drop shadow. Position on the left hand side. Copy and paste Element 43, resize 50%, mirror, flip & drop shadow. Position along the bottom.
Copy and paste Element 55, resize 40% & drop shadow. Position bottom left hand corner. Copy and paste Element 49, resize 30% & drop shadow. Position next to your basket.
Copy and paste your tube, resize as necessary and drop shadow.
Copy and paste Element 50, resize 50% & drop shadow. Position bottom right hand corner.
Copy and paste Element 12, resize 40%, mirror, rotate left 20 & drop shadow. Position top right hand corner.
Repeat with Element 10 and position on the left hand side on top of the basket.
X out white background, merge visible. Open white background, resize to your liking (I have used 500x500).
Add copyright and name on your tag. I have used Cutie Pop, size 60, color #cb9b1f and then added the following gradient glow and drop shadow.

Save and you are done.
I hope you have enjoyed my tutorial.
Pls feel free to experiment and use my tutorial as a guide.
Monday, August 22, 2011
Tut & Tag using my "EMOtionally Yours" Scrap Kit
9:56 PM | Posted by
Shal |
Edit Post

My dearest friend tweety has wrote this gorgeous tutorial for me,
this time using my "EMOtionally Yours" kit !
She did such an amazing job as always
Thank you so much my dear friend !
Tutorial can be found here.

Another one of my dear friends, Jenn from Ginnibug Designz, has also used my "EMOtionally Yours" kit, this time to create this gorgeous tag.
Thanks so much Jenn .. I just love it !
I Heart Skulls Tut
8:29 PM | Posted by
Shal |
Edit Post

Feel free to use my tutorial as a guide and have fun giving it your own spin.
This tutorial assumes you have a working knowledge of PSP.
Needed Supplies :
Tube of Choice .. I am using the work of verymany which you must have a license to use. Please do not use this work without purchasing through PFD here.
Scrap Kit of Choice .. I have used a gorgeous PTU Kit from Scraps by Roo called "I Heart Skulls" which can be purchased here.
Mask of Choice .. I haved used WSL_Mask84 which can be downloaded here.
Font of Choice .. Machia
Let's get started
New image 600x600 and floodfill with white. New raster layer, select all, paste into selection Paper 17. Select none. New mask layer from image, WSL_Mask84, invert transparency unchecked, and merge group.
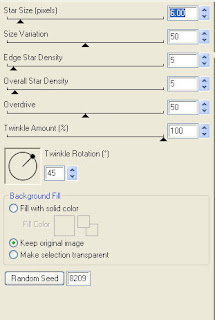
Select all/float/defloat, effects xenofex/constellation with the following settings
This tutorial assumes you have a working knowledge of PSP.
Needed Supplies :
Tube of Choice .. I am using the work of verymany which you must have a license to use. Please do not use this work without purchasing through PFD here.
Scrap Kit of Choice .. I have used a gorgeous PTU Kit from Scraps by Roo called "I Heart Skulls" which can be purchased here.
Mask of Choice .. I haved used WSL_Mask84 which can be downloaded here.
Font of Choice .. Machia
Let's get started
New image 600x600 and floodfill with white. New raster layer, select all, paste into selection Paper 17. Select none. New mask layer from image, WSL_Mask84, invert transparency unchecked, and merge group.
Select all/float/defloat, effects xenofex/constellation with the following settings

Copy and paste Element 25, resize 85% & adjust/add remove noise/uniform & monochrome checked/50%. Add drop shadow. I have used 2/2/40/4 throughout.
Copy and paste Element 14 &resize 65%. Using your magic wand, select the center portion of your frame, selections modify/expand 5. Copy and paste Paper 7 below your frame layer, selections invert and hit delete. Select none & drop shadow your frame.
Copy and paste Element 1, resize 65% & drop shadow. Position on the left hand side. Layer duplicate & mirror.
Copy and paste Element 66, resize 85% & drop shadow. Position on the right hand side. Copy and paste Element 40, resize 75%, flip & drop shadow. Position at the top of your frame.
Copy and paste Element 15, resize 75% & drop shadow. Position on the left hand side. Repeat with Element 19 and position next to your first lollipop.
Copy and paste your tube, resize as necessary & drop shadow.
Copy and paste Element 24, resize 75% & drop shadow. Position bottom left hand corner over the ends of your lollipop sticks.
Copy and paste Element 65, resize 50% & drop shadow. Position bottom right hand corner.
Copy and paste Element 5 and position top right hand corner. I then added the following gradient glow and drop shadow.

X out white background, merge visible. Open white background, resize to your liking (I have used 500x500).
Add copyright and name on your tag. I have used Machia, size 72, color black and then added the same gradient glow and drop shadow as with the word art.
Save and you are done.
I hope you have enjoyed my tutorial.
Pls feel free to experiment and use my tutorial as a guide.
Add copyright and name on your tag. I have used Machia, size 72, color black and then added the same gradient glow and drop shadow as with the word art.
Save and you are done.
I hope you have enjoyed my tutorial.
Pls feel free to experiment and use my tutorial as a guide.
Monday, August 15, 2011
School Dayz Tagger Size Kit
10:33 PM | Posted by
Shal |
Edit Post

School Dayz Tagger Size Kit
This kit contains 30 papers (800x800 in size) & 63 elements. Elements include bows, buttons, frames, paint splats, ribbons and a great variety of school themed elements including pens, crayons, paints, blocks, books, chalkboard, school houses, school buses, lunch boxes, 2 adorable back to schoolers and more.
Whether you're happy for the kidlets to be back to school or not, this is an adorable kit just for that time of the year !
Whether you're happy for the kidlets to be back to school or not, this is an adorable kit just for that time of the year !
Available now at Heartfelt Perfections, Twilight Scraps & Wilma4ever.
Love Means Tut
12:13 AM | Posted by
Shal |
Edit Post

Feel free to use my tutorial as a guide and have fun giving it your own spin.
This tutorial assumes you have a working knowledge of PSP.
Needed Supplies :
Tube of Choice .. I am using the work of Pinup Toons which you must have a license to use. Please do not use this work without purchasing through CDO here. I am licensed through CILM which is now closed.
Scrap Kit of Choice .. I have used a gorgeous PTU Kit from Joy Designs "Jackson" which can be purchased here.
Mask of Choice .. I haved used WSL_Mask84 & WSL_Mask366 which can be downloaded here.
Word art of Choice .. I have used word art from Aussie Scrap Designs which you can download here.
Font of Choice .. TheNautiGal
Let's get started
New image 600x600 and floodfill with white. New raster layer, select all, paste into selection Paper 7. Select none. New mask layer from image, WSL_Mask84, invert transparency unchecked, and merge group.
New raster layer, select all, paste into selection Paper 11. Select none. New mask layer from image, WSL_Mask366, invert transparency unchecked, and merge group. Adjust/add noise/uniform monochrome checked/25%.
Copy and paste Element 21 & resize 75%. Using your magic wand, select the center portion of your frame, selections modify/expand 5. Copy and paste Paper 10 below your frame layer, resize 75%, selections invert and hit delete. Select none & drop shadow your frame. I have used 2/2/40/4 throughout.
Copy and paste Element 2, resize 65% & drop shadow. Position top left hand corner of your start frame.
Copy and paste Element 18, resize 65% & drop shadow. Position on the right hand side of your star frame. Copy and paste Element 29, resize 30% & drop shadow. Position top right hand corner so it appears to be holding the heart string.
Copy and paste Element 34, resize 65% & drop shadow. Position on the left hand side.
Copy and paste your tube, resize as necessary & drop shadow.
Copy and paste Element 4, resize 65% & drop shadow. Position bottom left hand corner. Repeat with Element 20 & 19, resizing 30%. Position flowers on your bow.
Copy and paste Element 17, resize 40% & drop shadow. Position next to your flowers.
Copy and paste Word Art & resize 75%. I then added a size 5 fat color #b7d1d2 gradient glow & then drop shadow.
X out white background, merge visible. Open white background, resize to your liking (I have used 500x500).
Add copyright and name on your tag. I have used TheNautiGal, size 60, color black and then added the same gradient glow and drop shadow as with the word art.
Save and you are done.
I hope you have enjoyed my tutorial.
Pls feel free to experiment and use my tutorial as a guide.
Sunday, August 7, 2011
August Thank You Gift at Wilma4ever !
4:26 PM | Posted by
Shal |
Edit Post

August 2011 Thank You Gift!
Here is another wonderful collab from the designers of Wilma4ever, to show you (our loyal customer) how thankful we are that you are shopping at our store!
This Thank You Gift contains 19 Commercial and Personal Use products, this Gift is FREE when you purchase $7.50 or more in our store. Available here.
This Thank You Gift contains 19 Commercial and Personal Use products, this Gift is FREE when you purchase $7.50 or more in our store. Available here.

EMOtionally YOURS Tagger Size Kit
4:03 PM | Posted by
Shal |
Edit Post

EMOtionally YOURS Tagger Size Kit
This kit contains 25 papers (800x800 in size) & 75 elements. Elements include bead strings, bows, chains, flairs, frames, ribbons, splats & strings. Also included is a great variety of emo themed items including dolls, skulls, hears & lollipops.
A great kit for the Emo lover in all of us !
This kit contains 25 papers (800x800 in size) & 75 elements. Elements include bead strings, bows, chains, flairs, frames, ribbons, splats & strings. Also included is a great variety of emo themed items including dolls, skulls, hears & lollipops.
A great kit for the Emo lover in all of us !
Available now at Heartfelt Perfections, ScrapsNCrap, Twilight Scraps & Wilma4ever.
Saturday, August 6, 2011
Autumn Leaves Tut
11:54 PM | Posted by
Shal |
Edit Post

Feel free to use my tutorial as a guide and have fun giving it your own spin.
This tutorial assumes you have a working knowledge of PSP.
Needed Supplies :
Tube of Choice .. I am using the work of Ismael Rac which you must have a license to use. Please do not use his work without purchasing through here. I am licensed through AMI which is now closed.
Scrap Kit of Choice .. I have used a gorgeous PTU Kit from Sam's Scraps "Autumn Wishes" which can be purchased here.
Mask of Choice .. I haved used WSL_Mask84 which can be downloaded here.
Word art of Choice .. I have used word art by Lori which can be downloaded here.
http://wordartbylori.blogspot.com/
Font of Choice .. Pointed Brush
Let's get started
New image 600x600 and floodfill with white. New raster layer, select all, paste into selection Paper 12. Select none. New mask layer from image, WSL_Mask84, invert transparency unchecked, and merge group. Layer duplicate.
Copy and paste Leaf Glitter Scatter, resize 65% & drop shadow. I have used 2/2/40/4 throughout.
Copy and paste Frame 2. Using your magic wand, select the center portion of your frame, selections modify/expand 5. Copy and paste Paper 15 below your frame layer, resize 65%, selections invert and hit delete. Select none & drop shadow your frame. Merge down your frame with the background layer & rotate right 90.
Layer duplicate and rotate right 20, layer duplicate and mirror.
Copy and paste Window arch, resize 75% & drop shadow. Copy and paste Fabric Leaf 2, resize 50% & drop shadow. Position bottom left hand corner. Repeat with Fabric Leaf 1, mirror & position bottom right hand corner.
Copy and paste Ribbon 1, resize 65% & drop shadow. Position on the left hand side.
Copy and paste Branch, resize 50%, rotate left 35 and drop shadow. Position on the right hand side of your window arch. Layer duplicate and position next to your first branch. Copy and paste Owl, resize 25% & drop shadow. Position on your branches.
Copy and paste Bow 4, resize 65% & drop shadow. Position at the base of your branches. Repeat with Flower 1 and position on your bow.
Copy and paste Heart String, resize 65%, mirror & drop shadow. Position top right hand side.
Copy and paste your tube, resize as necessary and drop shadow. Copy and paste Pine Cones, resize 25% & drop shadow. Position bottom right hand corner a little towards centre. Copy and paste Ribbon 3, resize 65%, mirror & drop shadow. Position at the bottom of your tube towards the left hand side.
Copy and paste Leaf 1, resize 65%, mirror & drop shadow. Position at the bottom of your tube. Copy and paste Butterfly, resize 65%, rotate left 20 & drop shadow. Position bottom left hand corner.
Copy and paste Word Art, adjust add/remove noise/add noise/monochrome & uniform checked/50%. I then added a size 5 fat color #ddcbc0 gradient glow and then drop shadow.
X out white background, merge visible. Open white background, resize to your liking (I have used 500x500).
Add copyright and name on your tag. I have used Pointed Brush, size 60, color #f58148 and then added the same noise as with the word art, followed by this gradient glow & drop shadow.

Save and you are done.
I hope you have enjoyed my tutorial.
Pls feel free to experiment and use my tutorial as a guide.
Friday, August 5, 2011
Your Smile Tut
7:14 PM | Posted by
Shal |
Edit Post

Feel free to use my tutorial as a guide and have fun giving it your own spin.
This tutorial assumes you have a working knowledge of PSP.
Needed Supplies :
Tube of Choice .. I am using the work of Suzanne Woolcott which you must have a license to use. Please do not use her work without purchasing through here.
Scrap Kit of Choice .. I have used a gorgeous PTU Kit from Wilma4ever "Perfect Day" which can be purchased here.
Mask of Choice .. I haved used Vix_Mask363 which can be downloaded here.
Word Art of Choice .. I have used word art by Annie's Little Footprints which can be downloaded here.
Font of Choice .. LDJ Jilly Nilly
Let's get started
New image 600x600 and floodfill with white. New raster layer, select all, paste into selection Paper 8. Select none. New mask layer from image, Vix_Mask363, invert transparency unchecked, and merge group.
Copy and paste Element 18, resize 60% & drop shadow. I have used 2/2/40/4 throughout. Copy and paste Element 17 & drop shadow. Position towards the top of your frame.
Copy and paste Element 17, resize 65% & drop shadow. Position on the right hand side. Copy and paste Element 10, resize 75%, flip & drop shadow. Position along the bottom of your frame.
Copy and paste your tube, resize as necessary & drop shadow.
Copy and paste Element 16, resize 60% & drop shadow. Copy and paste Element 8, resize 50%, flip, rotate left 35 & drop shadow. Position on the left hand side of your frame.
Copy and paste Element 31, resize 60%, rotate right 90 & drop shadow. Position along the bottom. Copy and paste Element 1, resize 40%, rotate left 35 & drop shadow. Position bottom right hand corner. Copy and paste Element 4, resize 60% & drop shadow. Position along the bottom as well.
Copy and paste Element 5, resize 40%, mirror & drop shadow. Position bottom left hand side.
Copy and paste Element 24 & resize 65%. Position on the right hand side towards the top. Layer duplicate mirror. Layer duplicate, rotate right 90 and position along the bottom.
Copy and paste your word art and resize 45% twice. Position top right hand corner. I then added the following gradient glow.

X out white background, merge visible. Open white background, resize to your liking (I have used 500x500).
Add copyright and name on your tag. I have used LDJ Jilly Nilly, size 60, color black and then added the same gradient glow & drop shadow as used on the word art.
Save and you are done.
I hope you have enjoyed my tutorial. Pls feel free to experiment and use my tutorial as a guide.
Thursday, August 4, 2011
Friends in Bloom Tut
8:19 PM | Posted by
Shal |
Edit Post

Feel free to use my tutorial as a guide and have fun giving it your own spin.
This tutorial assumes you have a working knowledge of PSP.
Needed Supplies :
Tube of Choice .. I have used an adorable lil gal by MarloDeeDesigns and pls do not use without purchasing. You may purchase through ABCreations who is a licensed reseller for the clipart here.
Scrap Kit of Choice .. I have used a gorgeous PTU Kit from ABCreations "Moments in Time" which can be purchased here.
Mask of Choice .. I haved used WSL_Mask366 which can be downloaded here.
Word art of Choice .. I have used word art by Lori which can be downloaded here.
Font of Choice .. TheNautigal
Let's get started
New image 600x600 and floodfill with white. New raster layer, select all, paste into selection Paper 6. Select none. New mask layer from image, WSL_Mask366, invert transparency unchecked, and merge group. Resize 110%.
Repeat with Paper 2 and rotate right 20.
Copy and paste Frame 3 and resize 50% twice. Using your magic wand, select the center portion of your frame, selections modify/expand 2. Copy and paste Paper 3 below your frame layer, resize 40% twice, selections invert and hit delete. Select none & drop shadow your frame. I have used 2/2/40/4 throughout.
Copy and paste Glitter Bottle Bow Striped, resize 30% twice & drop shadow. Position middle top of your frame.
Copy and paste Ribbon 1, resize 40% twice & drop shadow. Position hanging down the left hand side of your frame. Repeat with Ribbon 2 resizing 50% twice.
Copy and paste Butterfly 3, resize 45% twice, rotate left 20 & drop shadow. Position top left hand corner. Repeat with Butterfly 2, this time resizing 35% twice and position next to your other butterfly. Position at the top of your ribbon.
Copy and paste Silky String Pink 2, resize 50% twice & drop shadow. Position bottom left hand corner of your frame.
Repeat with Silky String Teal, mirror, flip and position along the bottom of your frame.
Copy and paste your tube, resize as necessary and drop shadow.
Copy and paste Silky String Teal 2, resize 50% twice & drop shadow. Position towards the bottom.
Copy and paste Glitter Bottle Pink, resize 50% twice & drop shadow. Position bottom right hand corner. Repeat with Quail Teal, resizing 30% twice and position next to your glitter bottle.
X out white background, merge visible. Open white background, resize to your liking (I have used 500x500).
Copy and paste your word art, position top right hand corner. I then added a size 3 fat white gradient glow & then drop shadow.
Add copyright and name on your tag. I have used TheNautigal, size 60, color black and then added the same gradient glow & drop shadow as used on the word art.
Save and you are done.
I hope you have enjoyed my tutorial. Pls feel free to experiment and use my tutorial as a guide.
Subscribe to:
Posts (Atom)
Kits & Tuts


Blogs I Love


