About Me
My hobbies are PSP.
I love helping my friends who are starting with PSP.
Any similarity or resemblance to any other tutorial is purely coincidental and unintentional. Pls do not recopy my tutorials anywhere. Many thanks Susan.


Credit

Blinkie created by Rabid Designz. She does some amazing work ! Thanks so much Melissa.

Blinkie created by my long time friend tweety here. Thanks so much my friend :)
My blog was designed By Alika's Scraps. Thanks so much. You did an amazing job !

Showing posts with label FTU Tutorials. Show all posts
Showing posts with label FTU Tutorials. Show all posts
Monday, January 9, 2012
 Cake Makes Everything Better Tut
9:39 PM | Posted by
Shal |
 Edit Post

Feel free to use my tutorial as a guide and have fun giving it your own spin.
This tutorial assumes you have a working knowledge of PSP.
Needed Supplies :
Tube of Choice .. I am using the work of Ava Schwark which you must have a license to use. Please do not use her work without purchasing through PSP Tube Stop here.
Scrap Kit of Choice .. I have used a great FTU Kit from PF Desgins called "Celebrate Birthday". This is a Facebook Exclusive Freebie so you will need to like this page in order to download the kit.
Mask of Choice .. I have used WSL_Mask130 which can be downloaded here.
Word art of Choice .. I have used word art from Create with TLC which can be downloaded here.
Font of Choice .. Cutie Pie
Let's get started
New image 600x600 and floodfill with white. New raster layer, select all, paste into selection Paper 1. Select none. New mask layer from image, WSL_Mask130, invert transparency unchecked, and merge group. Resize 115% & layer duplicate.
Copy and paste Element 16, resize 50% twice & drop shadow. I have used 2/2/40/4 throughout.
Copy and paste Element 39, resize 35% twice & drop shadow. Position bottom top left hand corner. Layer duplicate and position a little lower on the left hand side. Layer duplicate and position on the right hand side.
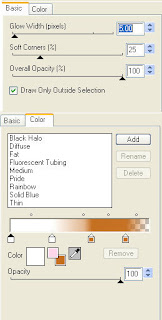
Select your Elipse in your Preset Shapes Tool, line style solid/width 20/anti alias checked/color #d4708c as foreground and draw out a nice size circular frame. Object/align/centre in canvas & convert to raster layer. Adjust/add remove noise/add noise/uniform monochrome checked/65%. Effect/3d effect/inner bevel with the following settings.
This tutorial assumes you have a working knowledge of PSP.
Needed Supplies :
Tube of Choice .. I am using the work of Ava Schwark which you must have a license to use. Please do not use her work without purchasing through PSP Tube Stop here.
Scrap Kit of Choice .. I have used a great FTU Kit from PF Desgins called "Celebrate Birthday". This is a Facebook Exclusive Freebie so you will need to like this page in order to download the kit.
Mask of Choice .. I have used WSL_Mask130 which can be downloaded here.
Word art of Choice .. I have used word art from Create with TLC which can be downloaded here.
Font of Choice .. Cutie Pie
Let's get started
New image 600x600 and floodfill with white. New raster layer, select all, paste into selection Paper 1. Select none. New mask layer from image, WSL_Mask130, invert transparency unchecked, and merge group. Resize 115% & layer duplicate.
Copy and paste Element 16, resize 50% twice & drop shadow. I have used 2/2/40/4 throughout.
Copy and paste Element 39, resize 35% twice & drop shadow. Position bottom top left hand corner. Layer duplicate and position a little lower on the left hand side. Layer duplicate and position on the right hand side.
Select your Elipse in your Preset Shapes Tool, line style solid/width 20/anti alias checked/color #d4708c as foreground and draw out a nice size circular frame. Object/align/centre in canvas & convert to raster layer. Adjust/add remove noise/add noise/uniform monochrome checked/65%. Effect/3d effect/inner bevel with the following settings.

Using your magic wand, select the center portion of your frame, selections modify/expand 5, copy and paste Paper 2 below your frame layer, resize 50% twice, selections invert and hit delete. Select none & drop shadow your frame.
Copy and paste Element 38, resize 40% twice & drop shadow. Position on the right hand side. Layer duplicate, resize 80% and position a little lower.
Copy and paste Element 34, resize 40% twice & drop shadow. Position on the left hand side.
Copy and paste Element 4, resize 35% twice & drop shadow. Position top left hand corner. Repeat with Element 8 and position next to your other balloon.
Copy and paste Tube, resize as necessary & drop shadow.
Copy and paste Element 10, resize 35%/25% & drop shadow. Position bottom left hand corner. Copy and paste Element 29, resize 50% twice & drop shadow. Position next to your parcels.
Copy and paste Element 27, resize 45% twice & drop shadow. Position on the right hand side. Repeat with Element 26 & rotate right 10. Position next to your first noise maker.
Copy and paste Element 39, resize 35% twice & drop shadow. Position bottom right hand corner.
Copy and paste Word art, resize 40%/45%, adjust/color balance/manual color correction/from black to #4ab4cd. I then added the following gradient glow and then drop shadow.

X out white background, merge visible. Open white background, resize to your liking (I have used 500x500).
Add copyright and name on your tag. I have used Cutie Pie, Size 48, color #4ab4cd, then added the same gradient glow and drop shadow as used on the word art.
Save and you are done.
I hope you have enjoyed my tutorial.
Pls feel free to experiment and use my tutorial as a guide.
Tuesday, January 3, 2012
Piling Up The Memories Tut
7:32 PM | Posted by
Shal |
Edit Post

Feel free to use my tutorial as a guide and have fun giving it your own spin.
This tutorial assumes you have a working knowledge of PSP.
Needed Supplies :
Tube of Choice .. I am using the work of Sweet-PinUp which you must have a license to use. Please do not use her work without purchasing through The doll Shop here.
Scrap Kit of Choice .. I have used a gorgeous FTU kit by Fantasy Moments called "Midnight Sky" which you can download here.
Mask of Choice .. I have used WSL_Mask84 & WSL_Mask366 which can be downloaded here.
Word art of choice .. I have used word art by Word Art Fun which can be downloaded here.
Font of Choice .. Cutie Pie
Let's get started
New image 600x600 and floodfill with white. New raster layer, select all, paste into selection Paper 4. Select none. New mask layer from image, WSL_Mask84, invert transparency unchecked, and merge group. Resize 110%.
Repeat using Paper 6 & mask WSL_Mask366.
Duplicate twice and rename your layers Mask 1,2 and 3. On your first Mask layer apply Dsb Flux/Bright Noise/65. On your 2nd layer, apply bright noise again, hitting mix twice. On your 3rd layer, apply again hitting mix 3 times. If you are deciding not to animate, skip this part of the tutorial
Copy and paste Element 23 & resize 55%. Using your magic wand, select the center portion of your frame, selections modify/expand 5, copy and paste Paper 1 below your frame layer, resize 65%, selections invert, hit delete & select none. Drop shadow your frame. I have used 2/2/40/4 throughout.
Merge down the frame with it's background layer. Layer duplicate and rotate right 25. Layer duplicate and mirror. I also dragged the first frame layer to the top.
Copy and paste Element 42, resize 65% twice & drop shadow. Position at the bottom of your frame.
Copy and paste Element 50, resize 40% & drop shadow. Position top centre of your frame. Copy and paste Element 6, resize 50% & drop shadow. Position hanging from top right hand corner of your frame. Copy and paste Element 17, resize 30% & drop shadow. Position at the top of your heart chain.
Copy and paste Element 32, resize 50% & drop shadow. Position bottom right hand corner. Copy and paste Element 45, resize 30% & drop shadow. Position bottom right hand corner. Repeat with Elements 47 & 48 and position next to your first flower.
Copy and paste Element 12, resize 30%, rotate left 30 & drop shadow. Position next to your flowers.
Copy and paste Element 77 & drop shadow. Centre. Copy and paste Element 63, resize 50%, mirror & drop shadow. Position bottom left hand corner.
Copy and paste your first tube layer, resize 50%/55% & drop shadow. Position sitting inside your top frame layer. Copy and paste your 2nd tube layer, resize 40% twice, mirror, rotate right 30 & drop shadow. Position top left hand corner.
Copy and paste your word art & resize 40% twice. I then added a size 6 fat color #f1b09b gradient glow. Select all/float/defloat/modify contract 6/invert and then adjust/add remove noise/add noise/monochrome gaussian checked/65%. Select none and drop shadow.
At this point if you need to, resize your tag. I have used 500x500. Add your copyright and name. I have used Cutie Pie, size 60 black. I then added all the same effects as were added to the word art.
If you are choosing not to animate, then you can save your tag.
To animate, close off Mask Layers 2 & 3 (the lil eye icon in your layer palette), Edit/Copy Merged and paste as new animation in Animation Shop. Close off Mask Layer 1 and open Mask Layer 2, Edit/Copy Merged and paste after current frame in AS. Close off Mask Layer 2 and open Mask Layer 3, Edit/Copy Merged and paste after current frame in AS.
Save as a gif.
I hope you have enjoyed my tutorial.
Pls feel free to experiment and use my tutorial as a guide.
Please feel free to send me your results.
I'd love to see what you came up with.
Saturday, December 17, 2011
Girls Just Wanna Have Fun Tut
4:14 PM | Posted by
Shal |
Edit Post

Feel free to use my tutorial as a guide and have fun giving it your own spin.
This tutorial assumes you have a working knowledge of PSP.
Needed Supplies :
Tube of Choice .. I am using the work of Rebelle Doll which you must have a license to use. Please do not use this work without purchasing through SNC here.
Scrap Kit of Choice .. I have used a FTU Kit from Fantasy Moments "Amazonia" which can be downloaded here.
Mask of Choice .. I have used WSL_Mask74 by weescotslass which can be downloaded here.
Word art of Choice .. I have used word art by Aussie Scrap Designs which can be downloaded here.
Font of Choice .. Cutie Pie
Let's get started
New image 600x600 and floodfill with white. New raster layer, select all, paste into selection Paper 30. Select none. New mask layer from image, WSL_Mask74, invert transparency unchecked, and merge group. Resize 105%.
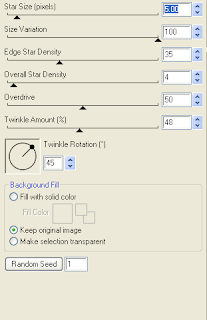
Copy and paste Element 17 & resize 20%. Using the following Mura's Meister/Copies setting, create a flower frame & then resize 90%.

Select all/float/defloat and apply the following Xenofex/Constellation setting.
Using your magic wand, select the center portion of your frame, selections modify/expand 15, copy and paste Paper 14 below your frame layers, selections invert and hit delete. Copy and paste Element 35, resize 75% & hit delete. Select none and drop shadow your frame & raindrops layers. I have used 2/2/40/4 throughout.
Copy and paste Element 21, resize 30% & drop shadow. Position bottom left hand corner of your frame. Repeat with Element 22 & 23 and position next to your first bow flower.
Copy and paste Element 70, resize 50% & drop shadow. Positiom bottom centre of your frame. Copy and paste Element 4, resize 75% & drop shadow. Position in the centre of yoru bow. Copy and paste Element 58, resize 65%, mirror & drop shadow. Position top right hand corner.
Copy and paste your tube, resize as necessary & drop shadow.
Copy and paste Element 72, resize 50% & drop shadow. Position bottom right hand corner.
Copy and paste your Word art and I then added a size 3 fat white gradient glow followed by drop shadow.
X out white background, merge visible. Open white background, resize to your liking (I have used 500x500).
Add copyright and name on your tag. I have used CutiePie, Size 60, color black, then added the same gradient and drop shadow as with the word art.
Save and you are done.
I hope you have enjoyed my tutorial.
Pls feel free to experiment and use my tutorial as a guide.
This tutorial assumes you have a working knowledge of PSP.
Needed Supplies :
Tube of Choice .. I am using the work of Rebelle Doll which you must have a license to use. Please do not use this work without purchasing through SNC here.
Scrap Kit of Choice .. I have used a FTU Kit from Fantasy Moments "Amazonia" which can be downloaded here.
Mask of Choice .. I have used WSL_Mask74 by weescotslass which can be downloaded here.
Word art of Choice .. I have used word art by Aussie Scrap Designs which can be downloaded here.
Font of Choice .. Cutie Pie
Let's get started
New image 600x600 and floodfill with white. New raster layer, select all, paste into selection Paper 30. Select none. New mask layer from image, WSL_Mask74, invert transparency unchecked, and merge group. Resize 105%.
Copy and paste Element 17 & resize 20%. Using the following Mura's Meister/Copies setting, create a flower frame & then resize 90%.

Select all/float/defloat and apply the following Xenofex/Constellation setting.

Using your magic wand, select the center portion of your frame, selections modify/expand 15, copy and paste Paper 14 below your frame layers, selections invert and hit delete. Copy and paste Element 35, resize 75% & hit delete. Select none and drop shadow your frame & raindrops layers. I have used 2/2/40/4 throughout.
Copy and paste Element 21, resize 30% & drop shadow. Position bottom left hand corner of your frame. Repeat with Element 22 & 23 and position next to your first bow flower.
Copy and paste Element 70, resize 50% & drop shadow. Positiom bottom centre of your frame. Copy and paste Element 4, resize 75% & drop shadow. Position in the centre of yoru bow. Copy and paste Element 58, resize 65%, mirror & drop shadow. Position top right hand corner.
Copy and paste your tube, resize as necessary & drop shadow.
Copy and paste Element 72, resize 50% & drop shadow. Position bottom right hand corner.
Copy and paste your Word art and I then added a size 3 fat white gradient glow followed by drop shadow.
X out white background, merge visible. Open white background, resize to your liking (I have used 500x500).
Add copyright and name on your tag. I have used CutiePie, Size 60, color black, then added the same gradient and drop shadow as with the word art.
Save and you are done.
I hope you have enjoyed my tutorial.
Pls feel free to experiment and use my tutorial as a guide.
Sunday, December 4, 2011
Angel Of Mine Tut
10:45 PM | Posted by
Shal |
Edit Post
Feel free to use my tutorial as a guide and have fun giving it your own spin.
This tutorial assumes you have a working knowledge of PSP.
Needed Supplies :
Tube of Choice .. I am using the work of April Story which you must have a license to use. Please do not use this work without purchasing through PSP Tube Stop here.
Scrap Kit of Choice .. I have used a great FTU Kit from Fantasy Designs called "Falling in Love" which can be downloaded here.
Mask of Choice .. I have used WSL_Mask4 by weescotslass which can be downloaded here.
Word Art of Choice .. I have used by Aussie Scrap Designs which can be downloaded here.
Font of Choice .. 2 Peas Sunshine
Let's get started
New image 600x600 and floodfill with white. New raster layer, select all, paste into selection Paper 15. Select none. New mask layer from image, WSL_Mask4, invert transparency unchecked, and merge group.
Duplicate twice and rename your layers Mask 1,2 and 3. On your first Mask layer apply the following Xenofex/Constellation.

Apply the same effects to your next Mask layer and hit random once. Apply again to your last Mask layer hitting random twice. Select none. If you decide not to animate your tag, then just skip the duplicate twice.
Copy and paste Element 43, resize 70% & drop shadow. I have used 2/240/4 throughout.
Copy and paste Element 77 & resize 70%. Using your magic wand, select the center portion of your frame, selections modify/expand 2. Copy and paste below your frame your tube & resize as necessary. Layer duplicate and drag this layer above your frame. On the tube layer below you frame, hit delete. Select none. Select the tube layer above your frame and erase the bottom portion of the tube so it appears to be coming out of your frame. Drop shadow your frame.
Copy and paste Element 67, resize 50% & drop shadow. Position bottom of your frame.
Copy and paste Element 26, resize 45% & drop shadow. Position bottom left hand corner. Copy and paste Element 21, resize 45%, rotate left 85 & drop shadow. Position on your greenery.
Copy and paste Element 62, resize 40% & drop shadow. Position bottom right hand corner.
Copy and paste Element 28, resize 30% & drop shadow. Position at the bottom of your rose stem. Layer duplicate & mirror. Copy and paste Element 27, resize 25% & drop shadow. Position between your other 2 flowers.
Copy and paste Element 54, resize 30% & drop shadow. Position hanging from the right hand side. Copy and paste Element 70, resize 30% & drop shadow. Position so it appears the butterfly is holding the hanging heart.
Copy and paste your Word Art. Adjust color balance/manual color correction from black to #b24885. Adjust/add remove noise/add noise/random monochrome checked 35%. I then added a size 3 fat white gradient glow & then drop shadow.
At this point if you need to, resize your tag. I have used 500x500. Add your copyright and name.
I have used for the Word Art, 2Peas Typo Size 16 color #046475 and typed out Under the Sea on my tag. I then added a small noise effect, adjust add/remove noise, monochrome uniform checked 50% and then a size 3 medium white gradient glow.
For the name, I have used 2 Peas Sunshine, size 60, color #b24885 and then added the same noise, gradient glow and drop shadow as with the word art.
If you are choosing not to animate, then you can save your tag.
To animate, close off Mask layers 2 & 3 (the lil eye icon in your layer palette), Edit/Copy Merged and paste as new animation in Animation Shop. Close off Mask Layer 1 and open Mask Layer 2, Edit/Copy Merged and paste after current frame in AS. Close off Mask Layer 2 and open Mask Layer 3, Edit/Copy Merged and paste after current frame in AS.
Save as a gif.
I hope you have enjoyed my tutorial.
Pls feel free to experiment and use my tutorial as a guide.
Please feel free to send me your results.
I'd love to see what you came up with.
Saturday, December 3, 2011
Fairytale Dreams Tut
10:41 AM | Posted by
Shal |
Edit Post

Feel free to use my tutorial as a guide and have fun giving it your own spin.
This tutorial assumes you have a working knowledge of PSP.
Needed Supplies :
Tube of Choice .. I am using the work of Lisa Cree which you must have a license to use. Please do not use this work without purchasing through PSP Tube Stop here.
Mask of Choice .. I have used WSL_Mask366 which can be downloaded here.
Template of Choice .. I have used a Template 71 by Nicole which can be downloaded here.
Word Art of Choice .. I have used Word art from Designs by Vaybs which can be downloaded here.
Font of Choice .. The NautiGal
Filters Used .. Eye Candy Impact Glass & Eye Candy Gradient Glow (Optional)
Let's get started
Open your template in PSP & delete credits layer. Image/Canvas Size/600x600. New raster layer, floodfill with white. On your layers palette, right click on the white layer, arrange & send to bottom.
New raster layer just above your background layer & floodfill with #9a3347. Select all, copy and paste into selection Paper 7. Select none. New mask layer from image, WSL_Mask366, invert transparency unchecked. Merge group & resize 105%.
Repeat this time using #448f24. Rotate right 20.
Select Rectangle Fill layer, select/all/float/defloat, copy and paste your tube or image, resize as necesary, selections invert, hit delete once & select none. Delete original Rectangle Fill layer.
If your tube or image has more open areas, floodfill a background layer first.
Select Rectangle Frame layer. Adjust/Color Balance/Manual Color correction from #606060 to #9a3347. Adjust/add remove noise/add noise/random monochrome checked 65%. I then added the following Eye Candy Impact/Glass Effect followed by drop shadow. I have used 2/2/40/4 throughout.

Copy and paste Rose Vine tube, resize as necessary, flip & drop shadow. Position along the bottom of your frame. If you are using a different tube set and don't have this, feel free to use a decorative flower vine you would have in a kit.
Select Square 1 layer, select all/float/defloat, copy and paste your tube or image, resize as necessary, position so you can see an interesting part of your tube, selections invert, hit delete once & select none. Delete original Square 1 layer.
Repeat this with Square 2 & 3 layers.
Select Square Frame layer, adjust/color balance/manual color correction from #a0a0a0 to #448f24. Repeat the same effects you used on the larger frame earlier.
Copy and paste Rose Vine tube, resize as necessary & drop shadow. Position along the top of your top small frame. Layer duplicate, rotate right 90 and position along the side of your bottom frame.
Copy and paste Word art & resize 40%/35%. I then added the same noise effect as used before, followed by a size 3 fat white gradient glow & then drop shadow.
X out white background, merge visible. Open white background, resize to your liking (I have used 500x500).
Add copyright and name on your tag. I used TheNautiGal, Size 72, Color black. Add the noise effect, gradient glow & drop shadow we used with word art.
Save and you are done.
I hope you have enjoyed my tutorial. Pls feel free to experiment and use my tutorial as a guide.
Thursday, November 17, 2011
Subtle Intoxication Tut
11:32 AM | Posted by
Shal |
Edit Post

Feel free to use my tutorial as a guide and have fun giving it your own spin.
This tutorial assumes you have a working knowledge of PSP.
Needed Supplies :
Tube of Choice .. I am using the work of Simona Candini which you must have a license to use. Please do not use her work without purchasing through SNC here.
Scrap Kit of Choice .. I have used a FTU Kit by Fantasy Moments called "Subtle Intoxication" which can be downloaded here.
Mask of Choice .. I have used Vix_Mask414 which can be downloaded here.
Font of Choice .. Humbucker
Let's get started
New image 600x600 and floodfill with white. New raster layer, select all, paste into selection Paper 2. Select none. New mask layer from image, Vix_Mask414, invert transparency unchecked, and merge group. Repeat with Paper 4 and mirror.
Copy and paste Scattered Skulls & resize 70%. Repeat with Scattered Hearts, resizing 75%.
Copy and paste Frame 1 & resize 60%. Using your magic wand, select the center portion of your frame, selections modify/expand 5, copy and paste Paper 8 below your frame layers, resize 75%, selections invert and hit delete. Copy and paste your tube & hit delete. Select none and drop shadow your frame.
I have used 2/2/40/4 throughout.
Copy and paste Swirl 2, resize 75% & drop shadow. Position top right hand corner of your frame. Repeat with Swirl 3 and position bottom left corner of your frame.
Copy and paste Ribbon 2, resize 50% & drop shadow. Position along the bottom starting at the left hand bottom corner. Repeat with Ribbon 1, mirror & flip. Position along the top of your frame starting at the top right hand corner.
Copy and paste Beaded Swirl 1, resize 65%, rotate right 90 and drop shadow. Position along the bottom of your frame. Repeat with String 1 and position along the bottom as well. I erased a bit of the long tail of the string on the left hand side.
Copy and paste String 2, resize 50% & drop shadow. Position on the left hand side of your frame.
Copy and paste Bow 1, resize 30% & drop shadow. Position top right hand corner in the middle of your bow from your ribbon. Copy and paste Heart 2, resize 15% & drop shadow. Position in the centre of your bow.
Copy and paste Skull Heart, resize 25% & drop shadow. Position bottom right hand corner.
Copy and paste Flame Pop, resize 50% & drop shadow. Position on the left hand side. Copy and paste Flower 2, resize 20% & drop shadow. Position at the base of your pop. Repeat with Flower 3 and position next to your first flower.
Copy and paste Scattered Skulls & resize 30%. Position on top of your flowers. Layer duplicate & mirror. Position on top of your Skull Heart.
Copy and paste Word Art, resize 50% & drop shadow. Position along the top.
X out white background, merge visible. Open white background, resize to your liking (I have used 500x500).
Add copyright and name on your tag. I have used Humbucker, Size 60 and used Paper 2 as my color. I then added a size 3 fat white gradient glow & then drop shadow.
Save and you are done.
I hope you have enjoyed my tutorial.
Pls feel free to experiment and use my tutorial as a guide.
Monday, October 10, 2011
Be Aware Tut
12:46 PM | Posted by
Shal |
Edit Post

Feel free to use my tutorial as a guide and have fun giving it your own spin.
This tutorial assumes you have a working knowledge of PSP.
Needed Supplies :
Tube of Choice .. I am using the work of Michi Art which you must have a license to use. Please do not use this work without purchasing through SNC here.
Scrap Kit of Choice .. I have used my FTU Kit for Creative Misfits called "Be A Fighter" which can be downloaded here.
Mask of Choice .. I have used WSL_Mask226 which can be downloaded here.
Wordart of Choice .. I have used word art by Bluedream Designs which can be downloaded here.
Font of Choice .. Cutie Pop
Let's get started
New image 600x600 and floodfill with white. New raster layer, select all, paste into selection Paper 1. Select none. New mask layer from image, WSL_Mask226, invert transparency unchecked, and merge group.
Copy and paste Element 1, resize 65%, mirror & drop shadow. I have used 2/2/40/4 throughout. Position bottom left hand corner.
Copy and paste Spiral 1, resize 75% & drop shadow. Position top left hand corner. Layer duplicate and move on the right hand side.
Copy and paste Frame 2 & resize 70%. Using your magic wand, select the center portion of your frame, selections modify/expand 5. Copy and paste Paper 11 below your frame layer, resize 65%, selections invert and hit delete. Select none and drop shadow your frame.
Copy and paste Doodle 2, resize 65% & drop shadow. Position bottom left hand corner.
Copy and paste Spiral 3, resize 50% & drop shadow. Position on the left hand side of your frame. Layer duplicate & mirror.
Copy and paste Element 6, resize 65% & drop shadow. Position on the left hand side of your frame.
Copy and paste Element 5, resize 65% & drop shadow. Position along the bottom left hand side of your frame. Layer duplicate & mirror.
Copy and paste Element 9, rotate left 25 & drop shadow. Position hanging on the right hand side of your frame.
Copy and paste your tube, resize as necessary & drop shadow.
Copy and paste Bow 2, resize 65% & drop shadow. Position bottom centre of your frame. I chose to trim some of the greenery peeking out at the bottom just to make it look neater.
Copy and paste Element 2, resize 40% & drop shadow. Position in the centre of your bow.
Copy and paste Element 13, resize 65% & drop shadow. Position bottom right hand corner. Repeat with Button 2 and position next to your cupcake.
Open your word art in PSP, delete credit and background layers. Select Aware layer, adjust color balance manual color correction from #c0c0c0 to #f765ac. Repeat with Be layer. Merge visible. I then added a size 3 fat white gradient glow and then drop shadow. Copy and paste your completed word art onto your tag and position top centre.
X out white background, merge visible. Open white background, resize to your liking (I have used 500x500).
Add copyright and name on your tag. I have used Cutie Pop, Size 60, color #f765ac and then added the same gradient glow & drop shadow as used on the word art.
Save and you are done.
I hope you have enjoyed my tutorial.
Pls feel free to experiment and use my tutorial as a guide
Sunday, September 11, 2011
Rise & Shine Tut
9:33 PM | Posted by
Shal |
Edit Post

Feel free to use my tutorial as a guide and have fun giving it your own spin.
This tutorial assumes you have a working knowledge of PSP.
Needed Supplies :
Tube of Choice .. I am using the work of Pinup Toons which you must have a license to use. Please do not use this work without purchasing through CDO here. I am licensed through CILM which is now closed.
Scrap Kit of Choice .. I have used a adorable FTU Kit from Kim's Korner called "On The Farm" which can be downloaded here.
Mask of Choice .. I haved used WSL_Mask326 which can be downloaded here.
Font of Choice .. 2 Peas Barn Door & TheNautiGal
Let's get started
New image 600x600 and floodfill with white. New raster layer, select all, paste into selection Paper 14. Select none. New mask layer from image, WSL_Mask326, invert transparency unchecked, and merge group.
Repeat with Paper 15, rotate right 15 and resize 90%.
Copy and paste Frame 3 and resize 75%. Using your magic wand, select the center portion of your frame, selections modify/expand 3. Copy and paste Paper 4 below your frame layer, resize 75%, selections invert and hit delete. Copy and paste Chicken Wire and hit delete.
Copy and paste Barn, resize 65%, position on the right hand side and hit delete. Copy and paste Tree 1, resize 65%, position on the left hand side and hit delete. Copy and paste Rooster 2, position towards the bottom and hit delete.
Select none. Drop shadow your frame. I have used 2/2/40/4 throughout.
Copy and paste Flower 3, resize 75% & drop shadow. Position on the left hand side. Repeat with Flower 1, resizing 50% & positioning next to your first flower. Repeat with Flower 2, resizing 40% & positioning this time on the right hand side.
Copy and paste Hay, resize 75% & drop shadow. Position along the bottom. Copy and paste Wheel, resize 40% & drop shadow. Position bottom left hand corner.
Copy and paste your tube, resize as necessary & drop shadow. Position on the left hand side so that you can see enough of your farm scene.
Copy and paste Rooster 1, resize 30% & drop shadow. Position bottom right hand corner. Repeat with Hen 3.
Using 2 Peas Barn Door Font, Size 48, Color #c56e1f, I typed out Rise & Shine. I then added the following gradient glow and then drop shadow. Position top right hand corner.
X out white background, merge visible. Open white background, resize to your liking (I have used 500x500).
Add copyright and name on your tag. I have used TheNautgal, Size 72, color #c56e1f and then added the same gradient glow & drop shadow as with the word art.
Save and you are done.
I hope you have enjoyed my tutorial.
Pls feel free to experiment and use my tutorial as a guide.
This tutorial assumes you have a working knowledge of PSP.
Needed Supplies :
Tube of Choice .. I am using the work of Pinup Toons which you must have a license to use. Please do not use this work without purchasing through CDO here. I am licensed through CILM which is now closed.
Scrap Kit of Choice .. I have used a adorable FTU Kit from Kim's Korner called "On The Farm" which can be downloaded here.
Mask of Choice .. I haved used WSL_Mask326 which can be downloaded here.
Font of Choice .. 2 Peas Barn Door & TheNautiGal
Let's get started
New image 600x600 and floodfill with white. New raster layer, select all, paste into selection Paper 14. Select none. New mask layer from image, WSL_Mask326, invert transparency unchecked, and merge group.
Repeat with Paper 15, rotate right 15 and resize 90%.
Copy and paste Frame 3 and resize 75%. Using your magic wand, select the center portion of your frame, selections modify/expand 3. Copy and paste Paper 4 below your frame layer, resize 75%, selections invert and hit delete. Copy and paste Chicken Wire and hit delete.
Copy and paste Barn, resize 65%, position on the right hand side and hit delete. Copy and paste Tree 1, resize 65%, position on the left hand side and hit delete. Copy and paste Rooster 2, position towards the bottom and hit delete.
Select none. Drop shadow your frame. I have used 2/2/40/4 throughout.
Copy and paste Flower 3, resize 75% & drop shadow. Position on the left hand side. Repeat with Flower 1, resizing 50% & positioning next to your first flower. Repeat with Flower 2, resizing 40% & positioning this time on the right hand side.
Copy and paste Hay, resize 75% & drop shadow. Position along the bottom. Copy and paste Wheel, resize 40% & drop shadow. Position bottom left hand corner.
Copy and paste your tube, resize as necessary & drop shadow. Position on the left hand side so that you can see enough of your farm scene.
Copy and paste Rooster 1, resize 30% & drop shadow. Position bottom right hand corner. Repeat with Hen 3.
Using 2 Peas Barn Door Font, Size 48, Color #c56e1f, I typed out Rise & Shine. I then added the following gradient glow and then drop shadow. Position top right hand corner.

X out white background, merge visible. Open white background, resize to your liking (I have used 500x500).
Add copyright and name on your tag. I have used TheNautgal, Size 72, color #c56e1f and then added the same gradient glow & drop shadow as with the word art.
Save and you are done.
I hope you have enjoyed my tutorial.
Pls feel free to experiment and use my tutorial as a guide.
Wednesday, September 7, 2011
Be A Good One Tut
2:31 PM | Posted by
Shal |
Edit Post

Feel free to use my tutorial as a guide and have fun giving it your own spin.
This tutorial assumes you have a working knowledge of PSP.
Needed Supplies :
Tube of Choice .. I am using the work of Barbara Jensen which you must have a license to use. Please do not use this work without purchasing through SNC here.
This particular image is an exclusive available only through SNC.
Scrap Kit of Choice .. I have used gorgeous FTU Kit from Fantasy Moments called "Mystic Gothic" which can be downloaded here.
Mask of Choice .. I have used WSL_Mask84 which can be downloaded here.
Word Art of Choice .. I have used word art by Tina Chambers which can be downloaded here.
Font of Choice .. Jayne Print
Let's get started
New image 600x600 and floodfill with white. New raster layer, select all, paste into selection Paper 7. Select none. New mask layer from image, WSL_Mask84, invert transparency unchecked, and merge group. Resize 110%.
Adjust/add remove noise/add noise/uniform monochrome checked/25%. Copy and paste Element 2, resize 75%, rotate right 45 & drop shadow. I have used 2/2/40/4 throughout. Position starting at the top left hand corner.
Copy and paste Element 58 & resize 70%. Using your magic wand, select the center portion of your frame, selections modify/expand 2. Copy and paste Paper 8 below your frame layer, resize 75%, selections invert and hit delete. Copy and paste Element 22, resize 75% & hit delete. Select none & drop shadow your frame.
Copy and paste Element 19, resize 50% & drop shadow. Position on the left hand side of your frame.
Copy and paste Element 66, resize 65%, rotate left 15 & drop shadow. Position on the left hand side. Layer duplicate, resize 75% and position just below.
Copy and paste Element 27, resize 50% & drop shadow. Position at the base of your black roses.
Copy and paste your tube. Position a lil to the right of centre and drop shadow.
Copy and paste Element 2, resize 50% & drop shadow. Position along the bottom. Copy and paste Element 77, resize 40% & drop shadow. Position bottom right hand corner.
Copy and paste your word art of choice & resize as required. I then added the following gradient glow & then drop shadow.

X out white background, merge visible. Open white background, resize to your liking (I have used 500x500).
Add copyright and name on your tag. I have used Jayne Print, Size 48, color black and the added the same gradient glow and drop shadow as on the word art.
Save and you are done.
I hope you have enjoyed my tutorial.
Pls feel free to experiment and use my tutorial as a guide.
Thursday, May 19, 2011
Welcome On Board Tut
8:24 PM | Posted by
Shal |
Edit Post
Feel free to use my tutorial as a guide and have fun giving it your own spin.
This tutorial assumes you have a working knowledge of PSP.
Needed Supplies :
Tube of Choice .. I am using the work of Lacy Clagg (www.lacyclagg.com) which you must have a license to use. Please do not use her work without purchasing through My Tag Art here.
The particular image I have used is FTU through My Tag Art. Please follow TOU if using these.
Scrap Kit of Choice .. I have used a gorgeous FTU Kit from Scrap Dimensions called Nautical Vibes which can be downloaded here.
Mask of Choice .. I have used WSL_Mask83 which can be downloaded here.
Font of Choice .. TheNautiGal
Filters of Choice .. Eye Candy/Water Drops
Let's get started
New image 600x600 and floodfill with white. Copy and paste Paper 10. New mask layer from image, WSL_Mask83, invert mask data unchecked, and merge group. Resize 105%.
Duplicate layer twice & rename Mask 1, 2 & 3. On your first Mask layer apply the following Eye Candy/Water Drops.

Apply the same Water Drops to your next Mask layer and hit random once. Apply again to your last Mask layer hitting random twice. Select none. If you decide not to animate your tag, then just skip the duplicate twice.
Copy and paste Net, resize 40% & drop shadow. I have used 2/2/40/4 throughout. Position top right hand corner.
Copy and paste Ribbon 3, resize 65% & drop shadow. Position bottom left hand corner. Layer duplicate, flip. Copy and paste String 2, resize 65%, rotate left 90 & drop shadow. Position along the bottom. Repeat with String 3. Layer duplicate, flip.
Copy and paste Life Ring 2, resize 65% & drop shadow. Position bottom right hand corner. Copy and paste Bow 1, resize 25% & drop shadow. Position at the bottom of your life ring.
Copy and paste Life Ring, resize 40% & drop shadow. Position top left hand corner. Copy and paste Sea Plant, resize 50% & drop shadow. Position bottom left hand corner.
Copy and paste Tube, mirror & drop shadow.
Copy and paste Rope, resize 35% & drop shadow. Position bottom left hand corner. Copy and paste Trap, resize 40% & drop shadow. Position next to your rope. Copy and paste Seashells 3, resize 20% & drop shadow. Position next to your trap.
Resize to your liking (I used 500x500).
Add copyright & Add your name. I used TheNautiGal size 72 color #00004b. I then added a size 3 fat white gradient glow and drop shadow as before. If you are choosing not to animate, then you can save your tag.
To animate, close off Mask layer 2 & 3 (the lil eye icon in your layer palette), Edit/Copy Merged and paste as new animation in Animation Shop. Close off Mask layer 1 and open Mask layer 2, Edit/Copy Merged and paste after current frame in AS. Close off Mask layer 2 and open Mask layer 3, Edit/Copy Merged and paste after current frame in AS.
If you like you can adjust the speed in AS, by select all/animation/frame properties and I set mine to 20. Save as a gif.
I hope you have enjoyed my tutorial.
Pls feel free to experiment and use my tutorial as a guide.
Please feel free to send me your results.
I'd love to see what you came up with.
Subscribe to:
Posts (Atom)
Kits & Tuts


Blogs I Love


