About Me
My hobbies are PSP.
I love helping my friends who are starting with PSP.
Any similarity or resemblance to any other tutorial is purely coincidental and unintentional. Pls do not recopy my tutorials anywhere. Many thanks Susan.


Credit

Blinkie created by Rabid Designz. She does some amazing work ! Thanks so much Melissa.

Blinkie created by my long time friend tweety here. Thanks so much my friend :)
My blog was designed By Alika's Scraps. Thanks so much. You did an amazing job !

Leave Me A Message
Followers
My Blog List
Sunday, August 30, 2009
 Falling Into Fall Tut
2:35 PM | Posted by
Shal |
 Edit Post
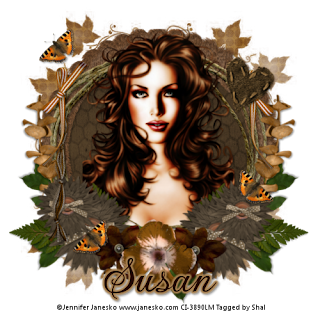 Feel free to use my tutorial as a guide and
have fun giving it your own spin.
This tutorial assumes you have a working knowledge of PSP.
Needed Supplies & Filters :
Scrap Kit of Choice .. I have used a gorgeous PTU kit from Cora called Jacob which can be purchased here. Kit is available in both full size and tagger size. I have used tagger size for this tutorial.
Tube of Choice .. I am using the work of Jennifer Janesko which you must have a license to use. Please do not use her work without purchasing through CILM here.
Mask of Choice .. I have used Vix_Mask238 which can be downloaded from her site here.
Filters required ... Eye Candy Gradient Glow (optional)
Font of Choice .. I have used Gwendolyn Bold
Let's get started !
New Image 600x600 and floodfill with white. Open your mask in PSP.
Open Paper 4 in PSP and resize 600x600. Copy and paste just above your background layer.
New mask layer from image, Vix_Mask238, invert mask data unchecked, and merge group.
Open Frame 3 in PSP and resize 450x450. Copy and paste on your project.
Using your magic wand, select in the middle of your frame, selections/modify/expand 4.
Open Paper 4 in PSP and resize 600x600. Copy and paste on your project. Selections/invert delete. Selections/none and move this layer below your frame.
Copy and paste your chosen tube. Layer duplicate. Make certain you have one tube layer above your frame and one below your frame.
Select your tube layer beneath your frame and erase the portion of your tube that overlaps your frame on the bottom.
You may find it easier to do this step by X out your frame and 2nd tube layer, then opening thme again when you are done.
Select none. Drop shadow. I have used 2/2/40/4 throughout.
Select your tube layer that is above your frame. Using your selection tool, select the area of your tube that is overlapping your frame on the bottom, hit delete.
Drop shadow your frame layer.
Open twine in psp and resize to a width of 450. Copy and paste just above your frame layer. Drop shadow.
This is where you get to play with all the beautiful flowers and greens from this kit. I've shown you what I have done as an example. Feel free to use your own creativity with these elements.
Copy and paste flower 3. Image resize to a width of 75 and drop shadow. Position on the bottom right.
Layer duplicate, resize 75% and position a lil to the right of the other flower.
Merge down your 2 flower layers, duplicate and image mirror.
Copy and paste flower 1. Image resize to a width of 50. Drop shadow and duplicate layer. Position the flowers on either sides of your other flowers towards the bottom centre. See my image for placement.
Copy and paste flower 4. Image resize to a width of 50. Drop and shadow and position in the centre of the other flowers.
I then merged all my flower layers and resized 85%.
Copy and paste greens 5. Image resize to a width of 100. Drop and shadow and position below your flower layer and lil to the right.
Duplicate a few times and postion to your liking below your flower layer.
Copy and paste greens 8. Image resize to a width of 70. Drop shadow and position below your flowers layer to the right. Layer duplicate and image mirror.
Copy and paste greens 6. Image resize to a width of 70. Image rotate right 20. Drop shadow and position to the right of your frame. Layer duplicate and image mirror.
Copy and paste worn heart. Image resize to a width of 75. Image rotate/right 20 and drop shadow. Position on the top right.
Copy and paste bow 1. Image resize to a width of 50. Drop shadow and position on the left side of your frame. Layer duplicate and image mirror.
Copy and paste thread. Image resize to a width of 100. Drop shadow and position just below your bow layer on the left side.
Copy and paste butterly. Image reisze to a width of 40. Drop shadow. Position to the top left of your frame. Duplicate and position a few more butterflies to your liking.
X out white background, merge visible.
Open white background, resize to your liking (I used 500x500).
Add copyright.
Add your name .. I used Gwendolyn Bold, Size 60 dark brown color and added
a gradient glow with settings Width 3, Fat, Tan. Add drop shadow.
Save and you are done.
I hope you have enjoyed my tutorial. This kit has many great elements,
so pls feel free to experiment and use my tutorial as a guide.
Please feel free to send me your results.
I'd love to see what you came up with.
Saturday, August 29, 2009
 Celestial Autumn Tut
8:32 PM | Posted by
Shal |
 Edit Post
 Feel free to use my tutorial as a guide and
have fun giving it your own spin.
This tutorial assumes you have a working knowledge of PSP.
Needed Supplies :
Scrap Kit of Choice .. I have used a gorgeous PTU kit from Oopsie Daisy called Celestial Autumn. Unfortunately the scrap kit is currently unavailable.
Mask of Choice .. I have used Vix_Mask238 & Vix_Mask362
which can be downloaded from Vix here.
Font of Choice .. I am using Agency FB.
Let's get started !
Open your mask in PSP.
New image 600x600 floodfill with white.
Copy and paste paper 10. New mask layer from image, Vix_Mask362, invert mask data unchecked and merge group. Layer duplicate and merge both these mask layers together.
Copy and paste paper 7. New mask layer from image, Vix_Mask238, invert mask data unchecked and merge group. Layer duplicate and merge both mask layers together. Drop shadow. I have used 2/2/40/4 throughout. Resize 90%
Copy and paste fall mix, resize 75% and drop shadow. Position centre.
Layer duplicate and image mirror.
Merge your 2 fall mix layers together. Layer duplicate and image/rotate/right 90.
Copy and paste ribbon frame, resize 65% and drop shadow. You may need to move your fall mix layers a bit so they sit nicely behind your frame.
Copy and paste tree, resize 75% and drop shadow. Position a lil to the right.
Copy and paste fence, resize 65% and drop shadow. Position towards the bottom.
Copy and paste floral 4, resize 25% and drop shadow. Position on the bottom left of your frame.
Copy and paste leaf 4, resize 25%, drop shadow. Image rotate right 90. Position this layer just below your flower layer. Layer duplicate and image mirror.
Copy and paste floral 5, resize 25%, drop shadow. Position a slightly over your flower on the left. Layer duplicate and image mirror.
Copy and paste ribbon1, resize 75% and drop shadow. Position to the bottom of your frame.
Copy and paste leaf string, resize 65% and drop shadow. Position just above your ribbon layer.
Copy and paste house, resize 25% and drop shadow. Position sitting on your face to the left side.
Copy and paste tag, resize 50% and drop shadow. Position just on top of the knot of your ribbon frame. You could eventually put your name on the tag but I have chosen to resize and paste a leaf instead.
Copy and paste butterfly, resize 25% and drop shadow. Position bottom right side.
Copy and paste pinecone, resize 10% and drop shadow. Position bottom left side. Layer duplicate and image mirror.
Copy and paste zaira, resize 85% and drop shadow. Position a lil to the left of your tree layer.
X out white background, merge visible.
Open white background, resize to your liking (I used 500x500).
Add copyright. Add your name .. I used Mea Culpa Size 72 color #1f272f and added
a gradient glow color #c8d3d9 and drop shadow.
Save and you are done.
I hope you have enjoyed my tutorial.
Please feel free to send me your results. I'd love to see what you came up with.
Wednesday, August 26, 2009
 Be Creative Tut
7:40 PM | Posted by
Shal |
 Edit Post
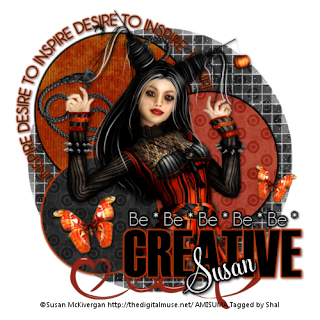 Feel free to use my tutorial as a guide and
have fun giving it your own spin.
This tutorial assumes you have a working knowledge of PSP.
Needed Supplies & Filters :
Scrap Kit of Choice .. I have used a gorgeous PTU kit from Cora called
The Elements: Fire, which can be purchased here.
This is a wonderful kit with 3 others in the collection .. Earth, Wind & Water.
These can purchased seperately or as a collection.
Template of Choice .. I have used a great template from Vix Template #4,
which can be downloaded on her blog here.
Mask of Choice .. I have used Vix_Mask16 which can be downloaded from Vix here.
Tube of Choice .. I am using the work of Susan McKivergan which you must have a license to use. Please do not use her work without purchasing through Up Your Art here. I am licensed through Artistic Minds Inc. but they are now closed.
Filters required ... Xenofex/Constellation & Eye Candy/Gradient Glow
Font of Choice .. I am using Feel Script.
Let's get started !
Open your mask and template in PSP.
On your template, duplicate and close original. Delete copyright layer.
Copy and paste Paper 7 just above your background layer. New mask layer from image, Vix_Mask16, invert mask data unchecked, and merge group.
Effects, Xenofex, Constellation, Settings as follows.
Yes, I love adding this lil extra. Adds a lil sparkle hehe.
Select Words Layer, Effects Eye Candy/Gradient Glow/width 3 color #bb380a fat. Add drop shadow. I have used 2/2/40/4 throughout.
Now we will start filling our template layers. This is the part where you can play with different papers but the technique is the same.
Select Large Black Circle layer, Select All, Float, Defloat. Open Paper 2 from your kit. Copy and paste as new layer on your project. Selections/invert/ and hit delete. Selections/None and delete original layer.
Effects/Texture Effects/Blinds with settings 3/40 color black. Effects Eye Candy/Gradient Glow/width 3 color black fat. Add drop shadow.
Select Medium Dark Gray layer, Select All, Float, Defloat. Open Paper 6 from your kit. Copy and paste as new layer on your project. Selections/invert/ and hit delete. Selections/None and delete original layer.
Effects Eye Candy/Gradient Glow/width 3 color black fat. Add drop shadow.
Select Small Gray Circle Layer, Select All, Float, Defloat. Open Paper 7 from your kit. Copy and paste as new layer on your project. Selections/invert/ and hit delete. Selections/None and delete original layer.
Effects Eye Candy/Gradient Glow/width 3 color #bb380a fat. Add drop shadow.
Copy and paste your tube just above all the circle layers and drop shadow.
Select Creative layer and add Effects Eye Candy/Gradient Glow/width 3 color #bb380a fat, repeat and drop shadow.
Select Be layer and add Effects Eye Candy/Gradient Glow/width 3 color black fat, repeat and drop shadow.
Please feel free to experiment with the elements in this kit. I have added the following.
Copy and paste butterfly, resize 20%, image rotate left 15, drop shadow. Position on your black circle.
Duplicate layer, image mirror, resize 65% and position above your word art.
Copy and paste heart doodle, resize 50%, drop shadow and move your layer down just below your word art layers and position on the bottom.
Copy and paste rope, resize 50%, mirror, drop shadow and move your layer down just above your large orange circle and position above it.
X out white background, merge visible.
Open white background, resize to your liking (I used 500x500).
Add copyright. Add your name .. I used Feel Script size 48 color white bold and added
a black gradient glow and drop shadow.
Save and you are done.
I hope you have enjoyed my tutorial.
Please feel free to send me your results.
I'd love to see what you came up with.
Please feel free to send me your results.
I'd love to see what you came up with.
 Some wonderful new goodies using my tuts and scraps
4:15 PM | Posted by
Shal |
 Edit Post
I'm definitely gonna have to set up a slide with all these great new works !
LoisD from the Stalker forum has made these gorgeous creations. The first one using my Seeing Stars tut and the 2nd using my brand new Stalker Alert tut. Thanks so much Lois .. they are gorgeous.


LoisD from the Stalker forum has made these gorgeous creations. The first one using my Seeing Stars tut and the 2nd using my brand new Stalker Alert tut. Thanks so much Lois .. they are gorgeous.


My good friend Dite had a play with my first scrap kit ! Gorgeous job hon .. I really do love it !!!

 August Featured XeracX Tutorial Contest
1:37 PM | Posted by
Shal |
 Edit Post
Julie from Bits n Bobs was the winner of this contest ! Congrats Julie ! Her tutorial Girlfriend is now the featured tutorial this month on the Stalker forum. If you haven't already, pop by and try Julie's Tutorial. There will be a draw for 3 random members to win a single Rac tube of their choice !
You can find the details here.
Here was my attempt!

You can find the details here.
Here was my attempt!

 Stalker Alert Tut
12:08 PM | Posted by
Shal |
 Edit Post
have fun giving it your own spin.
This tutorial assumes you have a working knowledge of PSP.
Needed Supplies & Filters :
Tube of Choice .. I am using the work of Ismael Rac which you must have a license to use. I am licensed through Artistic Minds Inc. but they are now closed. You can now find Ismael's artwork licensed through his own store. Pls do not use his work without purchasing through here.
Template of Choice .. I have used a great template from Sharon at Dolly's Tag World (Template 2), which can be downloaded on her blog here. Pls visit her blog for more great templates.
Mask of Choice .. I have used WSL_84 which can be downloaded from weescotslass here.
Word Art of Choice .. I have used some wonderful art by DragonflyMaiden from the Rac Stalker forum. She has allowed me to include it with this tut and you can download it here. Please visit the forum here for more of great word art.
Filters required ... Xenofex (Constellation), Xero (Fritillary) & Eye Candy (Gradient Glow)
Font of Choice .. I am using Futurist Fixed Width
Let's get started !
Open your mask & template in PSP, duplicate and close original.
Delete copyright layers and image/canvas size 650x650. Floodfill background layer with white.
Choose a darker color from your tube for your background and a lighter color for your foreground. I have used #1b3c8a & #6bb6de
New raster layer just above your background layer. Floodfill with your foreground color.
New mask layer from image, WSL_84, invert mask data unchecked, and merge group.
New raster layer and floodfill with your background color.
New mask layer from image, WSL_84, invert mask data unchecked, and merge group. Resize 90% and lower opacity of this layer 75%.
Effects/Xenofex/Constellation with the following settings:
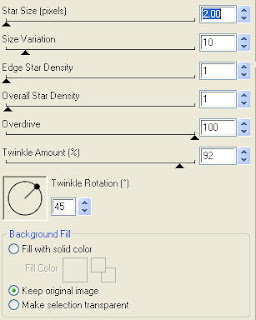
Select Rectangle 1 layer, Select All, Float, Defloat, New Raster Layer, floodfill with a gradient from your 2 selected colors .. i have used these settings:

Select none and delete original layer.
Effects/Xero Fritillary with the following settings 7/160/30/45.
Select Rectangle Border 1 layer, Select All, Float, Defloat, New Raster Layer, floodfill with your darker color. Select none. Adjust/add remove noise/add noise with settings uniform/15%/monochrome checked. Add drop shadow. I have used 2/2/40/4 throughout. Delete original layer.
Repeat the same steps for Rectangle 2 and Rectangle Border 2 layers.
Select Starburst layer, Select All, Float, Defloat, New Raster Layer, floodfill with your darker color, copy and paste your selected close up tube, position within your star, selections/invert, delete. Select none. Change blend mode to luminance and delete your original layer.
Select Starburst Border layer, Select All, Float, Defloat, New Raster Layer, floodfill with your darker color. Select none. Adjust/add remove noise/add noise with settings uniform/15%/monochrome checked. Add drop shadow.
Merge down your 3 layers for your starburst (border, tube, background).
Copy and paste your full size tube. Resize as necessary and reposition your starburst layer if needed.
Copy and paste your word art. Add a gradient glow with settings Width 3, Fat, color #6bb6de and drop shadow.
X out white background, merge visible.
Open white background, resize to your liking (I used 500x500).
Add copyright. Add your name .. I used Futurist Fixed Width Size color black and added the same gradient glow as previous and dark shadow.
Save and you are done.
I hope you have enjoyed my tutorial.
Please feel free to send me your results.
I'd love to see what you came up with.
This tutorial assumes you have a working knowledge of PSP.
Needed Supplies & Filters :
Tube of Choice .. I am using the work of Ismael Rac which you must have a license to use. I am licensed through Artistic Minds Inc. but they are now closed. You can now find Ismael's artwork licensed through his own store. Pls do not use his work without purchasing through here.
Template of Choice .. I have used a great template from Sharon at Dolly's Tag World (Template 2), which can be downloaded on her blog here. Pls visit her blog for more great templates.
Mask of Choice .. I have used WSL_84 which can be downloaded from weescotslass here.
Word Art of Choice .. I have used some wonderful art by DragonflyMaiden from the Rac Stalker forum. She has allowed me to include it with this tut and you can download it here. Please visit the forum here for more of great word art.
Filters required ... Xenofex (Constellation), Xero (Fritillary) & Eye Candy (Gradient Glow)
Font of Choice .. I am using Futurist Fixed Width
Let's get started !
Open your mask & template in PSP, duplicate and close original.
Delete copyright layers and image/canvas size 650x650. Floodfill background layer with white.
Choose a darker color from your tube for your background and a lighter color for your foreground. I have used #1b3c8a & #6bb6de
New raster layer just above your background layer. Floodfill with your foreground color.
New mask layer from image, WSL_84, invert mask data unchecked, and merge group.
New raster layer and floodfill with your background color.
New mask layer from image, WSL_84, invert mask data unchecked, and merge group. Resize 90% and lower opacity of this layer 75%.
Effects/Xenofex/Constellation with the following settings:

Select Rectangle 1 layer, Select All, Float, Defloat, New Raster Layer, floodfill with a gradient from your 2 selected colors .. i have used these settings:

Select none and delete original layer.
Effects/Xero Fritillary with the following settings 7/160/30/45.
Select Rectangle Border 1 layer, Select All, Float, Defloat, New Raster Layer, floodfill with your darker color. Select none. Adjust/add remove noise/add noise with settings uniform/15%/monochrome checked. Add drop shadow. I have used 2/2/40/4 throughout. Delete original layer.
Repeat the same steps for Rectangle 2 and Rectangle Border 2 layers.
Select Starburst layer, Select All, Float, Defloat, New Raster Layer, floodfill with your darker color, copy and paste your selected close up tube, position within your star, selections/invert, delete. Select none. Change blend mode to luminance and delete your original layer.
Select Starburst Border layer, Select All, Float, Defloat, New Raster Layer, floodfill with your darker color. Select none. Adjust/add remove noise/add noise with settings uniform/15%/monochrome checked. Add drop shadow.
Merge down your 3 layers for your starburst (border, tube, background).
Copy and paste your full size tube. Resize as necessary and reposition your starburst layer if needed.
Copy and paste your word art. Add a gradient glow with settings Width 3, Fat, color #6bb6de and drop shadow.
X out white background, merge visible.
Open white background, resize to your liking (I used 500x500).
Add copyright. Add your name .. I used Futurist Fixed Width Size color black and added the same gradient glow as previous and dark shadow.
Save and you are done.
I hope you have enjoyed my tutorial.
Please feel free to send me your results.
I'd love to see what you came up with.
Monday, August 24, 2009
 Adams Pink Fantasia
5:09 PM | Posted by
Shal |
 Edit Post
have fun giving it your own spin.
This tutorial assumes you have a working knowledge of PSP.
Needed Supplies & Filters :
Scrap Kit of Choice .. I have used a gorgeous PTU kit from Bits n Bobs called Fantasia,
which can be purchased here.
Tube of Choice .. I am using the adorable work of Joel Adams which you must have a license to use. Please do not use his work without purchasing through CILM here.
Mask of Choice .. I have used BabesDesignz_Mask13
which can be downloaded from her blog here.
Filters required ... Xenofex Constellation & Eye Candy Gradient Glow (both optional)
Font of Choice .. I have used Feel Script
Let's get started !
New Image 600x600 and floodfill with white. Open your mask in PSP.
Copy and paste Paper 1 just above your background layer. New mask layer from image, BabesDesignz_Mask13, invert mask data checked, and merge group.
Effects, Xenofex, Constellation, Settings as follows.

Copy and paste Frame 3 and drop shadow. I have used 2/2/40/4 throughout.
Copy and paste diamond rain 3, resize 40% and position in the centre of your frame layer.
Move rain layer below your frame layer.
Copy and paste grass and position towards the bottom of your frame.
Drop shadow and move layer down below your frame layer.
Copy and paste bench, resize 65%, drop shadow and position to the right.
Copy and paste bubbles 3, resize 50%, drop shadow. Position to the top right of your frame.
Layer duplicate, image mirror and lower down a bit.
Copy and paste dove 3, resize 50%, drop shadow.
Position to the top right of your frame on top of your bubbles.
Copy and paste flower 1, resize 40%, drop shadow. Position on the bottom of your frame a lil left of centre. Layer/duplicate and image/mirror.
Copy and paste flower 3, resize 35%, drop shadow. Position in the centre of your 2 other flowers.
Copy and paste string ribbon 1, resize 65%, drop shadow. Move this layer down below your flower layers and position to the right a bit.
Layer duplicate/Image mirror.
Copy and paste your tube and drop shadow.
X out white background, merge visible.
Open white background, resize to your liking (I used 500x500).
Add copyright.
Add your name .. I used Feel Script, Size 72 color #97c0cf and added
a gradient glow with settings Width 3, Fat, White. Add drop shadow.
Save and you are done.
I hope you have enjoyed my tutorial. This kit has many great elements,
so pls feel free to experiment and use my tutorial as a guide.
Please feel free to send me your results.
I'd love to see what you came up with.
This tutorial assumes you have a working knowledge of PSP.
Needed Supplies & Filters :
Scrap Kit of Choice .. I have used a gorgeous PTU kit from Bits n Bobs called Fantasia,
which can be purchased here.
Tube of Choice .. I am using the adorable work of Joel Adams which you must have a license to use. Please do not use his work without purchasing through CILM here.
Mask of Choice .. I have used BabesDesignz_Mask13
which can be downloaded from her blog here.
Filters required ... Xenofex Constellation & Eye Candy Gradient Glow (both optional)
Font of Choice .. I have used Feel Script
Let's get started !
New Image 600x600 and floodfill with white. Open your mask in PSP.
Copy and paste Paper 1 just above your background layer. New mask layer from image, BabesDesignz_Mask13, invert mask data checked, and merge group.
Effects, Xenofex, Constellation, Settings as follows.

Copy and paste Frame 3 and drop shadow. I have used 2/2/40/4 throughout.
Copy and paste diamond rain 3, resize 40% and position in the centre of your frame layer.
Move rain layer below your frame layer.
Copy and paste grass and position towards the bottom of your frame.
Drop shadow and move layer down below your frame layer.
Copy and paste bench, resize 65%, drop shadow and position to the right.
Copy and paste bubbles 3, resize 50%, drop shadow. Position to the top right of your frame.
Layer duplicate, image mirror and lower down a bit.
Copy and paste dove 3, resize 50%, drop shadow.
Position to the top right of your frame on top of your bubbles.
Copy and paste flower 1, resize 40%, drop shadow. Position on the bottom of your frame a lil left of centre. Layer/duplicate and image/mirror.
Copy and paste flower 3, resize 35%, drop shadow. Position in the centre of your 2 other flowers.
Copy and paste string ribbon 1, resize 65%, drop shadow. Move this layer down below your flower layers and position to the right a bit.
Layer duplicate/Image mirror.
Copy and paste your tube and drop shadow.
X out white background, merge visible.
Open white background, resize to your liking (I used 500x500).
Add copyright.
Add your name .. I used Feel Script, Size 72 color #97c0cf and added
a gradient glow with settings Width 3, Fat, White. Add drop shadow.
Save and you are done.
I hope you have enjoyed my tutorial. This kit has many great elements,
so pls feel free to experiment and use my tutorial as a guide.
Please feel free to send me your results.
I'd love to see what you came up with.
Sunday, August 23, 2009
 Fairy Vision in Blue Tut
3:12 PM | Posted by
Shal |
 Edit Post
have fun giving it your own spin.
This tutorial assumes you have a working knowledge of PSP.
Needed Supplies & Filters :
Scrap Kit of Choice .. I have used a gorgeous PTU kit from Cora called The Elements: Water, which can be purchased here.
This is a wonderful kit with 3 others in the collection .. Earth, Wind & Fire.
These can purchased seperately or as a collection.
Template of Choice .. I have used a great template from Cheri Template #32,
which can be downloaded on her blog here.
Mask of Choice .. I have used WSL_63 which can be downloaded from weescotslass here.
Tube of Choice .. I am using the work of Susan McKivergan which you must have a license to use. Please do not use her work without purchasing through Up Your Art here. I am licensed through Artistic Minds Inc. but they are now closed.
Filters required ... Penta.com (Dot & Cross) & Eye Candy (Gradient Glow) .. both optional
Font of Choice .. I am using Mea Culpa
Let's get started !
Open your mask and template in PSP.
On your template, duplicate and close original. Delete copyright layer.
Open Paper 1 and copy and paste just above your background layer. New mask layer from image, WSL_63, invert mask data unchecked, and merge group. Resize mask layer 110%.
Now we will start filling our template layers. This is the part where you can play with different papers but the technique is the same.
Select Raster5 layer, Select All, Float, Defloat. Open Paper 2 from your kit. Copy and paste as new layer on your project. Selections/invert/ and hit delete. Selections/None and delete original layer.
Adjust/Add Remove Noise/Add Noise with settings Uniform/35%/Monochrome checked. Drop shadow. I have used 2/2/40/4 black throughout.
Select Raster 2 layer, Select All, Float, Defloat. Open Paper 1 from your kit. Copy and paste as new layer on your project. Selections/invert/ and hit delete. Selections/None and delete original layer.
Add a gradient glow with settings Width 3, Fat, White and drop shadow.
Select Raster 3 layer, Select All, Float, Defloat. Open Paper 3 from your kit. Copy and paste as new layer on your project. Selections/invert/ and hit delete. Selections/None and delete original layer. Drop shadow.
Select Raster 4 layer, Select All, Float, Defloat. Open Paper 4 from your kit. Copy and paste as new layer on your project. Selections/invert/ and hit delete. Selections/None and delete original layer. Drop shadow.
Effect Penta.com/Dot and Cross with settings 72/10/2.
Copy and paste waterdrops, resize 50%, Image/Mirror, Image/Free Rotate/Left 30 and drop shadow. Position to the lower right.
Copy and paste sea weed, resize 50% and drop shadow.
Copy and paste ribbon 2, resize 40%, , drop shadow. Position to the top left side.
Layer duplicate, image mirror and Image/Roate/Free Rotate/Right 15.
Copy and paste flower 3, resize 40%, Image/Rotate/Free Rotate/Left 125, drop shadow. Position on the lower left side.
Layer duplicate and move up a bit. Merge down your 2 flower layers, duplicate and image mirror.
Copy and paste Butterfly, resize 40%, position top right and drop shadow.
Copy and paste Bubbles, resize 40%, position to the left of your heart frame and drop shadow.
Copy and paste flower 4, resize 25%, drop shadow, position to the lower right, duplicate and image mirror.
Copy and paste flower 1, resize 25%, drop shadow, position to the lower right, duplicate and image mirror.
Copy and paste flower 5, resize 25%, drop shadow, position to the center of your other flowers.
Copy and paste your tube and drop shadow.
X out white background, merge visible. Open white background, resize to your liking (I used 500x500).
Add copyright. Add your name .. I used Mea Culpa Size 72 color #1f272f and added
a gradient glow color #c8d3d9 and drop shadow.
Save and you are done.
I hope you have enjoyed my tutorial. Please feel free to send me your results. I'd love to see what you came up with.
 2 more tags from my Xeracx Stalker Tut
11:20 PM | Posted by
Shal |
 Edit Post
2 more lovely ladies from the Stalker forum tried my lil tutorial and I just had to show them off. The first is from PA Cream and the second is from NyghtBloom.
 Gothic Wonderland Take 2 Tut
12:35 PM | Posted by
Shal |
 Edit Post
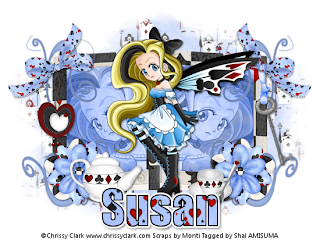
Feel free to use my tutorial as a guide and
have fun giving it your own spin.
This tutorial assumes you have a working knowledge of PSP.
Needed Supplies & Filters :
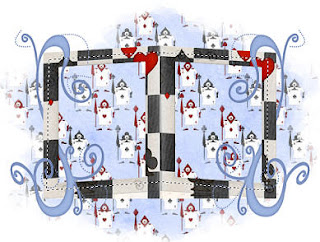 Copy and paste Paper 19, selections invert, delete.
Move your paper layer below your frame layer. Do not deselect.
Open your close up tube, resize 65%, delete. Selections none. Layer duplicate, image mirror.
Change blend mode of both your tube layers to luminance (L) and turn opacity down to 50.
Drop shadow your frame. I use 2/2/40/4 throughout.
Copy and paste bow 4, resize 50%, drop shadow. Position to the top left of your frame.
Layer duplicate and position to the top right of your frame.
Copy and paste key silver blue, resize 65%, drop shadow.
Position to the right side of your frame just below your bow. See my tag for placement.
Copy and paste heart pendant 2, resize 50%, drop shadow.
Position to the left side of your frame just below your bow.
Copy and paste flower 1, resize 50%, drop shadow. Position to the bottom left of your frame. Layer duplicate and position to the bottom right of your frame.
Copy and paste teaset pot, resize 30%, drop shadow. Position to the bottom left.
Copy and paste teaset cup and saucer, resize 30%, drop shadow. Position to the bottom right.
Copy and paste teaset spoon, resize 65%, drop shadow, image mirror.
Position next to your cup and saucer.
Copy and paste your full size tube, resize 85% and drop shadow.
X out white background, merge visible.
Open white background, resize to your liking (I used a width of 550).
Add copyright. Add your name. I used Impact, Size 60. I used Paper 4 as my bacgkround pattern, Angle 0, Scale 75 and black for my foreground with a stroke width of 2.
I then added a gradient glow with settings Width 3, Fat, White. Add drop shadow.
Save and you are done.
I hope you have enjoyed my tutorial. This kit has oodles of great elements, so pls feel free to experiment and use my tutorial as a guide.
Please feel free to send me your results.
I'd love to see what you came up with.
have fun giving it your own spin.
This tutorial assumes you have a working knowledge of PSP.
Needed Supplies & Filters :
Tube of Choice .. I am using the work of Chrissy Clark which you must have a license to use. Please do not use her work without purchasing through My Tag Art here.
Pls note mine is licensed through AMI where her art was previously sold.
Scrap Kit of Choice .. I have used a gorgeous PTU kit from Monti called Gothic Wonderland, which can be purchased at Artistic Minds Inc here.
Mask of Choice .. I have used WSL_220 which can be downloaded from weescotslass here.
Filters required ... Eye Candy Gradient Glow (optional)
Font of Choice .. I have used Impact
Let's get started !
New Image 650x500 and floodfill with white. Open your mask in PSP.
Copy and paste Paper 13 just above your background layer. New mask layer from image, WSL_220, invert mask data unchecked, and merge group.
Copy and paste Frame 14. Resize 85%.
Using your freehand selection tool, select an area similar to this
 Copy and paste Paper 19, selections invert, delete.
Move your paper layer below your frame layer. Do not deselect.
Open your close up tube, resize 65%, delete. Selections none. Layer duplicate, image mirror.
Change blend mode of both your tube layers to luminance (L) and turn opacity down to 50.
Drop shadow your frame. I use 2/2/40/4 throughout.
Copy and paste bow 4, resize 50%, drop shadow. Position to the top left of your frame.
Layer duplicate and position to the top right of your frame.
Copy and paste key silver blue, resize 65%, drop shadow.
Position to the right side of your frame just below your bow. See my tag for placement.
Copy and paste heart pendant 2, resize 50%, drop shadow.
Position to the left side of your frame just below your bow.
Copy and paste flower 1, resize 50%, drop shadow. Position to the bottom left of your frame. Layer duplicate and position to the bottom right of your frame.
Copy and paste teaset pot, resize 30%, drop shadow. Position to the bottom left.
Copy and paste teaset cup and saucer, resize 30%, drop shadow. Position to the bottom right.
Copy and paste teaset spoon, resize 65%, drop shadow, image mirror.
Position next to your cup and saucer.
Copy and paste your full size tube, resize 85% and drop shadow.
X out white background, merge visible.
Open white background, resize to your liking (I used a width of 550).
Add copyright. Add your name. I used Impact, Size 60. I used Paper 4 as my bacgkround pattern, Angle 0, Scale 75 and black for my foreground with a stroke width of 2.
I then added a gradient glow with settings Width 3, Fat, White. Add drop shadow.
Save and you are done.
I hope you have enjoyed my tutorial. This kit has oodles of great elements, so pls feel free to experiment and use my tutorial as a guide.
Please feel free to send me your results.
I'd love to see what you came up with.
Friday, August 21, 2009
 Gothic Wonderland Tut
3:31 PM | Posted by
Shal |
 Edit Post
have fun giving it your own spin.
This tutorial assumes you have a working knowledge of PSP.
Needed Supplies & Filters :
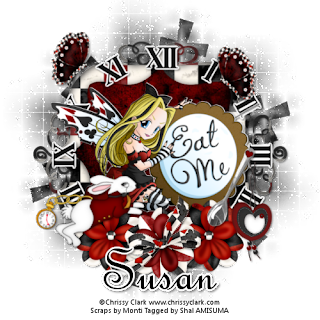
Tube of Choice .. I am using the work of Chrissy Clark which you must have a license to use. Please do not use her work without purchasing through My Tag Art here.
 Copy and paste Frame 10. Resize 90%.
Using your magic wand, select the middle part of your frame, selections/modify/expand 3.
Copy and paste Paper 24, selections invert, delete, selections none.
Move this layer just below your frame layer.
Drop shadow your frame. I use 2/2/40/4 throughout.
Copy and paste Wonderland Clock Face, resize 110% and drop shadow.
Copy and paste Flower 2, resize 50% and drop shadow. Position to the lower left of your frame. Layer duplicate and image mirror.
Copy and paste Flower 6, resize 50% and drop shadow.
Position to the center of your other 2 flowers.
Copy and paste Bow 6, resize 50%, drop shadow and position on your middle flower.
Copy and paste Heart Pendant 2, resize 50% and drop shadow.
Position to the right side of your clock face.
Copy and paste your chosen tube, resize accordingly and drop shadow.
Copy and paste White Rabbit Running, resize 50%, image rotate left/30 degrees, drop shadow. Position to the bottom left of your frame.
Copy and paste Tea Set Spoon, drop shadow, image mirror and position the to the right.
Copy and paste Butterfly 6, resize 30%, drop shadow and position to the top left.
Image rotate right/15 degrees.
Layer duplicate, image mirror and position a lil lower.
X out white background, merge visible.
Open white background, resize to your liking (I used 500x500).
Add copyright. Add your name .. I used French Script, Size 72 black and added
a gradient glow with settings Width 3, Fat, White. Add drop shadow.
Save and you are done.
I hope you have enjoyed my tutorial. This kit has oodles of great elements, so pls feel free to experiment and use my tutorial as a guide.
Please feel free to send me your results.
I'd love to see what you came up with.
This tutorial assumes you have a working knowledge of PSP.
Needed Supplies & Filters :
Tube of Choice .. I am using the work of Chrissy Clark which you must have a license to use. Please do not use her work without purchasing through My Tag Art here.
Pls note mine is licensed through AMI where her art was previously sold.
Scrap Kit of Choice .. I have used a gorgeous PTU kit from Monti called Gothic Wonderland, which can be purchased at Artistic Minds Inc here.
Mask of Choice .. I have used WSL_325 which can be downloaded from weescotslass here.
Filters required ... Xenofex Constellation & Eye Candy Gradient Glow (both optional)
Font of Choice .. I have used Feel Script
Let's get started !
New Image 600x600 and floodfill with white. Open your mask in PSP.
Copy and paste Paper 27 just above your background layer. New mask layer from image, WSL_325, invert mask data unchecked, and merge group.
Effects, Xenofex, Constellation, Settings as follows.
 Copy and paste Frame 10. Resize 90%.
Using your magic wand, select the middle part of your frame, selections/modify/expand 3.
Copy and paste Paper 24, selections invert, delete, selections none.
Move this layer just below your frame layer.
Drop shadow your frame. I use 2/2/40/4 throughout.
Copy and paste Wonderland Clock Face, resize 110% and drop shadow.
Copy and paste Flower 2, resize 50% and drop shadow. Position to the lower left of your frame. Layer duplicate and image mirror.
Copy and paste Flower 6, resize 50% and drop shadow.
Position to the center of your other 2 flowers.
Copy and paste Bow 6, resize 50%, drop shadow and position on your middle flower.
Copy and paste Heart Pendant 2, resize 50% and drop shadow.
Position to the right side of your clock face.
Copy and paste your chosen tube, resize accordingly and drop shadow.
Copy and paste White Rabbit Running, resize 50%, image rotate left/30 degrees, drop shadow. Position to the bottom left of your frame.
Copy and paste Tea Set Spoon, drop shadow, image mirror and position the to the right.
Copy and paste Butterfly 6, resize 30%, drop shadow and position to the top left.
Image rotate right/15 degrees.
Layer duplicate, image mirror and position a lil lower.
X out white background, merge visible.
Open white background, resize to your liking (I used 500x500).
Add copyright. Add your name .. I used French Script, Size 72 black and added
a gradient glow with settings Width 3, Fat, White. Add drop shadow.
Save and you are done.
I hope you have enjoyed my tutorial. This kit has oodles of great elements, so pls feel free to experiment and use my tutorial as a guide.
Please feel free to send me your results.
I'd love to see what you came up with.
Thursday, August 20, 2009
 Happy Halloween FTU TS Scrap Kit
4:24 PM | Posted by
Shal |
 Edit Post

Happy Halloween FTU Tagger Size Scrap Kit
I finally did it. I had hoped to make a lil kit for my dear friends, but everyone told me I should be sharing it on my blog. It's my first try at a kit and I do hope you like it. I know I'm a bit early for Halloween, but I just love the holiday and didn't know how long it would take me to put something together I really liked. Your comments will be greatly appreciated so I know how to make something better next time.
Kit includes 25 papers and 55 elements.
It is FTU but pls do not share or upload anywhere.
Pls direct your friends to download here if they like it.
You can download it at My Tag Art here.
Monday, August 17, 2009
 My 2nd Award !
9:34 PM | Posted by
Shal |
 Edit Post

Thank you so much Mincrisar Department Store for my 2nd award.
Here are the guidelines for accepting the award:
1 - Display the prize.
2 - Link to the Blog from whom you received it.
3 - Nominate another 10 blogs.
4 - Leave a message on their blog, letting them know they have received it
I'm giving this award to these lovely blogs:
My Lil Scrappy Life
Scrap In Time
Tiggsvision
tweety's Tutorials
Litlgrlblue Designs
Toris Tidbits Tutorials
The Life and Times of Leah
Julies Creationz
Dolly's Tag World
Creations by Witchysheart
Saturday, August 15, 2009
 Xeracx Stalker Tut
3:14 PM | Posted by
Shal |
 Edit Post
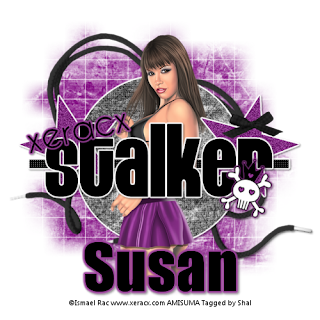 Feel free to use my tutorial as a guide and
have fun giving it your own spin.
This tutorial assumes you have a working knowledge of PSP.
Needed Supplies & Filters :
Tube of Choice .. I am using the work of Ismael Rac which you must have a license to use. I am licensed through Artistic Minds Inc. but they are now closed. You can now find Ismael's artwork licensed through his own store. Pls do not use his work without purchasing through here.
Scrap Kit of Choice .. I have used a gorgeous FTU kit from Crazy Cakes called Stalker, which can be downloaded on her blog here.
Template of Choice .. I have used a great template from Toxic Desirez Template #3, which can be downloaded on her blog here.
Mask of Choice .. I have used WSL_84 which can be downloaded from weescotslass here.
Filters required ... Xero (Fritillary) & Eye Candy (Gradient Glow)
Font of Choice .. I am using Impact.
Let's get started !
Open your mask and template in PSP. On your template, duplicate and close original.
Delete copyright layer and Image/Canvas Size 650x650.
Open Paper 11 and copy and paste just above your background layer. New mask layer from image, WSL_84, invert mask data unchecked, and merge group.
Now we will start filling our template layers. This is the part where you can play with different papers but the technique is the same.
Select circle layer, Select All, Float, Defloat. Open Paper 12 from your kit. Copy and paste as new layer on your project. Selections/invert/ and hit delete. Selections/None and delete circle layer.
Effects Xero/Fritillary, Settings 4/64/68/27.
Effects Eye Candy/Gradient Glow, Settings Width 3, Fat, White. Add drop shadow. I am using settings 2/2/40/4 throughtout.
Select rectangle layer, Select All, Float, Defloat. New Raster Layer and floodfill with black. Effects/Texture/Weave with Settings 1/3/3, fill gaps checked and color white in both boxes. Add same gradient glow and drop shadow as before. Selections/None and delete rectangle layer.
Copy and paste your tube just above the rectangle layer.
Resize as required and drop shadow. Delete outline layer.
Select star layer, Select All, Float, Defloat. New Raster Layer and floodfill with #832c83. Adjust/Add remove noise with Settings Uniform, Monochrome checked, 50%. Add same gradient glow and drop shadow. Selections/None and delete star layer.
Select Word Art 1 layer, Select All, Float, Defloat. New Raster Layer and floodfill with black. Add same gradient glow and drop shadow as before. Selections/None and delete Word Art 1 layer.
Select Word Art 2 layer, add same gradient glow but this time use color #832c83.
I repeated the gradient glow and added drop shadow.
Select Skull Fill 2 layer, Select All, Float, Defloat. New Raster Layer and floodfill with #832c83. Selections/None and delete Skull Fill 2 layer.
Merge down all skull layers and add the same gradient glow as you did with
the word art (color #832c83). Drop shadow.
Now you can decide to add elements from the scrap kit to your liking. Feel free to experiment.
I have added ccsshoelace4 (resize 75%).
Duplicated and positioned both just above my mask layer.
I then added bow1 (resize 30%) and positioned above one of my stars.
X out white background, merge visible.
Open white background, resize to your liking (I used 500x500).
Add copyright. Add your name .. I used Impact, Size 72 black and added
the gradient glow with color #832c83 and drop shadow.
Save and you are done.
I hope you have enjoyed my tutorial.
Please feel free to send me your results.
I'd love to see what you came up with.
Friday, August 14, 2009
 My First Award !!
1:22 PM | Posted by
Shal |
 Edit Post

Thank you so much Creationz by WitchysHeart for my very first award.
Here are the guidelines for accepting the award:
1. Add the logo to your blog
2. Link to the person from whom you received this award
3. Nominate 7 or more blogs
4. Leave a message on their blog, letting them know they are One Lovely Blog!
I'm giving this award to these lovely blogs:
My Lil Scrappy Life
Scrap In Time
Tiggsvision
tweety's Tutorials
Bits N Bobs Tutorials
Crazy Cakes Scraps
Oahubeachgirl
Saturday, August 8, 2009
 Back to School FTU Kits anyone ?
8:14 PM | Posted by
Shal |
 Edit Post
Does anyone have a back to school ftu scrap kit on the horizon ? I've been looking for a current one .. but haven't come across one. I'm particularly interested in one that includes a chalk board. Pls let me know if you have one or have seen one !
 Loving these tags using my tuts
8:10 PM | Posted by
Shal |
 Edit Post
Victoria from the Stalkers forum did these gorgeous tags using my Rac Stalker tutorial ! I just fell in love with the pink one in particular .. starting to be my favorite tube lol. Thanks so much Victoria .. just gorgeous !!!


Subscribe to:
Posts (Atom)
Labels
- 1$ Mini Kits (4)
- Angela Newman (7)
- Awards (10)
- Blog Trains (6)
- Caron Vinson (1)
- CU Items (8)
- Elias (3)
- Extras (6)
- FTU Scrap Kits (22)
- FTU Tutorials (39)
- Halloween (1)
- Irish Bitch Designs (2)
- KatNKDA (28)
- KiwiFire Storm (1)
- Maigan Lynn (6)
- Misc (1)
- News (98)
- Pinup Toons (1)
- PTU Scrap Kits (79)
- PTU Tutorials (245)
- Sweet Dream Scraps (3)
- Tags Using my Scraps (10)
- Tags Using My Tuts (13)
- Tuts Using My Kits; (63)
- Tuts Using My Kits; Tags Using my Scraps (3)
- verymany (2)
- Wicked Princess Scraps (3)
Blog Archive
-
▼
2009
(107)
-
▼
August
(19)
- Falling Into Fall Tut
- Celestial Autumn Tut
- Be Creative Tut
- Some wonderful new goodies using my tuts and scraps
- August Featured XeracX Tutorial Contest
- Stalker Alert Tut
- Adams Pink Fantasia
- Fairy Vision in Blue Tut
- A Gothic Wonderland Inspiration
- 2 more tags from my Xeracx Stalker Tut
- Gothic Wonderland Take 2 Tut
- Gothic Wonderland Tut
- Happy Halloween FTU TS Scrap Kit
- My 2nd Award !
- Tags from my Xeracx Stalker Tut
- Xeracx Stalker Tut
- My First Award !!
- Back to School FTU Kits anyone ?
- Loving these tags using my tuts
-
▼
August
(19)


