About Me
My hobbies are PSP.
I love helping my friends who are starting with PSP.
Any similarity or resemblance to any other tutorial is purely coincidental and unintentional. Pls do not recopy my tutorials anywhere. Many thanks Susan.


Credit

Blinkie created by Rabid Designz. She does some amazing work ! Thanks so much Melissa.

Blinkie created by my long time friend tweety here. Thanks so much my friend :)
My blog was designed By Alika's Scraps. Thanks so much. You did an amazing job !

Saturday, December 31, 2011
 First Snowflake Tut
10:05 PM | Posted by
Shal |
 Edit Post

Feel free to use my tutorial as a guide and have fun giving it your own spin.
This tutorial assumes you have a working knowledge of PSP.
Needed Supplies :
Tube of Choice .. I am using the work of Zlata_M which you must have a license to use. Please do not use this work without purchasing through The PSP Project here.
Scrap Kit of Choice .. I have used one of my own PTU Kit "Cordelia's Chilly Christmas" which can be purchased here.
Mask of Choice .. I have used WSL_Mask84 which can be downloaded here.
Word art of choice .. I have used word art by Linda's Place which can be downloaded here.
Font of Choice .. Snowcap
Let's get started
New image 600x600 and floodfill with white. New raster layer, select all, paste into selection Paper 15. Select none. New mask layer from image, WSL_Mask84, invert transparency unchecked, and merge group.
Repeat with Paper 13 & mask WSL_Mask38. Resize 105%, adjust/add remove noise/add noise/uniform monochrome checked/40%.
Copy and paste Frame 10 & resize 75%. Using your magic wand, select the center portion of your frame, selections modify/expand 5, copy and paste Paper 13 below your frame layer, selections invert, hit delete & select none. Drop shadow your frame. I have used 2/2/40/4 throughout. Merge down your frame layer with it's background layer.
Layer duplicate, resize 50% & rotate right 25. Position bottom right hand corner. Layer duplicate, mirror & resize 65%. Position top left hand side of your big star frame.
Copy and paste Element 20, resize 75% & drop shadow. Repeat with Element 9. Copy and paste Element 12, resize 50% & drop shadow. Position top right hand corner.
Copy and paste Ribbon/Bow 3, resize 65% & drop shadow. Position towards the bottom on the right hand side. Repeat with Ribbon/Bow 5, resizing 50% & mirror. Position bottom left hand corner.
Copy and paste your tube, resize as necessary & drop shadow. Copy and paste String 5, resize 65% & drop shadow. Position towards the bottom.
Copy and paste Poinsettia 3, resize 35% & drop shadow. Position bottom left hand corner. Repeat with Poinsettia 5.
Copy and paste Ornament 4, resize 35% & drop shadow. Position hanging from the point of your large star on the left hand side. Layer duplicate & mirror.
Copy and paste Flake 10, resize 35% & drop shadow. Position top left hand corner and drag this layer to just above your mask layer.
Copy and paste Word art & resize 35% twice. Adjust color balance/manual color correction from black to #352b74. I then added a size 4 fat white gradient glow. Select all/float/defloat/invert & adjust/add remove noise/add noise/random & monochrome checked/75%. Select none and drop shadow. Position top left hand corner.
X out white background, merge visible. Open white background, resize to your liking (I have used 500x500).
Add copyright and name on your tag. I have used Snowcap, Size 60, color #352b74 and then added the same gradient glow, noise and drop shadow as with the word art.
Save and you are done.
I hope you have enjoyed my tutorial.
Pls feel free to experiment and use my tutorial as a guide.
Time Traveller New Year Tut
7:22 PM | Posted by
Shal |
Edit Post

Feel free to use my tutorial as a guide and have fun giving it your own spin.
This tutorial assumes you have a working knowledge of PSP.
Needed Supplies :
Tube of Choice .. I am using the work of Lisa Cree which you must have a license to use. Please do not use this work without purchasing through PSP Tube Stop here.
Scrap Kit of Choice .. I have used a great PTU Kit from Lisa Cree for New Year which can be purchased here.
Mask of Choice .. I have used WSL_Mask366 which can be downloaded here.
Word art of Choice .. I have used word art from Linda's Place which you can download here.
Font of Choice .. LDJ Jilly Nilly
Let's get started
New image 600x600 and floodfill with white. New raster layer, select all, paste into selection Texture IceAndGlitterGold. Select none. New mask layer from image, WSL_Mask366, invert transparency unchecked, and merge group. Resize 110%.
Copy and paste CraackedRoundFrame and resize 90%. Using your magic wand, select the center portion of your frame, selections modify/expand 10, copy and paste Texture ChampagneYellowBubbles below your frame layer, selections invert and hit delete. Copy and paste below your frame your tube & resize as necessary. Layer duplicate and drag this layer above your frame. On the tube layer below you frame, hit delete & select none. Select the tube layer above your frame and erase the bottom portion of the tube so it appears to be coming out of your frame. Drop shadow your frame. I have used 2/2/40/4 throughout.
Copy and paste BlueStarsFalling0010 & drop shadow. Position top left hand corner. Layer duplicate/mirror and position on the right hand side. Copy and paste PartyPopperYellow0007, drop shadow and position bottom left hand corner. Depending on the tube you are using, erase some of the sparkles if they are covering the face of your tube. Layer duplicate & mirror.
Copy and paste Ribbon1Yellow, drop shadow and position bottom left hand corner. Repeat with Ribbon2Blue and position with your first ribbon. Repeat with Ribbon1Blue, mirror/flip and drag this layer just above your mask layer.
Copy and paste LongBalloonYellow, resize 50% & drop shadow. Position far bottom right hand corner. Copy and paste ClockWhiteAndSilver, resize 40% & drop shadow. Position next to your balloon.
Copy and paste PartyPopperYellow0003 & drop shadow. Position top right hand corner and drag this layer just above your mask layer.
Copy and paste BalloonYellow, resize 50% & drop shadow. Position top left hand corner. Repeat with BalloonBlue and position next to your first balloon.
Copy and paste ConfettiBlue & drop shadow. Positon bottom left hand corner. Layer duplicate a few times and move around to your liking.
Copy and paste Word Art and resize 50% twice. Adjust/add remove noise/add noise/random checked/65%. I then added a size 3 fat white gradient glow followed by drop shadow.
X out white background, merge visible. Open white background, resize to your liking (I have used 500x500).
Add copyright and name on your tag. I have used LDG Jilly Nilly, Size 60, color black, then added the same effects I did on the word art with the noise, gradient glow & drop shadow.
Save and you are done.
I hope you have enjoyed my tutorial.
Pls feel free to experiment and use my tutorial as a guide.
Let It Snow Tut
5:56 PM | Posted by
Shal |
Edit Post

Feel free to use my tutorial as a guide and have fun giving it your own spin.
This tutorial assumes you have a working knowledge of PSP.
Needed Supplies :
Tube of Choice .. I am using the work of Zlata_M which you must have a license to use. Please do not use this work without purchasing through PFD here.
Scrap Kit of Choice .. I have used a great PTU Kit from Designs by Stina called "Winter Wonderland" which can be purchased here.
Mask of Choice .. I have used WSL_Mask84 & WSL_Mask366 which can be downloaded here.
Word art of choice .. I have used word art by Annie's Little Footprints which can be downloaded here.
Font of Choice .. The Nauti Gal
Let's get started
New image 600x600 and floodfill with white. New raster layer, select all, paste into selection Paper 2. Select none. New mask layer from image, WAL_Mask84, invert transparency unchecked, and merge group.
Repeat with Paper 3 & mask WSL_Mask366. Resize 110%.
Copy and paste Frame 09 and resize 30%. Select all/float/defloat, copy and paste Paper 9, resize 40% twice, selections/invert, hit delete on your keyboard & delete original frame layer.
Effects/Alien Skin Eye Candy 5 Impact & apply the following glass effect and then select none.

Using your magic wand, select the center portion of your frame, selections modify/expand 10, new raster layer below your frame layer & floodfill with white. Copy and paste Stars, resize 40%/30%, selections invert and hit delete. Duplicate layer and mirror. Repeat with Scene 4, skipping the duplicate/mirror part. Select none.
Drop shadow your frame, scene and stars layers. I have used 2/2/40/4 throughout.
Select your frame layer, select/all/float/defloat and I then applied the following constellation layer to add some sparkle.

Copy and paste Sleigh Bells, resize 30%/50% & drop shadow. Position on the right hand side of your frame.
Copy and paste Bow 2, resize 30%/50% & drop shadow. Position top right hand corner of your frame. Layer duplicate & mirror.
Copy and paste Holly 2, resize 40%/30%, rotate right 90 & drop shadow. Position top centre of your frame.
Copy and paste Christmas Tree, resize 30% & drop shadow. Position bottom left hand corner.
Copy and paste your tube & drop shadow.
Copy and paste Snowman, resize 40%/35% & drop shadow. Position bottom right hand corner.
Copy and paste Snow Scatter, resize 30%/50%, mirror & drop shadow. Position towards the bottom.
Copy and paste Word Art, resize 30%/55% and then added a size 4 fat white gradient glow & drop shadow.
X out white background, merge visible. Open white background, resize to your liking (I have used 500x500).
Add copyright and name on your tag. I have used The Nauti Gal, Size 72, color black, then added the same effects I did on the word art with the gradient glow & drop shadow.
Save and you are done.
I hope you have enjoyed my tutorial.
Pls feel free to experiment and use my tutorial as a guide.
Last Chance to Buy My Store for the low price of only 5.00$ !
4:32 PM | Posted by
Shal |
Edit Post

New Year's Eve/New Year's day ... 5.00$ !
Thursday, December 29, 2011
The Journey of a Lifetime Extras
6:41 PM | Posted by
Shal |
Edit Post

Tube of Choice .. I am using the work of Meg Baker which you must have a license to use. Please do not use her work without purchasing through PSP Tube Stop here.


Monday, December 26, 2011
Winter Wonderland Tut
10:01 PM | Posted by
Shal |
Edit Post
Feel free to use my tutorial as a guide and have fun giving it your own spin.
This tutorial assumes you have a working knowledge of PSP.
Needed Supplies & Filters :
Tube of Choice .. I am using the work of Alex Prihodko which you must have a license to use. Please do not use his work without purchasing through PFD here.
Scrap Kit of Choice .. I have used a gorgeous PTU kit from Angel's Designz called "Frost Berry" which be purchased here.
Mask of Choice .. I haved used WSL_Mask366 which can be downloaded here.
Word art of Choice .. I have used word art from Annie's Little Footprints which can be downloaded here.
Font of Choice .. KR Snowflake 2
Filters of Choice .. Vanderlee/Snowflakes
Let's get started !
New image 600x600 and floodfill with white. New raster layer, select all, paste into selection Paper 14. Select none. New mask layer from image, WSL_Mask366, invert transparency unchecked, and merge group. Resize 115%. Repeat using Paper 12 and rotate right 20.
Copy and paste Frame 3 & resize 90%. Using your magic wand, select the center portion of your frame, selections modify/expand 5, copy and paste Paper 11 below your frame layers, selections invert and hit delete. Selections invert and duplicate your background layer twice, renaming your layers Snow 1,2 & 3.
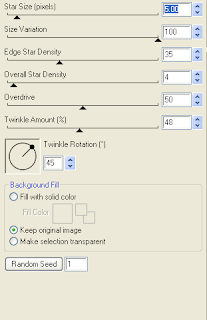
On your first snow layer apply the following Vanderlee/Snowflakes.
This tutorial assumes you have a working knowledge of PSP.
Needed Supplies & Filters :
Tube of Choice .. I am using the work of Alex Prihodko which you must have a license to use. Please do not use his work without purchasing through PFD here.
Scrap Kit of Choice .. I have used a gorgeous PTU kit from Angel's Designz called "Frost Berry" which be purchased here.
Mask of Choice .. I haved used WSL_Mask366 which can be downloaded here.
Word art of Choice .. I have used word art from Annie's Little Footprints which can be downloaded here.
Font of Choice .. KR Snowflake 2
Filters of Choice .. Vanderlee/Snowflakes
Let's get started !
New image 600x600 and floodfill with white. New raster layer, select all, paste into selection Paper 14. Select none. New mask layer from image, WSL_Mask366, invert transparency unchecked, and merge group. Resize 115%. Repeat using Paper 12 and rotate right 20.
Copy and paste Frame 3 & resize 90%. Using your magic wand, select the center portion of your frame, selections modify/expand 5, copy and paste Paper 11 below your frame layers, selections invert and hit delete. Selections invert and duplicate your background layer twice, renaming your layers Snow 1,2 & 3.
On your first snow layer apply the following Vanderlee/Snowflakes.

Apply the same settings to your next snow layer and randomize. Apply again to your last snow layer hitting and randomize again. Select none. If you decide not to animate your tag, then just skip the duplicate twice and snow steps.
Drop shadow your frame. I have used 2/2/40/4 throughout. Copy and paste Sucker, resize 65% & drop shadow. Position on the right hand side.
Copy and paste your tube, resize as necessary & drop shadow. Copy and paste Branch, resize 50% & drop shadow. Position bottom right hand corner. Layer duplicate & mirror.
Copy and paste Lights, resize 85% & drop shadow. Position along the bottom. Copy and paste Heart String & drop shadow. Position along the bottom as well.
Copy and paste Bow 1, resize 50% & drop shadow. Position bottom right hand corner. Copy and paste Bells, resize 75% & drop shadow. Position bottom right hand corner.
Copy and paste Bead String, resize 75% & drop shadow. Position on the left hand side. Copy and paste Bow 3, resize 50% & drop shadow. Position at the top of your Bead String. Repeat with Charm, resizing 40% & position on top of your bow.
Copy and paste Sparkles & position along the bottom.
Copy and paste Word Art, resize 30% & then 50%. Adjust color balance/manual color correction from black to #d1557d. Adjust/add remove noise/add noise/uniform monochrome checked/50%. Size 3 fat white gradient glow followed by drop shadow.
At this point if you need to, resize your tag. I have used 500x500. Add your copyright and name. I have used KR Snowflake, size 60, color #49bdc1 and added the same noise, gradient glow & drop shadow as with the word art.
If you are choosing not to animate, then you can save your tag.
To animate, close off Snow Layer 2 & 3 (the lil eye icon in your layer palette), Edit/Copy Merged and paste as new animation in Animation Shop. Close off Snow Layer 1 and open Snow Layer 2, Edit/Copy Merged and paste after current frame in AS. Close off Snow Layer 2 and open Snow Layer 3, Edit/Copy Merged and paste after current frame in AS.
In animation shop, select all, frame properties 25. Save as a gif.
Save and you are done.
I hope you have enjoyed my tutorial.
Pls feel free to experiment and use my tutorial as a guide.
Please feel free to send me your results.
I'd love to see what you came up with.
Cheers Tut
8:24 PM | Posted by
Shal |
Edit Post

Feel free to use my tutorial as a guide and have fun giving it your own spin.
This tutorial assumes you have a working knowledge of PSP.
Needed Supplies :
Tube of Choice .. I am using the work of Simona Candini which you must have a license to use. Please do not use her work without purchasing through SNC here.
Scrap Kit of Choice .. I have used a PTU Kit from Dark Moon's Dream called "Mitternachts Melody" which can be purchased here.
Mask of Choice .. I have used WSL_Mask8 by weescotslass which can be downloaded here.
Font of Choice .. Jayne Print
Let's get started
New image 600x600 and floodfill with white. New raster layer, select all, paste into selection Paper 10. Select none. New mask layer from image, WSL_Mask8, invert transparency unchecked, and merge group. Layer duplicate & merge down both mask layers.
Duplicate twice and rename your layers Mask 1,2 and 3. On your first Mask layer apply Dsb Flux/Bright Noise/50. On your 2nd layer, apply bright noise again, hitting mix twice. On your 3rd layer, apply again hitting mix 3 times. If you are deciding not to animate, skip this part of the tutorial.
Copy and paste Splatter, resize 65% & position top left hand corner. Layer duplicate, rotate right 90 and position lower right hand side.
Copy and paste Frame 4 & resize 85%. Using your magic wand, select the center portion of your frame, selections modify/expand 5, copy and paste Glitter below your frame layers, selections invert and hit delete. Copy and paste below your frame your tube & resize as necessary. Layer duplicate and drag this layer above your frame. On the tube layer below you frame, hit delete & select none. Select the tube layer above your frame and erase the bottom portion of the tube so it appears to be coming out of your frame. Drop shadow your frame. I have used 2/2/40/4 throughout.
Copy and paste Branch 2, resize 75%, mirror & drop shadow. Position on the right hand side of your frame.
Copy and paste Bow 4 & drop shadow. Position top right hand corner of your frame. Layer duplicate & mirror.
Copy and paste Bow 2, resize 75% & drop shadow. Position bottom centre of your frame. Copy and paste Deco 5, resize 75% & drop shadow. Position bottom right hand corner.
Copy and paste Branch 1, resize 85% & drop shadow. Position on the right hand side. Repeat with Ivy and position along the bottom.
Copy and paste Balloon, resize 85% & drop shadow. Position on the right hand side.
Copy and paste Feathers, drop shadow and position bottom left hand corner. Copy and paste Deco 4, resize 75% & drop shadow. Position next to your Feathers.
Copy and paste Ribbon 2 & drop shadow. Position towards the bottom. Layer duplicate & move up a bit.
Copy and paste Flowers 2, mirror & drop shadow. Position bottom left hand corner.
Copy and paste Bird Cage, resize 75% & drop shadow. Position bottom right hand corner. Repeat with Dove, resizing 50% & position at the base of your cage.
At this point if you need to, resize your tag. I have used 500x500. Add your copyright and name. I have used Jayne Print, size 48, color #8c1313. I then added the same bright noise effect as used before, followed by this gradient glow & then drop shadow.

If you are choosing not to animate, then you can save your tag.
To animate, close off Mask Layers 2 & 3 (the lil eye icon in your layer palette), Edit/Copy Merged and paste as new animation in Animation Shop. Close off Mask Layer 1 and open Mask Layer 2, Edit/Copy Merged and paste after current frame in AS. Close off Mask Layer 2 and open Mask Layer 3, Edit/Copy Merged and paste after current frame in AS.
Save as a gif.
I hope you have enjoyed my tutorial.
Pls feel free to experiment and use my tutorial as a guide.
Please feel free to send me your results.
I'd love to see what you came up with.
Santa's CU Goodie Bag at Twilight Scraps
6:19 PM | Posted by
Shal |
Edit Post

Santa's CU Goodie Bag at Twilight Scraps
This 'Santa's CU Goodie Bag was put together by several of our very talented designers. This CU Grab Bag is filled with items from Overlays, Templates, PSP Scripts, Elements packs & MORE. There is a total of 37 CU Items inside the CU Goodie Bag. Free gift with 10.00$ purchase.
Thank you for supporting Twilight Scraps!!
Thank you for supporting Twilight Scraps!!

Jingle Jangle Collaboration at Twilight Scraps
6:05 PM | Posted by
Shal |
Edit Post

Jingle Jangle Collaboration at Twilight Scraps
The Jingle Jangle Collaboration was put together by several of our very talented designers. There is a total of 19 products inside this collab, Please be sure to read the terms by each designer. Free gift with 10.00$ purchase.
Thank you for supporting Twilight Scraps!!
Thank you for supporting Twilight Scraps!!

Happy Emo New Year Tagger Size Kit
5:55 PM | Posted by
Shal |
Edit Post

Happy Emo New Year Tagger Size Kit
This kit contains 24 papers (800x800 in size) & 81 elements. Elements include balloons, bows, buttons, emo dolls, fireworks, frames, hats, noise makers, ribbons, word art as well as apiano, champagne bottle & glasses.
Time to celebrate and ring in the new year !
Time to celebrate and ring in the new year !
Tuesday, December 20, 2011
Under the Mistletoe Tut
8:38 PM | Posted by
Shal |
Edit Post

Feel free to use my tutorial as a guide and have fun giving it your own spin.
This tutorial assumes you have a working knowledge of PSP.
Needed Supplies :
Tube of Choice .. I am using the work of Alex Prihodko which you must have a license to use. Please do not use this work without purchasing through PFD here.
Scrap Kit of Choice .. I have used a PTU Kit from Eclipse Creations called "Purple Golden Xmas" which can be purchased here.
Mask of Choice .. I have used WSL_Mask78 by weescotslass which can be downloaded here.
Word art of Choice .. I have used word art by Little Footprints which can be downloaded here.
Font of Choice .. Santa's Sleigh
Let's get started
New image 600x600 and floodfill with white. New raster layer, select all, paste into selection Paper 1. Select none. New mask layer from image, WSL_Mask78, invert transparency unchecked, and merge group. Layer duplicate & merge down both mask layers.
New raster layer, select all, paste into selection Paper 2. Select none. New mask layer from image, WSL_Mask78, invert transparency unchecked, and merge group. Rotate right 10.
Copy and paste Splat 2, resize 40%, adjust/add remove noise/add noise/random monochrome checked/50% & drop shadow. I have used 2/2/40/4 throughout. Position top right hand corner. Layer duplicate & move bottom left hand corner.
Copy and paste Frame 2 & resize 75%. Using your magic wand, select the center portion of your frame, selections modify/expand 5, copy and paste Paper 6 below your frame layers, selections invert and hit delete. Drop shadow your frame.
Copy and paste Ladder, resize 75%, rotate right 45 & drop shadow. Position on the right hand side of your frame. Copy and paste Nussknacker 1, resize 65% & drop shadow. Position bottom right hand corner. Repeat with Tree Cupcake 2 and position next to your first element.
Copy and paste Garland 2, resize 75%, rotate right 90 & drop shadow. Position on the left hand side of your frame. Repeat with Garland 1. Copy and paste Decoration, resize 65% & drop shadow. Position top left hand side of your frame.
Copy and paste Lollipop 1, resize 50% & drop shadow. Positon bottom left hand corner. Repeat with Lollipop 6, resizing 45% and position next to your other Lollipop.
Copy and paste your tube, resize as necessary & drop shadow. Copy and paste Decoration 2 & drop shadow. Position along the bottom.
Copy and paste Lights, resize 85% & drop shadow. Position along the bottom as well.
Copy and paste your selected word art, resize as necessary (40% and then 35% for mine). I then added the following gradient glow. Select all/float/defloat/modify/contract 6/invert and then add the same noise effect as used before. Select none and drop shadow. Position top right hand corner.

X out white background, merge visible. Open white background, resize to your liking (I have used 500x500).
Add copyright and name on your tag. I have used Santa's Sleigh, Size 60, color black, then added the same effects I did on the word art with the gradient glow, noise and drop shadow.
Save and you are done.
I hope you have enjoyed my tutorial.
Pls feel free to experiment and use my tutorial as a guide.
Monday, December 19, 2011
Tutorial using my "Christmas Cookies" Tagger Size Kit
2:10 PM | Posted by
Shal |
Edit Post

My dearest friend tweety wrote this great tutorial using my "Christmas Cookies" Tagger Size Kit. I absolutely love it ! Just gorgeous ! Thanks so much my sweet friend. You can find the tutorial here.
Sunday, December 18, 2011
9:48 PM | Posted by
Shal |
Edit Post

Sally Gilroy created this gorgeous tag using my Color Me Happy Tagger Size Kit. Thanks so much my friend it's just gorgeous !
Tutorial using my "Christmas Cheer" Tagger Size Kit
9:30 PM | Posted by
Shal |
Edit Post

Crystal from Crystal's Creations wrote this gorgeous tutorial using my Christmas Cheer Tagger Size Kit. You can find the tutorial on her blog here. Thanks so much .. I love it !
Tags using my "Christmas Cheer" Tagger Size Kit
9:04 PM | Posted by
Shal |
Edit Post

Lesia at Deadly Desire Tagz created this gorgeous set of extras using my Christmas Cheer Tagger Size Kit. You can find the complete set on her blog here. Thanks so much .. these are gorgeous !

K'Lani at Tutorials by K'Lani created this gorgeous tag using my Christmas Cheer Tagger Size Kit as well. Thanks so much .. I love it !

K'Lani at Tutorials by K'Lani created this gorgeous tag using my Christmas Cheer Tagger Size Kit as well. Thanks so much .. I love it !
Saturday, December 17, 2011
Steampunk Christmas Tut
8:27 PM | Posted by
Shal |
Edit Post

Feel free to use my tutorial as a guide and have fun giving it your own spin.
This tutorial assumes you have a working knowledge of PSP.
Needed Supplies :
Tube of Choice .. I am using the work of Caron Vinson which you must have a license to use. Please do not use her work without purchasing through CDO here.
Scrap Kit of Choice .. I have used a PTU Kit from Tootypup called "Vintage Christmas Steampunk" which can be purchased here.
Mask of Choice .. I have used WSL_Mask74 by weescotslass which can be downloaded here.
Font of Choice .. Steampunk
Let's get started
New image 600x600 and floodfill with white. New raster layer, select all, paste into selection Paper 2. Select none. New mask layer from image, WSL_Mask76, invert transparency unchecked, and merge group. Layer duplicate & merge down both mask layers.
New raster layer, select all, paste into selection Paper 10. Select none. New mask layer from image, WSL_Mask366, invert transparency unchecked, and merge group. Resize 115%.
Duplicate twice and rename your layers Mask 1,2 and 3. On your first Mask layer apply Dsb Flux/Bright Noise/65. On your 2nd layer, apply bright noise again, hitting mix twice. On your 3rd layer, apply again hitting mix 3 times. If you are deciding not to animate, skip this part of the tutorial
Copy and paste Bronze Gear 4 & resize 65%. Using your magic wand, select the center portion of your frame, selections modify/expand 5, copy and paste Paper 9 below your frame layer, resize 65%, selections invert and hit delete. Select none and drop shadow your frame. I have used 2/2/40/4 throughout.
Copy and paste Clock 7, resize 50% & drop shadow. Position along the top of your frame. Copy and paste Christmas Carol 7, resize 40% & drop shadow. Position bottom right hand corner.
Copy and paste Christmas Bauble 7, resize 65% & drop shadow. I then trimmed the top part of the chain and positioned on the left hand side. Copy and paste Holly 4, resize 15%, flip & drop shadow. Position at the top of your bauble chain.
Copy and paste your tube, mirror & resize if necessary & drop shadow. Copy and paste Deco 1, resize 50% & drop shadow. Position along the bottom.
At this point if you need to, resize your tag. I have used 500x500. Add your copyright and name. I have used Steampunk, size 48, color #baa061. I then added a noise effect .. adjust/add remove noise/add noise/uniform monochrome checked/50% and added a size 8 fat color #5d2520 gradient glow followed by drop shadow.
If you are choosing not to animate, then you can save your tag.
To animate, close off Mask Layers 2 & 3 (the lil eye icon in your layer palette), Edit/Copy Merged and paste as new animation in Animation Shop. Close off Mask Layer 1 and open Mask Layer 2, Edit/Copy Merged and paste after current frame in AS. Close off Mask Layer 2 and open Mask Layer 3, Edit/Copy Merged and paste after current frame in AS.
Save as a gif.
I hope you have enjoyed my tutorial.
Pls feel free to experiment and use my tutorial as a guide.
Please feel free to send me your results.
I'd love to see what you came up with.
Girls Just Wanna Have Fun Tut
4:14 PM | Posted by
Shal |
Edit Post

Feel free to use my tutorial as a guide and have fun giving it your own spin.
This tutorial assumes you have a working knowledge of PSP.
Needed Supplies :
Tube of Choice .. I am using the work of Rebelle Doll which you must have a license to use. Please do not use this work without purchasing through SNC here.
Scrap Kit of Choice .. I have used a FTU Kit from Fantasy Moments "Amazonia" which can be downloaded here.
Mask of Choice .. I have used WSL_Mask74 by weescotslass which can be downloaded here.
Word art of Choice .. I have used word art by Aussie Scrap Designs which can be downloaded here.
Font of Choice .. Cutie Pie
Let's get started
New image 600x600 and floodfill with white. New raster layer, select all, paste into selection Paper 30. Select none. New mask layer from image, WSL_Mask74, invert transparency unchecked, and merge group. Resize 105%.
Copy and paste Element 17 & resize 20%. Using the following Mura's Meister/Copies setting, create a flower frame & then resize 90%.

Select all/float/defloat and apply the following Xenofex/Constellation setting.
Using your magic wand, select the center portion of your frame, selections modify/expand 15, copy and paste Paper 14 below your frame layers, selections invert and hit delete. Copy and paste Element 35, resize 75% & hit delete. Select none and drop shadow your frame & raindrops layers. I have used 2/2/40/4 throughout.
Copy and paste Element 21, resize 30% & drop shadow. Position bottom left hand corner of your frame. Repeat with Element 22 & 23 and position next to your first bow flower.
Copy and paste Element 70, resize 50% & drop shadow. Positiom bottom centre of your frame. Copy and paste Element 4, resize 75% & drop shadow. Position in the centre of yoru bow. Copy and paste Element 58, resize 65%, mirror & drop shadow. Position top right hand corner.
Copy and paste your tube, resize as necessary & drop shadow.
Copy and paste Element 72, resize 50% & drop shadow. Position bottom right hand corner.
Copy and paste your Word art and I then added a size 3 fat white gradient glow followed by drop shadow.
X out white background, merge visible. Open white background, resize to your liking (I have used 500x500).
Add copyright and name on your tag. I have used CutiePie, Size 60, color black, then added the same gradient and drop shadow as with the word art.
Save and you are done.
I hope you have enjoyed my tutorial.
Pls feel free to experiment and use my tutorial as a guide.
This tutorial assumes you have a working knowledge of PSP.
Needed Supplies :
Tube of Choice .. I am using the work of Rebelle Doll which you must have a license to use. Please do not use this work without purchasing through SNC here.
Scrap Kit of Choice .. I have used a FTU Kit from Fantasy Moments "Amazonia" which can be downloaded here.
Mask of Choice .. I have used WSL_Mask74 by weescotslass which can be downloaded here.
Word art of Choice .. I have used word art by Aussie Scrap Designs which can be downloaded here.
Font of Choice .. Cutie Pie
Let's get started
New image 600x600 and floodfill with white. New raster layer, select all, paste into selection Paper 30. Select none. New mask layer from image, WSL_Mask74, invert transparency unchecked, and merge group. Resize 105%.
Copy and paste Element 17 & resize 20%. Using the following Mura's Meister/Copies setting, create a flower frame & then resize 90%.

Select all/float/defloat and apply the following Xenofex/Constellation setting.

Using your magic wand, select the center portion of your frame, selections modify/expand 15, copy and paste Paper 14 below your frame layers, selections invert and hit delete. Copy and paste Element 35, resize 75% & hit delete. Select none and drop shadow your frame & raindrops layers. I have used 2/2/40/4 throughout.
Copy and paste Element 21, resize 30% & drop shadow. Position bottom left hand corner of your frame. Repeat with Element 22 & 23 and position next to your first bow flower.
Copy and paste Element 70, resize 50% & drop shadow. Positiom bottom centre of your frame. Copy and paste Element 4, resize 75% & drop shadow. Position in the centre of yoru bow. Copy and paste Element 58, resize 65%, mirror & drop shadow. Position top right hand corner.
Copy and paste your tube, resize as necessary & drop shadow.
Copy and paste Element 72, resize 50% & drop shadow. Position bottom right hand corner.
Copy and paste your Word art and I then added a size 3 fat white gradient glow followed by drop shadow.
X out white background, merge visible. Open white background, resize to your liking (I have used 500x500).
Add copyright and name on your tag. I have used CutiePie, Size 60, color black, then added the same gradient and drop shadow as with the word art.
Save and you are done.
I hope you have enjoyed my tutorial.
Pls feel free to experiment and use my tutorial as a guide.
Monday, December 12, 2011
Let It Snow Tut
7:42 PM | Posted by
Shal |
Edit Post
Feel free to use my tutorial as a guide and have fun giving it your own spin.
This tutorial assumes you have a working knowledge of PSP.
Needed Supplies :
Tube of Choice .. I am using the work of Ismael Rac which you must have a license to use. Please do not use his work without purchasing through here.
Scrap Kit of Choice .. I have used a PTU kit from Alika called "Dark Side of the Icicle" which can be purchased here.
Mask of Choice .. I have used WSL_Mask84 & Vix_Mask 306 which can be downloaded here & here.
Font of Choice .. Snowblind
Let's get started
New image 600x600 and floodfill with white. New raster layer, select all, paste into selection Paper 7. New mask layer from image, WSL_Mask84, invert transparency unchecked, and merge group.
New raster layer, select all, paste into selection Paper 13. Select none. New mask layer from image, Vix_Mask306, invert transparency unchecked, and merge group. Layer duplicate, flip & merge down both mask layers.
Duplicate twice and rename your layers Mask 1,2 and 3. On your first Mask layer apply the following Xenofex/Constellation. If you are deciding not to animate, skip this part of the tutorial.
On your first Mask layer apply Dsb Flux/Bright Noise/65. On your 2nd layer, apply bright noise again, hitting mix twice. On your 3rd layer, apply again hitting mix 3 times.
Copy and paste Element 65 & resize 85%. Using your magic wand, select the center portion of your frame, selections modify/expand 5, copy and paste Paper 4 below your frame layers, selections invert and hit delete. Select none and drop shadow your frame. I have used 2/2/40/4 throughout.
Copy and paste Element 15, mirror & drop shadow. Position on the left hand side of your frame. Copy and paste Element 75, mirror & drop shadow. Position on the right hand side of your frame.
Copy and paste your tube, resize as necessary & drop shadow. Copy and paste Element 4, resize 50%, mirror & drop shadow. Position towards the bottom. Repeat with Element 3. Repeat with Element 49 (skipping the mirror).
Copy and paste Element 40, resize 65% & drop shadow. Position along the bottom going up the right hand side. Copy and paste Element 23 & drop shadow. Position towards the bottom. Layer duplicate & flip. Drag this layer below your tube layer and position along the top of your frame.
Copy and paste Element 78, resize 50%, add a size 3 fat white gradient glow followed by drop shadow. Position top right hand corner.
Copy and paste Element 80, resize 65% & drop shadow. Position bottom right hand corner.
At this point if you need to, resize your tag. I have used 500x500. Add your copyright and name. I have used Snowblind, size 60, color black. I then added a noise effect .. adjust/add remove noise/add noise/random monochrome checked/65% and added the same gradient glow and drop shadow as with the word art.
If you are choosing not to animate, then you can save your tag.
To animate, close off Mask Layers 2 & 3 (the lil eye icon in your layer palette), Edit/Copy Merged and paste as new animation in Animation Shop. Close off Mask Layer 1 and open Mask Layer 2, Edit/Copy Merged and paste after current frame in AS. Close off Mask Layer 2 and open Mask Layer 3, Edit/Copy Merged and paste after current frame in AS.
Save as a gif.
I hope you have enjoyed my tutorial.
Pls feel free to experiment and use my tutorial as a guide.
Please feel free to send me your results.
I'd love to see what you came up with.
Subscribe to:
Posts (Atom)
Kits & Tuts


Blogs I Love


