About Me
My hobbies are PSP.
I love helping my friends who are starting with PSP.
Any similarity or resemblance to any other tutorial is purely coincidental and unintentional. Pls do not recopy my tutorials anywhere. Many thanks Susan.


Credit

Blinkie created by Rabid Designz. She does some amazing work ! Thanks so much Melissa.

Blinkie created by my long time friend tweety here. Thanks so much my friend :)
My blog was designed By Alika's Scraps. Thanks so much. You did an amazing job !

Showing posts with label KatNKDA. Show all posts
Showing posts with label KatNKDA. Show all posts
Monday, January 14, 2013
 Collector of Hearts Tut
11:11 AM | Posted by
Shal |
 Edit Post

Feel free to use my tutorial as a guide and have fun giving it your own spin.
This tutorial assumes you have a working knowledge of PSP.
Needed Supplies :
Tube of Choice .. I am using the work of Angelica S. which you must have a license to use. Please do not use her work without purchasing at SATC here. This image is called "Heart Collector".
Scrap Kit of Choice .. I have used a gorgeous PTU kit from Angelica S. called "Mystique" which you can purchase at SATC here.
Mask of Choice .. I have used Mask mask02PSP.png which is included with your scrap kit.
Font of Choice .. Cutie Pop
Let's get started
Open Mask mask02PSP.png in PSP and minimize. New image 600x600 and floodfill with white.
New raster layer, select all, copy and paste Paper 13, select none. Layer/new mask layer/from image, select your mask in the drop down menu, source luminance ticked & invert mask data checked. Merge group.
Image resize and resize your mask layer 125%.
Repeat mask application using Paper 14 and resizing 115%, then rotate right 45. Copy and paste Element 55 & drop shadow. I have used 2/2/40/4 throughout.
Copy and paste Element 12 and resize 85%. Using your magic wand, select the center portion of your frame, selections modify/expand 5, copy and paste Paper 5 below your frame layer, resize 50%, selections invert and hit delete. Copy and paste your tube of choice, resize as necessary & hit delete. Change blend mode to luminance legacy and reduce opacity to 85%. Select none & drop shadow your frame.
Copy and paste Element 20 above your frame layer, resize 65% & drop shadow. Position bottom right hand corner. Repeat with Element 62 and position along the top of your frame. Copy and paste Element 38 & drop shadow. Position on the right hand side.
Copy and paste Element 47, drop shadow and position along the bottom of your frame.
Copy and paste Element 46, mirror, resize 65% & drop shadow. Position bottom left hand corner. Copy and paste Element 6, resize 25% & drop shadow. Position on the left hand side of your frame. Copy and paste Element 53, resize 50% & drop shadow. Position bottom left hand corner.
Copy and your tube, resize to your liking & drop shadow. Position on the right hand side of your frame.
X out white background, merge visible. Open white background, resize to your liking (I have used 500x500).
Add copyright and name on your tag. I have used Cutie Pop, Size 60, Color #640101. Adjust/add remove noise/add noise/uniform monochrome checked/50% and then added the following gradient glow & then dropshadow.

Save and you are done.
I hope you have enjoyed my tutorial.
Pls feel free to experiment and use my tutorial as a guide.
Friday, February 11, 2011
Angel Heart to Heart Tut
7:45 PM | Posted by
Shal |
Edit Post

Feel free to use my tutorial as a guide and have fun giving it your own spin.
This tutorial assumes you have a working knowledge of PSP.
Needed Supplies & Filters :
Tube of Choice .. I am using the work of KatNKDA which you must have a license to use. Please do not use her work without purchasing through her store here.
Scrap Kit of Choice .. I have used a gorgeous PTU scrap kit by KatNKDA called "Heart to Heart" which you can purchase through her store here.
Mask of Choice .. I haved used one of KatNKDA's masks included in the kit (mask01).
Word art of Choice .. I have used word art by Aussie Scrappers which you can download here.
Font of Choice .. I have used Pointed Brush.
Let's get started
New image 600x600 and floodfill with white. New raster layer, select all, copy and paste into selection Paper 5. Select none.
Open mask01.png in PSP. Layer/new mask layer from image/select your mask/source luminance & invert mask data checked. Merge group. Resize 125%.
Adjust/add remove noise/uniform monochrome checked/50%.
New raster layer, select all, copy and paste into selection Paper 12. Select none. Layer/new mask layer from image/select your mask/source luminance & invert mask data checked. Merge group. Resize 115% and drop shadow. I have used 2/2/40/4 throughout.
New raster layer, select all, copy and paste into selection Overlay 1. Select none & resize 85%.
Copy and paste Element 69 and resize 45% twice. Using your magic wand, select the center portion of your frame, selections modify/expand 2. Copy and paste Paper 14 below your frame layer, resize 40% twice, selections invert and hit delete. Select none & drop shadow your frame.
Copy and paste Element 39, resize 50% twice & drop shadow.
Copy and paste Element 63, resize 35% twice, mirror & drop shadow. Position bottom right hand corner.
Copy and paste Element 1, resize 40% twice, rotate left 90 & drop shadow. Position top right hand corner of your frame. Layer duplicate and mirror.
Copy and paste Element 7, resize 40% twice & drop shadow. Position bottom right hand corner. Layer duplicate & mirror.
Copy and paste Element 9, resize 40% twice & drop shadow. Position bottom left hand corner. Layer duplicate, resize 65% & position a lil lower of your first flower.
Copy and paste Element 12, resize 35% twice & drop shadow. Position above your other flowers.
Copy and paste Element 81, resize 40% twice & drop shadow. Position bottom right hand corner.
Copy and paste your tube, resize as necessary & drop shadow.
X out white background, merge visible. Open white background, resize to your liking (I have used 500x500).
Copy and paste your word art. Adjust color balance/manual color correction from black to #561a27. Add the following gradient glow & then drop shadow.

Add copyright and your name. I have used Pointed Brush, Size 48, color #561a27 and then added the same gradient glow & drop shadow as the word art.
Save and you are done.
I hope you have enjoyed my tutorial. Pls feel free to experiment and use my tutorial as a guide.
Please feel free to send me your results. I'd love to see what you came up with.
Monday, January 31, 2011
Love Is Tut
4:29 PM | Posted by
Shal |
Edit Post

Feel free to use my tutorial as a guide and have fun giving it your own spin.
This tutorial assumes you have a working knowledge of PSP.
Needed Supplies & Filters :
Tube of Choice .. I am using the work of Jennifer Nilsson (http://www.jenniferlnilsson.com) which you must have a license to use. Please do not use her work without purchasing through My Tag Art here.
Scrap Kit of Choice .. I have used a gorgeous FTU scrap kit from Scraps Dimensions called "Sweet Valentine" which can be downloaded here.
Mask of Choice .. I haved used WSL_Mask160 by weescotslass which can be downloaded here.
Template of Choice .. I have used Template #4 also from Scraps Dimensions which can be downloaded here.
Font of Choice .. Pointed Brush
Let's get started
Open your template in PSP & delete credits. Floodfill your background layer with white.
New raster layer just above your background layer. Select all, copy and paste into selection Paper 2. Select none. New mask layer from image, WSL_Mask160, invert transparency unchecked. Merge group. Resize 120%.
Copy and paste Doodle, resize 85% & drop shadow. I have used 2/2/40/4 throughout. Position on the right hand side. Layer duplicate & resize 85%. Position a lil lower on the same side.
Select Raster 2 layer, select all/float/defloat, copy and paste Paper 6, selections invert and hit delete. Select none and delete original Raster 2 layer.
Add the following gradient glow & then drop shadow.

Select Raster 3 layer, select all/float/defloat, copy and paste Paper 10, selections invert and hit delete. Select none and delete original Raster 3 layer.
Select Raster 4 layer, select all/float/defloat, copy and paste Paper 5, selections invert and hit delete. Select none and delete original Raster 4 layer. Add drop shadow.
Select Raster 5 layer, select all/float/defloat, copy and paste Paper 2, selections invert and hit delete. Select none and delete original Raster 5 layer. Add drop shadow.
Select Raster 7 layer, select all/float/defloat, copy and paste Paper 9, selections invert and hit delete. Select none and delete original Raster 7 layer.
Select Raster 6 layer, select all/float/defloat, copy and paste Paper 8, selections invert and hit delete. Select none and delete original Raster 6 layer.
Select Raster 9 layer. Adjust color balance/manual color correction from black to #bd104a. Adjust/add remove noise/monochrome uniform checked/50%. Add the same gradient glow and drop shadow as before.
Select Raster 10 layer. Adjust color balance/manual color correction from dark gray to #ec5c8f. Adjust/add remove noise/monochrome random checked/50%. Add gradient glow and drop shadow.
Copy and paste branch, resize 85%, rotate left 15 & drop shadow. Position on the left hand side.
Copy and paste Heart 1, resize 40% & drop shadow. Position hanging from the rectangular frame.
Copy and paste your tube, resize 85%, mirror & drop shadow.
Copy and paste Envelope & resize 50%. Using your magic wand, select the center portion of the envelope frame, selections modify/expand 3. Copy and paste your image below your envelope frame layer, resize image as necessary, selections invert and hit delete. Select none.
Merge down the Envelope frame & image and then drop shadow. Rotate right 15 and position bottom right hand corner.
Copy and paste Valentine's Candy, resize 65% & drop shadow. Position bottom left hand corner.
X out white background, merge visible. Open white background, resize to your liking (I have used 500x500).
Add copyright and name on your tag. I have used Pointed Brush, Size 60, color #da2e67. I then added a noise effect (adjust/add remove noise/monochrome uniform checked/50%) and then added the same gradient glow & drop shadow as before.
Save and you are done.
For a lil extra twist, I added a bling to my finished tag.
The bling I have used is from KatNKDA's Member's group. Any bling will work, the only difference will be the amount of layers.
Open your bling & finished tag (.jpg with white background) in Animation shop. Check how many layers your bling has .. mine had 4 .. so you need to duplicate your tag until you have 4 layers also (edit/duplicate selected). Select your bling, select all & copy. Edit/propagate paste. Select your tag, select all, edit/paste into selection and position your bling on your tag where you would like it to be.
View animation to see if positioning is to your liking. If your bling has movement, you may have to undo and redo to position to where it flows well, or even resize your bling before starting. Save as gif.
I hope you have enjoyed my tutorial. Pls feel free to experiment and use my tutorial as a guide.
Please feel free to send me your results. I'd love to see what you came up with.
Please feel free to send me your results. I'd love to see what you came up with.

Wednesday, October 27, 2010
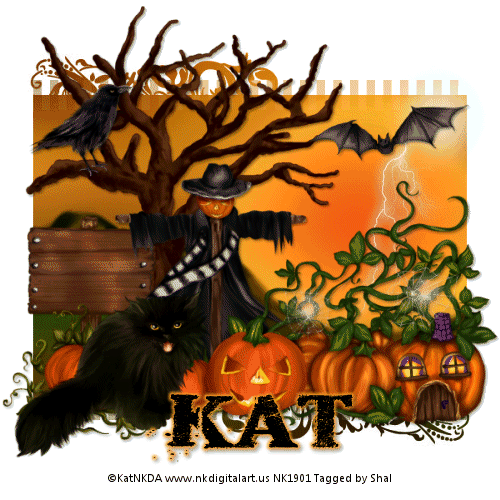
The Pumpkin Patch Tut
10:45 PM | Posted by
Shal |
Edit Post
Feel free to use my tutorial as a guide and have fun giving it your own spin.
This tutorial assumes you have a working knowledge of PSP.
Needed Supplies & Filters :
Tube of Choice .. I am using the work of KatNKDA which you must have a license to use. Please do not use her work without purchasing through her store here.
Scrap Kit of Choice .. I have used a gorgeous PTU scrap kit by KatNKDA called "It's Pumpkin Time" which you can purchase through her store here.
Mask of Choice .. I haved WSL_Mask355 used which can be downloaded here.
Font of Choice .. I have used Dead Secretary
Let's get started
New image 600x600 and floodfill with white.
Copy and paste background 2 and resize 50%. New mask layer from image, WSL_Mask355, invert transparency unchecked. Merge group.
Duplicate the layer twice and rename your layers Lightning 1, 2 and 3. Select your first layer and apply lightning with the following settings.
Pls note depending on where you want your lightning start, you will see on the preview of where the lightning will be applied, there is 2 lil circles with an X in them. You may move these about so that you can place where your lightning will start and finish. I usually like to position a lil inside my image that way it doesn't go over the edge of it.
Select your 2nd lightning layer and apply effect again hitting random seed.
Select your last lightning layer and apply effect again hitting random seed again. Select none. If you decide not to animate your tag, then just skip the duplicate twice and lightning portions of this tut.
Copy and paste Element 26, resize 30% & drop shadow. I have used 2/2/40/4 throughout. Position on the left hand side. Copy and paste Element 25, resize 30% twice & drop shadow. Position standing on one of the branches.
Copy and paste Element 2, resize 40% twice and drop shadow. Position bottom left hand corner.
Copy and paste Element 6, resize 40% twice & drop shadow. Position at the base of your tree. Copy and paste Element 1, resize 40% twice & drop shadow. Position bottom left hand corner.
Copy and paste the pumpkin house included with your cat tubes, resize 40% twice & drop shadow. Position bottom right hand corner.
Copy and paste Element 4, resize 40% twice, mirror & drop shadow. Position next to your pumpkin house tube.
Copy and paste your cat tube, resize 35% twice, mirror & drop shadow. Position in front of your pumpkins.
Copy and paste Element 27, resize 40% twice & drop shadow. Position top right hand side at the top of the sun.
At this point if you need to, resize your tag. I have used 500x500. Add your copyright and name. I have used Dead Secretary Size 48 black and then added a size 4 medium color #ffa127 gradient glow & drop shadow.
If you are choosing not to animate, then you can save your tag.
To animate, close off Lightning Layer 2 & 3 (the lil eye icon in your layer palette), Edit/Copy Merged and paste as new animation in Animation Shop. Close off Lightning Layer 1 and open Lightning Layer 2, Edit/Copy Merged and paste after current frame in AS. Close off Lightning Layer 2 and open Lightning Layer 3, Edit/Copy Merged and paste after current frame in AS.
You may want to view your animation and decide if you wish to slow down the speed of your lightning. To do this Edit/Select All and then animation/frame properties. I have set mine for 30.
Save as a gif.
I hope you have enjoyed my tutorial. Pls feel free to experiment and use my tutorial as a guide.
This tutorial assumes you have a working knowledge of PSP.
Needed Supplies & Filters :
Tube of Choice .. I am using the work of KatNKDA which you must have a license to use. Please do not use her work without purchasing through her store here.
Scrap Kit of Choice .. I have used a gorgeous PTU scrap kit by KatNKDA called "It's Pumpkin Time" which you can purchase through her store here.
Mask of Choice .. I haved WSL_Mask355 used which can be downloaded here.
Font of Choice .. I have used Dead Secretary
Let's get started
New image 600x600 and floodfill with white.
Copy and paste background 2 and resize 50%. New mask layer from image, WSL_Mask355, invert transparency unchecked. Merge group.
Duplicate the layer twice and rename your layers Lightning 1, 2 and 3. Select your first layer and apply lightning with the following settings.

Pls note depending on where you want your lightning start, you will see on the preview of where the lightning will be applied, there is 2 lil circles with an X in them. You may move these about so that you can place where your lightning will start and finish. I usually like to position a lil inside my image that way it doesn't go over the edge of it.
Select your 2nd lightning layer and apply effect again hitting random seed.
Select your last lightning layer and apply effect again hitting random seed again. Select none. If you decide not to animate your tag, then just skip the duplicate twice and lightning portions of this tut.
Copy and paste Element 26, resize 30% & drop shadow. I have used 2/2/40/4 throughout. Position on the left hand side. Copy and paste Element 25, resize 30% twice & drop shadow. Position standing on one of the branches.
Copy and paste Element 2, resize 40% twice and drop shadow. Position bottom left hand corner.
Copy and paste Element 6, resize 40% twice & drop shadow. Position at the base of your tree. Copy and paste Element 1, resize 40% twice & drop shadow. Position bottom left hand corner.
Copy and paste the pumpkin house included with your cat tubes, resize 40% twice & drop shadow. Position bottom right hand corner.
Copy and paste Element 4, resize 40% twice, mirror & drop shadow. Position next to your pumpkin house tube.
Copy and paste your cat tube, resize 35% twice, mirror & drop shadow. Position in front of your pumpkins.
Copy and paste Element 27, resize 40% twice & drop shadow. Position top right hand side at the top of the sun.
At this point if you need to, resize your tag. I have used 500x500. Add your copyright and name. I have used Dead Secretary Size 48 black and then added a size 4 medium color #ffa127 gradient glow & drop shadow.
If you are choosing not to animate, then you can save your tag.
To animate, close off Lightning Layer 2 & 3 (the lil eye icon in your layer palette), Edit/Copy Merged and paste as new animation in Animation Shop. Close off Lightning Layer 1 and open Lightning Layer 2, Edit/Copy Merged and paste after current frame in AS. Close off Lightning Layer 2 and open Lightning Layer 3, Edit/Copy Merged and paste after current frame in AS.
You may want to view your animation and decide if you wish to slow down the speed of your lightning. To do this Edit/Select All and then animation/frame properties. I have set mine for 30.
Save as a gif.
I hope you have enjoyed my tutorial. Pls feel free to experiment and use my tutorial as a guide.
Sunday, October 17, 2010
Immortal Tut
9:35 PM | Posted by
Shal |
Edit Post

Feel free to use my tutorial as a guide and have fun giving it your own spin.
This tutorial assumes you have a working knowledge of PSP.
Needed Supplies & Filters :
Tube of Choice .. I am using the work of KatNKDA which you must have a license to use. Please do not use her work without purchasing through her store here.
Scrap Kit of Choice .. I have used a gorgeous PTU scrap kit by KatNKDA called "Immortal" which you can purchase through her store here.
Mask of Choice .. I haved used WSL_Mask255 which can be downloaded here.
Font of Choice .. I have used Morpheus
Let's get started
New image 600x600 and floodfill with white.
New raster layer just above your background layer. Select all, copy and paste into selection Paper 13. Select none. New mask layer from image, WSL_Mask255, invert transparency unchecked. Merge group.
Copy and paste Element 15, resize 75% & drop shadow. I have used 2/2/40/4 throughout.
Copy and paste Element 114, resize 40% twice & drop shadow. Position top righ hand corner. Layer duplicate, mirror & flip.
Copy and paste Element 100, resize 40% twice & drop shadow. Position bottom centre.
Copy and paste Element 11 & resize 45% twice. Using your magic wand, select the center portion of your frame, selections modify/expand 5. Copy and paste Paper 8 below your frame layer, resize 40% twice, selections invert and hit delete. Copy and paste your tube, resize as necessary & hit delete. Select none, merge down your frame, tube & background layers, rotate left 5 & drop shadow. Position top left hand corner.
Copy and paste Element 69, resize 30% & drop shadow. Position on the left hand side of your frame. Copy and paste Element 118, resize 30% & drop shadow. Position so it appears the wolf charm is hanging from the jewel.
Copy and paste Element 83, resize 40% twice & drop shadow. Position bottom centre of your frame.
Copy and paste Element 56, resize 40% twice & drop shadow. Position bottom left hand corner. Repeat with Element 57, resizing 35% twice and position on top of your other leaves.
Copy and paste Element 50, resize 35% twice, rotate left 80 & drop shadow. Position the rose lying on your leaves. Layer duplicate, resize 85% and move over a bit of your other rose.
Copy and paste your full length tube, resize if necessary, drop shadow and position on the right hand side.
Copy and paste Element 65, resize 30% twice & drop shadow. Position bottom right hand corner.
X out white background, merge visible. Open white background, resize to your liking (I have used 500x500).
Add copyright and your name. I have used Morpheus, Size 60, color black and then added a size 5 fat color #770000 gradient glow, followed by a size 5 fat black gradient glow and then drop shadow.
Save and you are done.
I hope you have enjoyed my tutorial. Pls feel free to experiment and use my tutorial as a guide.
Please feel free to send me your results. I'd love to see what you came up with.
Wise Fall Tut
4:24 PM | Posted by
Shal |
Edit Post

Feel free to use my tutorial as a guide and have fun giving it your own spin.
This tutorial assumes you have a working knowledge of PSP.
Needed Supplies & Filters :
This tutorial assumes you have a working knowledge of PSP.
Needed Supplies & Filters :
Tube of Choice .. I am using the work of KatNKDA which you must have a license to use. Please do not use her work without purchasing through her store here.
Scrap Kit of Choice .. I have used a gorgeous PTU scrap kit by KatNKDA called "Almost Autumn" which you can purchase through her store here.
Mask of Choice .. I haved used one of KatNKDA's masks included in the kit (mask01PSP).
Font of Choice .. I have used Gwendolyn Bold
Let's get started
New image 600x600 and floodfill with white. New raster layer, select all, copy and paste into selection Paper 3. Select none.
Open mask01PSP.png in PSP. Layer/new mask layer from image/select your mask/source luminance & invert mask data checked. Merge group. Resize 110%.
Repeat with paper 8 but not resize.
Copy and paste Element 73, resize 25% & drop shadow. I have used 2/2/40/4 throughout. Position top left hand corner.
Copy and paste Element 72, resize 25%, mirror & drop shadow. Position bottom right hand corner.
Copy and paste Element 1 & resize 25%. Using your magic wand, select the center portion of your frame, selections modify/expand 5. Copy and paste Paper 15 below your frame layer, resize 20%, selections invert and hit delete. Select none, merge down your frame & background layers, rotate left 15 & drop shadow.
Copy and paste Element 22, resize 35% twice & drop shadow. Position bottom left hand corner.
Copy and paste Element 7 & resize 20%. Using your magic wand, select the center portion of your frame, selections modify/expand 5. Copy and paste Paper 4 below your frame layer, resize 20%, selections invert and hit delete. Select none, merge down your frame & background layers, rotate right 15 & drop shadow.
Copy and paste your tube & resize 40% twice.
Copy and paste Element 61, resize 35% & drop shadow. Position bottom right hand corner.
Copy and paste Element 2, resize 30% twice & drop shadow. Position bottom left hand corner of your last frame.
Copy and paste Element 37, resize 30%/50% & drop shadow. Position sitting on the leaves.
Copy and paste Element 4, resize 30% twice & drop shadow. Position bottom right hand corner. Copy and paste Element 3, resize 25% twice & drop shadow. Position next to your blue leaves.
Copy and paste Element 27, resize 25% twice & drop shadow. Position at the stem of your leaves.
Copy and paste Element 29, resize 25% & drop shadow. Position top right hand corner.
X out white background, merge visible. Open white background, resize to your liking (I have used 500x500).
Add copyright and your name. I have used Gwendolyn Bold, Size 60, color #702804 and then added noise (adjust/add noise/gaussian & mono checked/65%). I then added the following gradient glow and then drop shadow.

Save and you are done.
I hope you have enjoyed my tutorial. Pls feel free to experiment and use my tutorial as a guide.
Please feel free to send me your results. I'd love to see what you came up with.
Monday, September 6, 2010
Kat's Taurus Tut
12:31 PM | Posted by
Shal |
Edit Post

Feel free to use my tutorial as a guide and have fun giving it your own spin.
This tutorial assumes you have a working knowledge of PSP.
Needed Supplies & Filters :
Tube of Choice .. I am using the work of KatNKDA which you must have a license to use. Please do not use her work without purchasing through her store here.
Scrap Kit of Choice .. I have used a gorgeous PTU scrap kit from KatNKDA's new Zodiac Series called "Taurus" which you can purchase through her store here.
Mask of Choice .. I haved used WSL_Mask74 which can be downloaded here.
Font of Choice .. WaterBrushROB
Let's get started
New image 600x600 and floodfill with white. New raster layer, select all, copy and paste into selection Paper 3. Select none. New mask layer from image, WSL_Mask74, invert transparency unchecked. Merge group.
Copy and paste Element 23, resize 40% and then 45% & drop shadow. I have used 2/2/40/4 throughout.
Copy and paste Element 27, resize 40% twice & drop shadow. Position top centre of your frame.
Copy and paste Element 1, resize 40% twice, image/flip/mirror & drop shadow. Position top centre of your frame.
Copy and paste Element 10, resize 40% twice, image/mirror, rotate left 40 & drop shadow. Position bottom right corner of your frame.
Copy and paste Element 25, resize 40% twice & drop shadow. Position bottom left corner. Layer duplicate and move to top right corner.
Copy and paste Element 7, resize 35% twice & drop shadow. Position bottom left hand corner. Repeat with Element 9 & position next to your first flower. Copy and paste Element 11, resize 25% & drop shadow. Position above your other flowers.
Resize your Tube 75% and drop shadow. I used the Tagger size version of the tube.
Copy and paste Element 58, resize 35% twice & drop shadow. Position on your animal, see my tag for placement. Copy and paste Element 2, resize 35% twice, image/mirror, rotate right 15 & drop shadow. Position towards the bottom of the silk drop.
Copy and paste Element 39, resize 40% twice & drop shadow. Position on your silk drop. Copy and paste Element 14, resize 25% twice, rotate left 25 & drop shadow. Position at the top of your tag.
Copy and paste Element 19 above your mask layer, resize 40% twice & drop shadow. Position bottom right corner.
X out white background, merge visible. Open white background, resize to your liking (I have used 500x500).
Add copyright and your name. I have used WaterBrushROB, Size 60, color #e15f81 and then added the following gradient glow and then drop shadow.

Save and you are done.
I hope you have enjoyed my tutorial. Pls feel free to experiment and use my tutorial as a guide.
Please feel free to send me your results. I'd love to see what you came up with.
Sunday, August 22, 2010
Treat For You Tut
7:20 PM | Posted by
Shal |
Edit Post

Feel free to use my tutorial as a guide and have fun giving it your own spin.
This tutorial assumes you have a working knowledge of PSP.
Needed Supplies & Filters :
Tube of Choice .. I am using the work of Keith Garvey which you must have a license to use. Please do not use his work without purchasing through My PSP Tubes here.
Scrap Kit of Choice .. I have used a gorgeous PTU Kit from KatNKDA called Ladies Night which can be purchased here.
Template of Choice .. I have used template 294 by Missy which can be downloaded from her blog here.
Mask of Choice .. I haved used WSL_Mask83 which can be downloaded here.
Font of Choice .. Waterbrush ROB
Let's get started
Open your template in PSP & delete credits, pixel words, suckers & raster 1 layers. Resize canvas size 700x700 & floodfill background layer with white.
New raster layer/ Select all, copy and paste into selection Paper 27. Select none. New mask layer from image, WSL_Mask83, invert transparency unchecked. Merge group. Layer duplicate and merge down both mask layers.
Select Oval layer, select all/float/defloat, copy and paste Paper 19, selections invert and hit delete. Copy and paste element 01 (see my tag for placement) & hit delete. Change blend mode to luminance for the eye layer. Merge down eye layer with new oval layer. Select none and delete original Oval layer.
I then added the following gradient glow and drop shadow. I have used 2/2/40/4 throughout.

Select Glittered oval layer, select all/float/defloat, copy and paste Paper 11, selections invert and hit delete. Select none and delete original Glittered oval layer. Add gradient glow & drop shadow.
Select Circle 1 layer. Adjust/add noise/random mono checked/50% & then drop shadow.
Select Circle 2 layer, select all/float/defloat, copy and paste Paper 27, resize 75%, selections invert and hit delete. Select none and delete original Circle 2 layer. Add gradient glow & drop shadow.
Select Shape layer and change color to black (adjust color balance/manual color correction/from original color to black). Then add gradient glow & drop shadow.
Select Heart layer and change color to black. Then add the same noise, gradient glow & drop shadow as before.
Select Small heart/Glittered hearts layers and change color from pink to #9b71c0.
Select Word art layer and add the following gradient glow and then drop shadow.

Copy and paste Element 35, resize 55%, rotate right 90 & drop shadow. Position nicely over your circle area on the right hand side. See my tag for placement.
Copy and paste Element 20 above mask layer & add gradient glow & then drop shadow.
At this point I decided to resize to 500x500. If you prefer you can wait till the end to do this and resize the rest of the elements accordingly.
Copy and paste Tube, resize 85% & drop shadow. Position on the right hand side.
Copy and paste Element 18, resize 40% & drop shadow. Position bottom left hand side.
Copy and paste Element 16 below your tube layer, resize 30% & drop shadow. Position at the top of your circle. Copy and paste Element 29, resize 40% & drop shadow. Position on your other bow.
Add copyright and your name. I have used Waterbrush ROB Size 72 black and then added the first gradient glow we used and then drop shadow.
Save and you are done.
I hope you have enjoyed my tutorial. Pls feel free to experiment and use my tutorial as a guide.
Please feel free to send me your results. I'd love to see what you came up with.
Saturday, July 31, 2010
Angelic Fairy Tut
6:06 AM | Posted by
Shal |
Edit Post

Feel free to use my tutorial as a guide and have fun giving it your own spin.
This tutorial assumes you have a working knowledge of PSP.
Needed Supplies & Filters :
Tube of Choice .. I am using the work of Caron Vinson which you must have a license to use. Please do not use her work without purchasing through CILM here.
Scrap Kit of Choice .. I have used a gorgeous PTU scrap kit by KatNKDA called Angelic which you can purchase here.
Mask of Choice .. I haved used Vix_Mask363 by Vix which can be downloaded here.
Font of Choice .. Pointed Brush
Filters used .. Dsb Flux/Bright Noise & Eye Candy/Gradient Glow
Let's get started
New image 600x600 and floodfill with white. New raster layer, select all, paste into selection Paper 10. Select none. New mask layer from image, Vix_Mask363, invert transparency unchecked, and merge group.
Copy and paste Element 2 and resize 85%. Using your magic wand, select the center portion of your frame, selections modify/expand 6. Copy and paste Paper 14 below your frame layer, resize 75%, selections invert and hit delete. Select none. Add drop shadow to your frame. I have used 2/2/40/4 throughout.
Merge down your frame and background layers. Rotate left 10.
Copy and paste Element 3 and resize 85%. Using your magic wand, select the center portion of your frame, selections modify/expand 6. Copy and paste Paper 13 below your frame layer, resize 75%, selections invert and hit delete. Select none. Add drop shadow to your frame.
Merge down your frame and background layers. Rotate right 10.
Copy and paste Element 20, resize 65% & drop shadow. Postion top left hand corner of your frame.
Copy and paste your tube, resize as necessary and drop shadow. Center your tube on your top frame.
Copy and paste Element 30 above your mask layer. Resize 75% and position on the right hand side. Add Dsb Flux/Bright Noise/35%. Layer duplicate & mirror. Position on the left hand side towards the bottom corner.
Copy and paste Element 08, resize 75%, rotate right 10 & drop shadow. Position along the bottom of your frame.
Copy and paste Element 10 & drop shadow. Position towards the bottom right hand corner of your frame. Trim the long end of the rope if necessary.
Copy and paste Element 1, resize 75% & drop shadow. Position along the bottom of your frame.
Copy and paste Element 17, resize 65% & drop shadow. Position along the bottom of your frame over your leaves and ribbon. Layer duplicate & resize 65%. Position top right hand corner of your frame.
Copy and paste Element 11, resize 75% & drop shadow. Postion bottom left hand corner of your frame. Copy and paste Element 12, resize 65% & drop shadow. Position next to your other flower.
X out white background, merge visible. Open white background, resize to your liking (I have used 500x500).
Add copyright and your name. I have used Pointed Brush, Size 48, color #4ba8b6e and then added the same bright noise as used earlier. I then added a size 3 fat white gradient glow and then drop shadow.
Save and you are done.
I hope you have enjoyed my tutorial. Pls feel free to experiment and use my tutorial as a guide.
Please feel free to send me your results. I'd love to see what you came up with.
Sunday, July 4, 2010
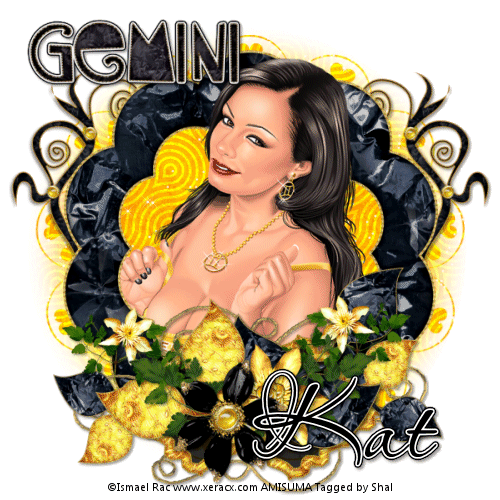
Playful Gemini Tut
10:46 PM | Posted by
Shal |
Edit Post
Feel free to use my tutorial as a guide and have fun giving it your own spin.
This tutorial assumes you have a working knowledge of PSP.
Needed Supplies & Filters :
Tube of Choice .. I am using the work of Ismael Rac which you must have a license to use. I am licensed through Artistic Minds Inc. but they are now closed. You can now find Ismael's artwork licensed through his own store. Pls do not use his work without purchasing through here.
Scrap Kit of Choice .. I have used a gorgeous PTU scrap kit from KatNKDA's new Zodiac Series called "Gemini" which you can purchase through her store here.
Mask of Choice .. I haved used WSL_Mask352 which can be downloaded here.
Font of Choice .. Passions Conflict Rob
Let's get started
New image 600x600 and floodfill with white. New raster layer, select all, copy and paste into selection Paper 6. Select none. New mask layer from image, WSL_Mask352, invert transparency unchecked. Merge group.
Duplicate twice and rename your layers Mask 1,2 and 3. On your first Mask layer apply the following Xenofex/Constellation.

Apply the same effects to your next Mask layer and hit random once. Apply again to your last Mask layer hitting random twice. Select none. If you decide not to animate your tag, then just skip the duplicate twice.
Copy and paste Element 4 & resize 45% twice. Using your magic wand, select the center portion of your frame, selections modify/expand 6, selections invert.
Copy and paste below your frame your tube & resize 75%. Layer duplicate and drag this layer above your frame. On the tube layer below you frame, hit delete. Select none. Select the tube layer above your frame and erase the bottom portion of the tube so it appears to be coming out of your frame. Drop shadow your frame. I have used 2/2/40/4 throughout.
Copy and paste Element 48 just above your mask layers, resize 40% twice & drop shadow. Position on the right hand side. Layer duplicate and mirror.
Select your top tube layer. Copy and paste Element 10, resize 35% twice & drop shadow. Position bottom centre.
Copy and paste Element 45, resize 40% twice & drop shadow. Position top the right of bottom centre. Copy and paste Element 46, resize 40% twice, mirror & drop shadow. Position to the left of bottom centre.
Copy and paste Element 23, resize 35% twice & drop shadow. Position bottom left hand side a lil above your leaves. Layer duplicate & mirror.
Copy and paste Element 26, resize 30% twice & drop shadow. Position to the left of bottom centre. Layer duplicate & mirror.
Copy and paste Element 27, resize 30% twice & drop shadow. Position to the right of bottom centre. Copy and paste Element 29, resize 40% twice & drop shadow. Position next to your other flower.
Copy and paste your selected Word art & resize 40% twice. I then added the following gradient glow and then drop shadow.

At this point if you need to, resize your tag. I have used 500x500. Add your copyright and name. I have used Passions Conflict Rob, size 72 black and added the same gradient glow and drop shadow as before.
If you are choosing not to animate, then you can save your tag.
To animate, close off Mask layer 2 & 3 (the lil eye icon in your layer palette), Edit/Copy Merged and paste as new animation in Animation Shop. Close off Mask layer 1 and open Mask layer 2, Edit/Copy Merged and paste after current frame in AS. Close off Mask layer 2 and open Mask layer 3, Edit/Copy Merged and paste after current frame in AS.
Save as gif.
I hope you have enjoyed my tutorial.
Pls feel free to experiment and use my tutorial as a guide.
Please feel free to send me your results.
Subscribe to:
Posts (Atom)
Kits & Tuts


Blogs I Love


