About Me
My hobbies are PSP.
I love helping my friends who are starting with PSP.
Any similarity or resemblance to any other tutorial is purely coincidental and unintentional. Pls do not recopy my tutorials anywhere. Many thanks Susan.


Credit

Blinkie created by Rabid Designz. She does some amazing work ! Thanks so much Melissa.

Blinkie created by my long time friend tweety here. Thanks so much my friend :)
My blog was designed By Alika's Scraps. Thanks so much. You did an amazing job !

Saturday, October 24, 2009
 Fairy Licious Tut
11:19 PM | Posted by
Shal |
 Edit Post

Feel free to use my tutorial as a guide and
have fun giving it your own spin.
This tutorial assumes you have a working knowledge of PSP.
Needed Supplies & Filters :
Tube of Choice .. I am using the gorgeous work of Caron Vinson which you must have a license to use. Please do not use this work without purchasing through CILM here.
have fun giving it your own spin.
This tutorial assumes you have a working knowledge of PSP.
Needed Supplies & Filters :
Tube of Choice .. I am using the gorgeous work of Caron Vinson which you must have a license to use. Please do not use this work without purchasing through CILM here.
Scrap Kit of Choice .. I have used a gorgeous PTU kit from Bits n Bobs called Babe A Licious,which can be purchased here.
Mask of Choice .. I have used zuzzanna_mask07 which can be downloaded from her blog here.
Font of Choice .. I have used Gwendolyn Bold.
Let's get started !
Open your mask. New image 600x600. Floodfill with white. New raster layer, select all, copy and paste into selection Paper 4.
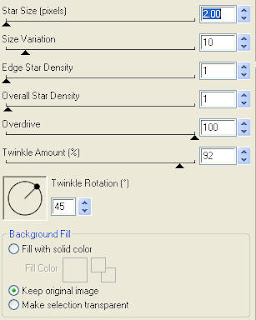
New mask layer from image, zuzzanna_mask07, invert mask data unchecked, and merge group. Duplicate twice and rename layers Mask 1, Mask 2 & Mask 3. On your first mask layer apply the following Constellation :

Apply the same Constellation to your next mask layer and hit random once. Apply again to your last mask layer hitting random twice. If you decide not to animate your tag, then just skip the duplicate twice.
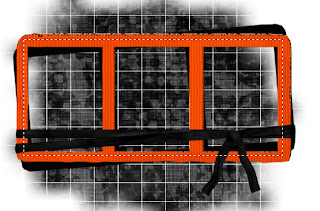
Copy and paste Frame 4 and resize 85%.
Using your magic wand, select the middle of your frames. Copy and paste your paper of choice, selections invert and hit delete. Do not deselect. Drag this layer below your frame layer. Copy and paste your selected tube(s) and hit delete. Select none.
You can select all 3 frame areas at once and then use the same paper, or you can do as I did and select one frame area at a time and use different papers for each. I have used Papers 8-9-10.
Drop shadow your frame. I have used 2/2/40/4 throughout.
Select your top mask layer. Copy and paste Fairy dust 1 and position top left hand side. Layer duplicate and flip, layer duplicate and mirror, and finally layer duplicate flip.
Copy and paste Doodle Bling 2, image mirror and position top left hand corner. Copy and paste Doodle Bling 3, image flip and position bottom right hand corner.
Copy and paste Doodle 3 and position bottom left hand corner. Layer duplicate, image mirror and position a lil higher.
Copy and paste Bow 4, resize 50% and drop shadow. Position in the middle of your frames.
Copy and paste Butterfly 2, resize 50% and drop shadow. Position top left hand side. Copy and paste Butterfly 3, resize 50%, drop shadow and image mirror. Position towards the bottom right hand corner.
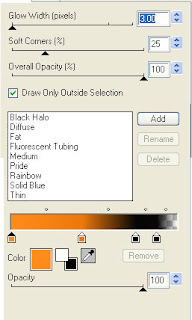
At this point if you need to, resize your tag. I have used 500x500. Add your copyright and name. I have used Gwendolyn Bold with the following gradient glow and then drop shadowed.

If you are choosing not to animate, then you can save your tag.
To animate, close off Mask Layer 2 & 3 (the lil eye icon in your layer palette), Edit/Copy Merged and paste as new animation in Animation Shop. Close off Mask Layer 1 and open Mask Layer 2, Edit/Copy Merged and paste after current frame in AS. Close off Mask Layer 2 and open Mask Layer 3, Edit/Copy Merged and paste after current frame in AS. Save as a gif.
I hope you have enjoyed my tutorial.
Pls feel free to experiment and use my tutorial as a guide.
Please feel free to send me your results.
I'd love to see what you came up with.
Gorjuss Boo Tut
9:20 PM | Posted by
Shal |
Edit Post

Feel free to use my tutorial as a guide and
have fun giving it your own spin.
This tutorial assumes you have a working knowledge of PSP.
Needed Supplies & Filters :
Tube of Choice .. I am using the work of Suzanne Woolcott which you must have a license to use. Please do not use her work without purchasing through her site here.
Scrap Kit of Choice .. I have used a gorgeous PTU kit from Cora called Haunted Mansion which be purchased here.
Mask of Choice .. I have used zuzzanna_mask07
which can be downloaded from her blog here.
Font of Choise .. I have used Impact.
Let's get started !
Open your mask in PSP. New image 600x600. Floodfill with white.
Copy and paste Paper 1. New mask layer from image, zuzzanna_mask07, invert mask data unchecked, and merge group.
Copy and paste Paper 1. New mask layer from image, zuzzanna_mask07, invert mask data unchecked, and merge group.
Copy and paste Frame 01 and resize 85%. Using your magic or your selection tool, select the middle part of your frame. Copy and paste Paper 5, resize 85%, selections invert and delete. Drag this layer below your frame layer. Drop shadow your frame. I have used 2/2/40/4 throughout.
Copy and paste Lights, resize 50%, layer duplicate mirror and position these to your liking within your frame. Erase the portion of the strings that overlap over the top of your frame.
Copy and paste Mesh 01, resize 50%, layer duplicate, mirror and position your mesh layers in your top corners of your frame.
Copy and paste Bat, resize 50%, rotate left 15 and drop shadow. Position top left hand side.
Copy and paste your tube and drop shadow.
Copy and paste Stars, resize 75%, image flip and mirror, position bottom of your frame. Drop shadow.
Copy and paste Mansion and resize 50%. I've added the following gradient glow and then drop shadow.

Copy and paste Spider web, resize 50% and drop shadow. Drag this layer just above your mask layer and duplicate. Position both Spider webs to your liking.
Copy and paste Word Art 2, image rotate right 25% and drop shadow. Position top right hand corner.
X out white background, merge visible.
Open white background, resize to your liking (I used 500x500).
Add copyright & Add your name. I used Impact and added the same gradient glow and drop shadow as before.
Save and you are done.
I hope you have enjoyed my tutorial.
Please feel free to send me your results.
I'd love to see what you came up with.
Thursday, October 22, 2009
Xeracx Stalkers Fall FTU Scrap Kit
5:55 PM | Posted by
Shal |
Edit Post

Xeracx Stalkers Fall FTU Scrap Kit
The Stalkers forum hosted their first themed scrap kit challenge and here is my portion. Other portions are available on the forum.
If you haven't already done so, pls join the Stalkers forum here.
It's a wonderful place with many great things happening.
Kit includes 18 papers and 62 elements.
It is FTU but pls do not share or upload anywhere.
Pls direct your friends to download here if they like it.
You can download it through Rapidshare here.
Saturday, October 17, 2009
Dark Night Tut
12:18 AM | Posted by
Shal |
Edit Post
 Feel free to use my tutorial as a guide and
have fun giving it your own spin.
This tutorial assumes you have a working knowledge of PSP.
Needed Supplies & Filters :
Tube of Choice .. I am using the work of KatNKDA which you must have a license to use. Please do not use her work without purchasing through her store here. I am licensed through Artistic Minds Inc. but they are now closed.
Scrap Kit of Choice .. I have used a gorgeous PTU Kit from KatNKDA called Ravenclaw which was purchased through Artistic Minds Inc. who are now closed. The kit is currently unavailable.
Scrap Kit of Choice .. I have used a gorgeous PTU Kit from KatNKDA called Ravenclaw which was purchased through Artistic Minds Inc. who are now closed. The kit is currently unavailable.
Font of Choice .. I have used Pendulum.
Let's get started !
Open element30maskedbg (included in your scrap kit elements). New image 600x600. Floodfill with white. New layer, select all, copy and paste Paper 9 into selection. Select none.
New mask layer from image, element30maskedbg, invert mask data unchecked, and merge group. Duplicate layer, merge both mask layers down and resize 85%.
Copy and paste element 07 and resize 65%. Using your magic select the middle of your frame. Modify expand by 6. Copy and paste Paper 8, resize 50%, selections/invert and hit delete. Select none.
Duplicate the layer twice and rename your layers Lightning 1, 2 and 3. Select your first layer and apply lightning with the following settings.
 Pls note depending on where you want your lightning start, you will see on the preview of where the lightning will be applied, there is 2 lil circles with an X in them. You may move these about so that you can place where your lightning will start and finish. I usually like to position a lil inside my image that way it doesn't go over the edge of it.
Select your 2nd lightning layer and apply effect again hitting random seed.
Select your last lightning layer and apply effect again hitting random seed again. If you decide not to animate your tag, then just skip the duplicate twice and lightning portions of this tut.
Add drop shadow to your frame. I have used 2/2/40/4 throughout.
Copy and paste element 05, resize 40%, drop shadow, rotate left 90 and position on the bottom. Copy and paste element 03, resize 40%, drop shadow and position on the left side.
Copy and paste element 20, resize 30% and position top right.
Copy and paste full size tube, mirror and drop shadow.
Copy and paste element 14, resize 40%, drop shadow and position bottom left. Copy and paste element 10, resize 50%, drop shadow and position a lil higer on the bottom right. You may need to adjust where you position the bird depending on your name and font you use.
Resize 500 x 500. Add your copyright and name. I have used Pendulum size 72 with the following gradient glow and drop shadow.

If you are choosing not to animate, then you can save your tag.
To animate, close off Lightning Layer 2 & 3 (the lil eye icon in your layer palette), Edit/Copy Merged and paste as new animation in Animation Shop. Close off Lightning Layer 1 and open Lightning Layer 2, Edit/Copy Merged and paste after current frame in AS. Close off Lightning Layer 2 and open Lightning Layer 3, Edit/Copy Merged and paste after current frame in AS.
You may want to view your animation and decide if you wish to slow down the speed of your lightning. To do this Edit/Select All and then animation/frame properties. I have set mine for 30.
Save as a gif.
I hope you have enjoyed my tutorial.
Pls feel free to experiment and use my tutorial as a guide.
Please feel free to send me your results.
I'd love to see what you came up with.
Friday, October 16, 2009
Rac Drive Me Crazy Tut
6:50 PM | Posted by
Shal |
Edit Post
 Feel free to use my tutorial as a guide and
have fun giving it your own spin.
This tutorial assumes you have a working knowledge of PSP.
Needed Supplies & Filters :
Tube of Choice .. I am using the work of Ismael Rac which you must have a license to use. I am licensed through Artistic Minds Inc. but they are now closed. You can now find Ismael's artwork licensed through his own store. Pls do not use his work without purchasing through here.
Scrap Kit of Choice .. I have used a gorgeous PTU kit from KatNKDA called Girlish, which can be purchased here.
Mask of Choice .. I have used zuzzanna_mask07
which can be downloaded from her blog here.
Word Art of Choice .. I have used word art from Lilmama which can be downloaded from her blog here.
Font of Choice .. I have used Comic Sans MS.
Let's get started !
Open your mask. New image 600x600. Floodfill with white. New layer, select all, copy and paste Paper 12 into selection. Select none.
New mask layer from image, zuzzanna_mask07, invert mask data unchecked, and merge group. Resize 90% and to add a lil sparkle, add the following Xenofex/Constellation settings.

Copy and paste Frame 01. Using your magic select all the open areas of your frame. If you find it easier, use your free hand selection tool to select around the area. Copy and paste Paper 10, resize 50%, selections/invert and hit delete. Do no deselect.
Copy and paste tube and resize 85%. Layer duplicate. Make certain you have one layer above your frame layer and one below.
Hit delete on the tube layer that is below your frame layer. Select none. I also trimmed the longer ribbon a piece. Drop shadow your frame. I have used 2/2/40/4.
On your tube layer that is above your frame to make it appear your tube is coming out of the frame.
Copy and paste Element 03, resize 50% and position bottom right. Copy and paste Element 4, resize 40% and position top left. Merge down both element layers.
Duplicate twice and rename layers Doodle 1, Doodle 2 & Doodle 3. On yourDoodle layer apply Dsb flux/bright noise/intensity 30/mix checked.
Apply the same bright noise to your next doodle layer and mix twice. Apply again to your last doodle layer hitting mix 3 times. If you decide not to animate your tag, then just skip the duplicate twice and bright noise portions of this tut.
Copy and paste Element 1, resize 20% and dark shadow. Position above your bow. Layer duplicate and resize 65%. Position a lil next to the first flower.
Copy and paste word art of your choice and resize as required. I applied the following gradient glow and then dark shadow.
 Resize 500x500. Add copyright and your name. I have used Comic Sans MS size 36 and added the same gradient glow and drop shadow as my word art.
If you are choosing not to animate, then you can save your tag.
To animate, close off Doodle Layer 2 & 3 (the lil eye icon in your layer palette), Edit/Copy Merged and paste as new animation in Animation Shop. Close off Doodle Layer 1 and open Doodle Layer 2, Edit/Copy Merged and paste after current frame in AS. Close off Doodle Layer 2 and open Doodle Layer 3, Edit/Copy Merged and paste after current frame in AS. Save as a gif.
I hope you have enjoyed my tutorial.
Pls feel free to experiment and use my tutorial as a guide.
Please feel free to send me your results.
I'd love to see what you came up with.
Wednesday, October 14, 2009
Rac Happy Halloween
1:16 PM | Posted by
Shal |
Edit Post
Feel free to use my tutorial as a guide and
have fun giving it your own spin.
This tutorial assumes you have a working knowledge of PSP.
Needed Supplies & Filters :
Tube of Choice .. I am using the work of Ismael Rac which you must have a license to use. I am licensed through Artistic Minds Inc. but they are now closed. You can now find Ismael's artwork licensed through his own store. Pls do not use his work without purchasing through here.
Scrap Kit of Choice .. I have used a gorgeous PTU kit from Black Cat called Halloween Mash, which can be purchased at Artistic Minds Inc. here.
Mask of Choice .. I have used WSL_Mask84 which can be downloaded from weescotslass here.
Filters required ... Dsb Flux (Bright Noise) & Animation Shop
Font of Choice .. I have used Jilly Nilly.
Let's get started !
New Image 600x600 and floodfill with white. Open your mask in PSP.
Copy and paste Paper 16. New mask layer from image, WSL_Mask84, invert mask data unchecked, and merge group.
Copy and paste Frame 1 and resize 75%. Using your magic wand, select all the areas in the middle of your frames and selections/modify/expand 5. Copy and paste Paper 2, selections invert and hit delete. Do not deselect.
Copy and paste your tube of choice, position under your frame and hit delete. Change blend mode of your tube layer to luminance. Drop shadow your frame. I have used 2/2/40/4 throughout.
Merge down your tube and background and then merge down your frame. Move this over to the left a bit.
Copy and paste your full size tube, drop shadow and position to the right. Copy and paste tree and position behind your tube on the right.
Copy and paste Bat, resize 50%, image rotate right 15 and position in your tree.
Copy and paste Beads 1, resize 75%, drop shadow and position on the bottom.
Copy and paste Word Art 2, resize 85%, position towards the bottom and duplicate twice. Rename layers Word art 1,2 and 3. On your first word art layer, apply dsb flux/bright noise/intensity 20/mix checked. Apply the same bright noise on your 2nd word art layer and hit mix twice. Apply again on your 3rd word art layer and hit mix three times. If you decide not to animate your tag, then just skip the duplicate twice.
Resize your tag 500x500. Add copyright and your name. I have used Jilly Nilly size 60 black with the following gradient glow and then drop shadow.
If you are choosing not to animate, then you can save your tag.
To animate, close off Word Art layer 2 & 3 (the lil eye icon in your layer palette), Edit/Copy Merged and paste as new animation in Animation Shop. Close off Word Art Layer 1 and open Word Art Layer 2, Edit/Copy Merged and paste after current frame in AS. Close off Word Art Layer 2 and open Word Art Layer 3, Edit/Copy Merged and paste after current frame in AS. Save as a gif.
I hope you have enjoyed my tutorial.
Pls feel free to experiment and use my tutorial as a guide.
Please feel free to send me your results.
I'd love to see what you came up with.
have fun giving it your own spin.
This tutorial assumes you have a working knowledge of PSP.
Needed Supplies & Filters :
Tube of Choice .. I am using the work of Ismael Rac which you must have a license to use. I am licensed through Artistic Minds Inc. but they are now closed. You can now find Ismael's artwork licensed through his own store. Pls do not use his work without purchasing through here.
Scrap Kit of Choice .. I have used a gorgeous PTU kit from Black Cat called Halloween Mash, which can be purchased at Artistic Minds Inc. here.
Mask of Choice .. I have used WSL_Mask84 which can be downloaded from weescotslass here.
Filters required ... Dsb Flux (Bright Noise) & Animation Shop
Font of Choice .. I have used Jilly Nilly.
Let's get started !
New Image 600x600 and floodfill with white. Open your mask in PSP.
Copy and paste Paper 16. New mask layer from image, WSL_Mask84, invert mask data unchecked, and merge group.
Copy and paste Frame 1 and resize 75%. Using your magic wand, select all the areas in the middle of your frames and selections/modify/expand 5. Copy and paste Paper 2, selections invert and hit delete. Do not deselect.
Copy and paste your tube of choice, position under your frame and hit delete. Change blend mode of your tube layer to luminance. Drop shadow your frame. I have used 2/2/40/4 throughout.
Merge down your tube and background and then merge down your frame. Move this over to the left a bit.
Copy and paste your full size tube, drop shadow and position to the right. Copy and paste tree and position behind your tube on the right.
Copy and paste Bat, resize 50%, image rotate right 15 and position in your tree.
Copy and paste Beads 1, resize 75%, drop shadow and position on the bottom.
Copy and paste Word Art 2, resize 85%, position towards the bottom and duplicate twice. Rename layers Word art 1,2 and 3. On your first word art layer, apply dsb flux/bright noise/intensity 20/mix checked. Apply the same bright noise on your 2nd word art layer and hit mix twice. Apply again on your 3rd word art layer and hit mix three times. If you decide not to animate your tag, then just skip the duplicate twice.
Resize your tag 500x500. Add copyright and your name. I have used Jilly Nilly size 60 black with the following gradient glow and then drop shadow.

If you are choosing not to animate, then you can save your tag.
To animate, close off Word Art layer 2 & 3 (the lil eye icon in your layer palette), Edit/Copy Merged and paste as new animation in Animation Shop. Close off Word Art Layer 1 and open Word Art Layer 2, Edit/Copy Merged and paste after current frame in AS. Close off Word Art Layer 2 and open Word Art Layer 3, Edit/Copy Merged and paste after current frame in AS. Save as a gif.
I hope you have enjoyed my tutorial.
Pls feel free to experiment and use my tutorial as a guide.
Please feel free to send me your results.
I'd love to see what you came up with.
Monday, October 12, 2009
A new award !!!
11:07 PM | Posted by
Shal |
Edit Post

What a great surprise !!! The amazing Patty from Sunspotpp's Place and that I met on the Stalker forum gave me this "juicy" award !!!
I'm supposed to pass it on to 3 others, so I will pass it to 3 equally amazing ladies ...
tweety of Tweety's Tutorials
Julie of BitsnBobs
Sharon of Dolly's Tag World
Have a great day ladies !
I'm supposed to pass it on to 3 others, so I will pass it to 3 equally amazing ladies ...
tweety of Tweety's Tutorials
Julie of BitsnBobs
Sharon of Dolly's Tag World
Have a great day ladies !
Friday, October 9, 2009
Spooktacular Tut
6:50 PM | Posted by
Shal |
Edit Post
 Feel free to use my tutorial as a guide and
have fun giving it your own spin.
This tutorial assumes you have a working knowledge of PSP.
Needed Supplies & Filters :
Tube of Choice .. I am using the work of Chrissy Clark which you must have a license to use. Please do not use her work without purchasing through My Tag Art here.
Pls note mine is licensed through AMI where her art was previously sold.
Scrap Kit of Choice .. I have used a gorgeous PTU scrapkit from Cora called Spooktacular, which you may purchase here.
Mask of Choice .. I have used WSL_Mask84 which can be downloaded from weescotslass here.
Filters required ... Xenofex (Constellation) & Animation Shop
Font of Choice .. I have used CK Mystery.
Let's get started !
New Image 600x600 and floodfill with white. Open your mask in PSP.
Copy and paste Textured Paper 5. New mask layer from image, WSL_Mask84, invert mask data unchecked, and merge group.
Duplicate twice and rename layers Mask 1, Mask 2 & Mask 3. On your first mask layer apply the following Constellation :

Apply the same Constellation to your next mask layer and hit random once. Apply again to your last mask layer hitting random twice. If you decide not to animate your tag, then just skip the duplicate twice.
Copy and paste Tree, resize 65% and drop shadow with a light gray.
I have used 2/2/40/4 throughout the rest with color black.
Copy and paste Fog and position towards the top. Layer duplicate and image flip.
Copy and paste Frame 5 and resize 65%. Using your magic wand, select all the areas in the middle of your frames and selections/modify/expand 5. Copy and paste Paper 10, selections invert and hit delete. Do not deselect.
Copy and paste your selected tubes and hit delete. Select none. Drop shadow your frame.
Copy and paste Black Cat, resize 30%, rotate right 15 and drop shadow. Position bottom right side. Copy and paste Bat, resize 30% and drop shadow. Position top left side. Layer duplicate, mirror and position lower on the right side.
Copy and paste Moon, resize 30% and drop shadow. Position top right side. Copy and paste Spider 1, resize 30% and drop shadow. Position on the left side of your frame as if the spider is hanging from it.
Copy and paste Skeleton 2, resize 50% and drop shadow. Drag this layer so it sits just above your fog layers. Position so it appears the skeleton is peeking out from behind your frame.
At this point if you need to, resize your tag. I have used 500x500. Add your copyright and name. I have used CK Mystery black size 60 with the following gradient glow.
 If you are choosing not to animate, then you can save your tag.
To animate, close off Mask Layer 2 & 3 (the lil eye icon in your layer palette), Edit/Copy Merged and paste as new animation in Animation Shop. Close off Mask Layer 1 and open Mask Layer 2, Edit/Copy Merged and paste after current frame in AS. Close off Mask Layer 2 and open Mask Layer 3, Edit/Copy Merged and paste after current frame in AS. Save as a gif.
I hope you have enjoyed my tutorial.
Pls feel free to experiment and use my tutorial as a guide.
Please feel free to send me your results.
I'd love to see what you came up with.
Friday, October 2, 2009
Rac Goblins & Witches
8:06 PM | Posted by
Shal |
Edit Post
Feel free to use my tutorial as a guide and
have fun giving it your own spin.
This tutorial assumes you have a working knowledge of PSP.
Needed Supplies & Filters :
Tube of Choice .. I am using the work of Ismael Rac which you must have a license to use. I am licensed through Artistic Minds Inc. but they are now closed. You can now find Ismael's artwork licensed through his own store. Pls do not use his work without purchasing through here.
Scrap Kit of Choice .. I have used my 2nd scrap kit which was is part of the Ghost Train Blog Train and you can download it from my blog here.
Mask of Choice .. I have used WSL_Mask84 which can be downloaded from weescotslass here.
Word Art of Choice .. I have used word art from Caitlin at Cupcake Sprinkles which can be downloaded from her blog here.
Image of Choice .. I have used one I found searching for haunted houses from stock.xchng here.
Filters required ... Xenofex (Constellation) & Animation Shop
Font of Choice .. I have used Satanick Regular.
Let's get started !
New Image 600x600 and floodfill with white. Open your mask in PSP.
Copy and paste Textured Paper 10. New mask layer from image, WSL_Mask84, invert mask data unchecked, and merge group.
Duplicate twice and rename layers Mask 1, Mask 2 & Mask 3. On your first mask layer apply the following Constellation :
Apply the same Constellation to your next mask layer and hit random once. Apply again to your last mask layer hitting random twice. If you decide not to animate your tag, then just skip the duplicate twice.
Copy and paste Cluster Frame 5. Using your magic wand, select all the areas in the middle of your frames and selections/modify/expand 5. Copy and paste your image, selections invert and hit delete. Selections none and move the image layer below your frame layer. Drop shadow your frame. I have used 2/2/40/4 throughout.
Copy and paste Bat, resize 59% and drop shadow. Position top left hand side. Layer duplicate and mirror. Position a lil lower.
Copy and paste Grain Lace Curly Ribbon 4, resize 50%, image/rotate/left 90 and drop shadow. Position bottom left of your frame. Copy and paste Grain Lace Curly Ribbon 5, resize 50%, image/rotate/left 90 and drop shadow. Position just above the other ribbon.
Copy and paste Double Bow 5, resize 40%, image/rotate/left 10 and drop shadow. Position above your ribbons.
Copy and paste your selected Word Art and resize 50%. I have then added an orange gradient glow size 3 and drop shadow.
Add copyright.
Add your name .. I used Satanick Regular, Size 72 color black and added
the same gradient glow and drop shadow as before.
If you are choosing not to animate, then you can save your tag.
To animate, close off Mask Layer 2 & 3 (the lil eye icon in your layer palette), Edit/Copy Merged and paste as new animation in Animation Shop. Close off Mask Layer 1 and open Mask Layer 2, Edit/Copy Merged and paste after current frame in AS. Close off Mask Layer 2 and open Mask Layer 3, Edit/Copy Merged and paste after current frame in AS. Save as a gif.
I hope you have enjoyed my tutorial.
This kit is only my 2nd attempt and my 1rst participating in a Blog Train.
I do hope you find it usefull.
Pls feel free to experiment and use my tutorial as a guide.
Please feel free to send me your results.
I'd love to see what you came up with.
Thursday, October 1, 2009
Rac Happy Halloween
6:27 PM | Posted by
Shal |
Edit Post

Feel free to use my tutorial as a guide and
have fun giving it your own spin.
This tutorial assumes you have a working knowledge of PSP.
Needed Supplies & Filters :
Tube of Choice .. I am using the work of Ismael Rac which you must have a license to use. I am licensed through Artistic Minds Inc. but they are now closed. You can now find Ismael's artwork licensed through his own store. Pls do not use his work without purchasing through here.
Scrap Kit of Choice .. I have used a gorgeous PTU kit from KatNKDA called Halloween, which can be purchased here.
Mask of Choice .. I have used WSL_Mask84 which can be downloaded from her blog here.
Word Art of Choice .. I have used word art from Caitlin at Cupcake Sprinkles which can be downloaded from her blog here.
Font of Choice .. I have used Satanick Regular.
Let's get started !
Open your mask. New image 650x550. Floodfill with white. Copy and paste Paper 9.
New mask layer from image, WSL_Mask84, invert mask data unchecked, and merge group.
Copy and paste Element 23 and resize 75%. Using your selection tool, select an area similar to this :
Copy and paste Paper 7, selections invert and hit delete. Do not deselect.
Copy and paste your first tube in the right side window, resize accordingly and hit delete. Repeat for the left side window. Change blend mode to luminance. Drop shadow your frame. I have used 2/2/40/4 throughout.
Copy and paste your main tube above your frame layer and drop shadow.
Copy and paste Element 01, resize 65% and drop shadow. Move this layer just above your mask layer. Copy and paste Element 13, drop shadow and move this layer just below your tree layer to the right. Layer duplicate and image mirror.
Copy and paste Element 16, resize 30% and drop shadow. Position bottom right hand side of your frame.
Copy and paste Word Art, resize 40% and I have added an orange gradient glow size 3 and drop shadow. Position top left hand corner.
X out white background, merge visible.
Open white background, resize to your liking (I used a width of 600).
Add copyright & Add your name. I used Satanick Regular size 72 with Paper 9 as a pattern. I then added the same gradient glow and drop shadow as I have used on my word art.
Save and you are done.
I hope you have enjoyed my tutorial. Please feel free to send me your results. I'd love to see what you came up with.
have fun giving it your own spin.
This tutorial assumes you have a working knowledge of PSP.
Needed Supplies & Filters :
Tube of Choice .. I am using the work of Ismael Rac which you must have a license to use. I am licensed through Artistic Minds Inc. but they are now closed. You can now find Ismael's artwork licensed through his own store. Pls do not use his work without purchasing through here.
Scrap Kit of Choice .. I have used a gorgeous PTU kit from KatNKDA called Halloween, which can be purchased here.
Mask of Choice .. I have used WSL_Mask84 which can be downloaded from her blog here.
Word Art of Choice .. I have used word art from Caitlin at Cupcake Sprinkles which can be downloaded from her blog here.
Font of Choice .. I have used Satanick Regular.
Let's get started !
Open your mask. New image 650x550. Floodfill with white. Copy and paste Paper 9.
New mask layer from image, WSL_Mask84, invert mask data unchecked, and merge group.
Copy and paste Element 23 and resize 75%. Using your selection tool, select an area similar to this :

Copy and paste Paper 7, selections invert and hit delete. Do not deselect.
Copy and paste your first tube in the right side window, resize accordingly and hit delete. Repeat for the left side window. Change blend mode to luminance. Drop shadow your frame. I have used 2/2/40/4 throughout.
Copy and paste your main tube above your frame layer and drop shadow.
Copy and paste Element 01, resize 65% and drop shadow. Move this layer just above your mask layer. Copy and paste Element 13, drop shadow and move this layer just below your tree layer to the right. Layer duplicate and image mirror.
Copy and paste Element 16, resize 30% and drop shadow. Position bottom right hand side of your frame.
Copy and paste Word Art, resize 40% and I have added an orange gradient glow size 3 and drop shadow. Position top left hand corner.
X out white background, merge visible.
Open white background, resize to your liking (I used a width of 600).
Add copyright & Add your name. I used Satanick Regular size 72 with Paper 9 as a pattern. I then added the same gradient glow and drop shadow as I have used on my word art.
Save and you are done.
I hope you have enjoyed my tutorial. Please feel free to send me your results. I'd love to see what you came up with.
October Fun Tut
12:23 PM | Posted by
Shal |
Edit Post
 Feel free to use my tutorial as a guide and
have fun giving it your own spin.
This tutorial assumes you have a working knowledge of PSP.
Needed Supplies & Filters :
Tube of Choice .. I am using the work of Suzanne Woolcott which you must have a license to use. Please do not use her work without purchasing through her site here.
Scrap Kit of Choice .. I have used a gorgeous PTU kit from Cora called Autumn Orchard which be purchased here.
Mask of Choice .. I have used WSL_Mask84 Weescotslass which can be downloaded here.
Template of Choice .. I have used Template #5 from Melissa which can be downloaded from her blog here.
Word Art of Chocie .. I have used Autumn Word Art from Cupcake Sprinkles which can be downloaded from her blog here.
Font of Choise .. I have used Gwendolyn Bold.
Let's get started !
Open your mask and template in PSP, duplicate and close originals. Delete copyright layer and resize canvas to 600x600. To make it easier to see as you go, you may want to add a new layer white background.
Copy and paste Paper 1. New mask layer from image, WSL_Mask84, invert mask data unchecked, and merge group. Duplicate layer and merge down.
Now we will start filling our template layers. This is the part where you can play with different papers but the technique is the same.
Select Semi Circle layer, Select All, Float & Defloat. Copy and paste Paper 3, selections invert and hit delete. Delete original Semi Circle layer and select none. I then added a size 3 color #c2a8a0 gradient glow and a drop shadow. I have used 2/2/40/4 throughout.
Select Dark Rectangle layer, Select All, Float & Defloat. Copy and paste Paper 3, selections invert and hit delete. Delete original Dark Rectangle layer and select none. Add same gradient glow and drop shadow.
Select Light Rectangle layer, Select All, Float & Defloat. Copy and paste Paper 2, selections invert and hit delete. Delete original Light Rectangle layer and select none.
I choose to change the color of my Dotted Rectangle layer to #59942c. I use the adjust/color balance/manual color correction method, going from color #444444 to color #59942c.
Select Circle layer, Select All, Float & Defloat. Copy and paste Paper 1, selections invert and hit delete. Delete original Circle layer and select none.
I changed the color of my Dottec Circle layer to #3c2b19.
Select Circle Frame layer, Select All, Float & Defloat. Copy and paste Paper 3, selections invert and hit delete. Delete original Circle Frame layer and select none. Add same gradient glow and drop shadow.
Copy and paste Tree, resize 75% and drop shadow.
Select Frame Background layer, Select All, Float & Defloat. Copy and paste Paper 2, selections invert and hit delete. Delete original Light Rectangle layer and select none.
Select Frames layer, Select All, Float & Defloat. Copy and paste Paper 3, selections invert and hit delete. Delete original Frames layer and select none. Add same gradient glow and drop shadow.
Copy and paste Fence, resize 75% and drop shadow. Position a lil towards the bottom.
Copy and paste Apple, resize 30% and drop shadow. Position in the top left side frame. Layer duplicate and mirror. Position this one in the bottom right side frame.
Copy and paste Leaf 3, resize 65%, rotate left 15 and drop shadow. Layer duplicate and mirror.
Copy and paste Leaf 1, resize 20% and drop shadow. Position down at the bottom of your fence. Layer duplicate and mirror.
Copy and paste your tube and drop shadow. Copy and paste Basket, resize 40% and drop shadow. Position as though the lil girl is holding the basket.
Duplicate one of your apple layers and resize 65%. Position the apple just below your basket layer. Duplicate and position next to the other apple. I also duplicated and put a few apples in different spots.
Copy and paste Bow 3, resize 30% and drop shadow. Position at the top of your basket.
Copy and paste your preferred word art and resize accordingly. I changed the color of mine to #3c2c1c. I then added a gradient glow, this time using the color of my fence (#f5dfbf) , and drop shadow.
X out white background, merge visible.
Open white background, resize to your liking (I used 500x500).
Add copyright & Add your name. I used Gwendolyn Bold with the same color as my word art, gradient glow and drop shadow.
Save and you are done.
I hope you have enjoyed my tutorial.
Please feel free to send me your results.
I'd love to see what you came up with.
Subscribe to:
Posts (Atom)
Kits & Tuts


Blogs I Love


