About Me
My hobbies are PSP.
I love helping my friends who are starting with PSP.
Any similarity or resemblance to any other tutorial is purely coincidental and unintentional. Pls do not recopy my tutorials anywhere. Many thanks Susan.


Credit

Blinkie created by Rabid Designz. She does some amazing work ! Thanks so much Melissa.

Blinkie created by my long time friend tweety here. Thanks so much my friend :)
My blog was designed By Alika's Scraps. Thanks so much. You did an amazing job !
Leave Me A Message
Followers
My Blog List
Friday, October 2, 2009
 Rac Goblins & Witches
8:06 PM | Posted by
Shal |
 Edit Post
Feel free to use my tutorial as a guide and
have fun giving it your own spin.
This tutorial assumes you have a working knowledge of PSP.
Needed Supplies & Filters :
Tube of Choice .. I am using the work of Ismael Rac which you must have a license to use. I am licensed through Artistic Minds Inc. but they are now closed. You can now find Ismael's artwork licensed through his own store. Pls do not use his work without purchasing through here.
Scrap Kit of Choice .. I have used my 2nd scrap kit which was is part of the Ghost Train Blog Train and you can download it from my blog here.
Mask of Choice .. I have used WSL_Mask84 which can be downloaded from weescotslass here.
Word Art of Choice .. I have used word art from Caitlin at Cupcake Sprinkles which can be downloaded from her blog here.
Image of Choice .. I have used one I found searching for haunted houses from stock.xchng here.
Filters required ... Xenofex (Constellation) & Animation Shop
Font of Choice .. I have used Satanick Regular.
Let's get started !
New Image 600x600 and floodfill with white. Open your mask in PSP.
Copy and paste Textured Paper 10. New mask layer from image, WSL_Mask84, invert mask data unchecked, and merge group.
Duplicate twice and rename layers Mask 1, Mask 2 & Mask 3. On your first mask layer apply the following Constellation :
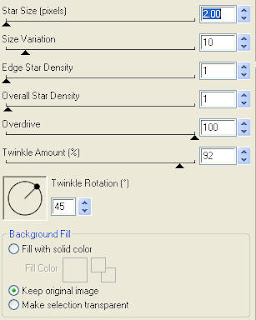
Apply the same Constellation to your next mask layer and hit random once. Apply again to your last mask layer hitting random twice. If you decide not to animate your tag, then just skip the duplicate twice.
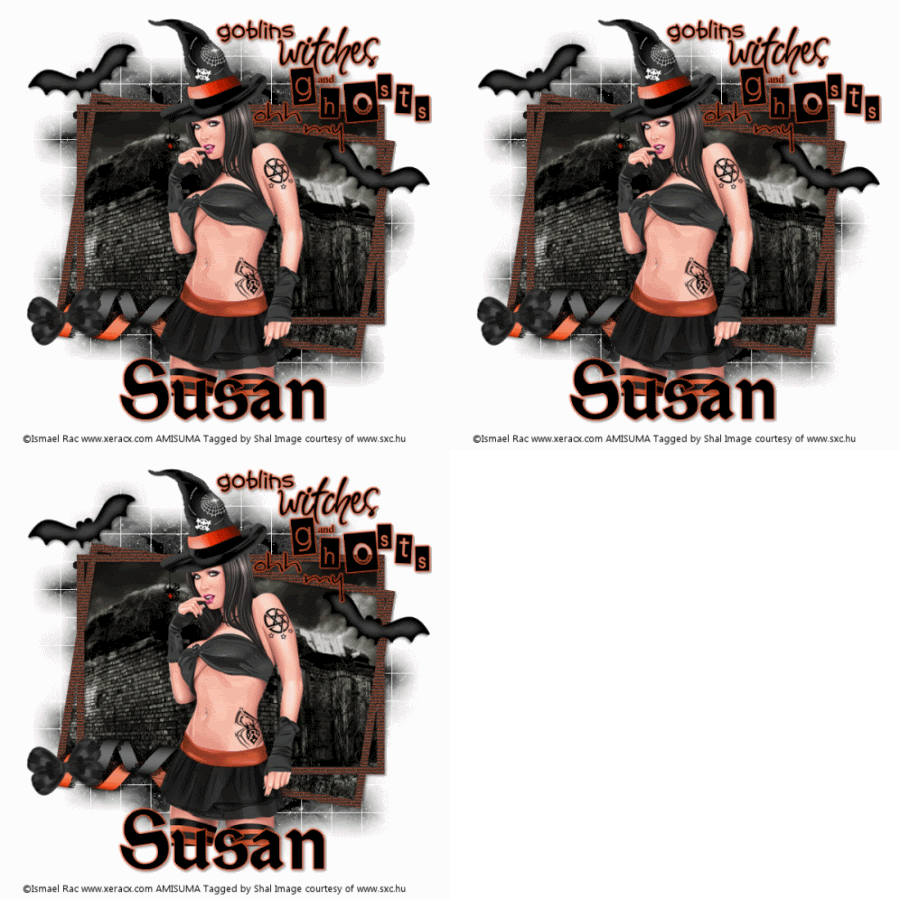
Copy and paste Cluster Frame 5. Using your magic wand, select all the areas in the middle of your frames and selections/modify/expand 5. Copy and paste your image, selections invert and hit delete. Selections none and move the image layer below your frame layer. Drop shadow your frame. I have used 2/2/40/4 throughout.
Copy and paste Bat, resize 59% and drop shadow. Position top left hand side. Layer duplicate and mirror. Position a lil lower.
Copy and paste Grain Lace Curly Ribbon 4, resize 50%, image/rotate/left 90 and drop shadow. Position bottom left of your frame. Copy and paste Grain Lace Curly Ribbon 5, resize 50%, image/rotate/left 90 and drop shadow. Position just above the other ribbon.
Copy and paste Double Bow 5, resize 40%, image/rotate/left 10 and drop shadow. Position above your ribbons.
Copy and paste your selected Word Art and resize 50%. I have then added an orange gradient glow size 3 and drop shadow.
Add copyright.
Add your name .. I used Satanick Regular, Size 72 color black and added
the same gradient glow and drop shadow as before.
If you are choosing not to animate, then you can save your tag.
To animate, close off Mask Layer 2 & 3 (the lil eye icon in your layer palette), Edit/Copy Merged and paste as new animation in Animation Shop. Close off Mask Layer 1 and open Mask Layer 2, Edit/Copy Merged and paste after current frame in AS. Close off Mask Layer 2 and open Mask Layer 3, Edit/Copy Merged and paste after current frame in AS. Save as a gif.
I hope you have enjoyed my tutorial.
This kit is only my 2nd attempt and my 1rst participating in a Blog Train.
I do hope you find it usefull.
Pls feel free to experiment and use my tutorial as a guide.
Please feel free to send me your results.
I'd love to see what you came up with.
have fun giving it your own spin.
This tutorial assumes you have a working knowledge of PSP.
Needed Supplies & Filters :
Tube of Choice .. I am using the work of Ismael Rac which you must have a license to use. I am licensed through Artistic Minds Inc. but they are now closed. You can now find Ismael's artwork licensed through his own store. Pls do not use his work without purchasing through here.
Scrap Kit of Choice .. I have used my 2nd scrap kit which was is part of the Ghost Train Blog Train and you can download it from my blog here.
Mask of Choice .. I have used WSL_Mask84 which can be downloaded from weescotslass here.
Word Art of Choice .. I have used word art from Caitlin at Cupcake Sprinkles which can be downloaded from her blog here.
Image of Choice .. I have used one I found searching for haunted houses from stock.xchng here.
Filters required ... Xenofex (Constellation) & Animation Shop
Font of Choice .. I have used Satanick Regular.
Let's get started !
New Image 600x600 and floodfill with white. Open your mask in PSP.
Copy and paste Textured Paper 10. New mask layer from image, WSL_Mask84, invert mask data unchecked, and merge group.
Duplicate twice and rename layers Mask 1, Mask 2 & Mask 3. On your first mask layer apply the following Constellation :

Apply the same Constellation to your next mask layer and hit random once. Apply again to your last mask layer hitting random twice. If you decide not to animate your tag, then just skip the duplicate twice.
Copy and paste Cluster Frame 5. Using your magic wand, select all the areas in the middle of your frames and selections/modify/expand 5. Copy and paste your image, selections invert and hit delete. Selections none and move the image layer below your frame layer. Drop shadow your frame. I have used 2/2/40/4 throughout.
Copy and paste Bat, resize 59% and drop shadow. Position top left hand side. Layer duplicate and mirror. Position a lil lower.
Copy and paste Grain Lace Curly Ribbon 4, resize 50%, image/rotate/left 90 and drop shadow. Position bottom left of your frame. Copy and paste Grain Lace Curly Ribbon 5, resize 50%, image/rotate/left 90 and drop shadow. Position just above the other ribbon.
Copy and paste Double Bow 5, resize 40%, image/rotate/left 10 and drop shadow. Position above your ribbons.
Copy and paste your selected Word Art and resize 50%. I have then added an orange gradient glow size 3 and drop shadow.
Add copyright.
Add your name .. I used Satanick Regular, Size 72 color black and added
the same gradient glow and drop shadow as before.
If you are choosing not to animate, then you can save your tag.
To animate, close off Mask Layer 2 & 3 (the lil eye icon in your layer palette), Edit/Copy Merged and paste as new animation in Animation Shop. Close off Mask Layer 1 and open Mask Layer 2, Edit/Copy Merged and paste after current frame in AS. Close off Mask Layer 2 and open Mask Layer 3, Edit/Copy Merged and paste after current frame in AS. Save as a gif.
I hope you have enjoyed my tutorial.
This kit is only my 2nd attempt and my 1rst participating in a Blog Train.
I do hope you find it usefull.
Pls feel free to experiment and use my tutorial as a guide.
Please feel free to send me your results.
I'd love to see what you came up with.
Subscribe to:
Post Comments (Atom)
Labels
- 1$ Mini Kits (4)
- Angela Newman (7)
- Awards (10)
- Blog Trains (6)
- Caron Vinson (1)
- CU Items (8)
- Elias (3)
- Extras (6)
- FTU Scrap Kits (22)
- FTU Tutorials (39)
- Halloween (1)
- Irish Bitch Designs (2)
- KatNKDA (28)
- KiwiFire Storm (1)
- Maigan Lynn (6)
- Misc (1)
- News (98)
- Pinup Toons (1)
- PTU Scrap Kits (79)
- PTU Tutorials (245)
- Sweet Dream Scraps (3)
- Tags Using my Scraps (10)
- Tags Using My Tuts (13)
- Tuts Using My Kits; (63)
- Tuts Using My Kits; Tags Using my Scraps (3)
- verymany (2)
- Wicked Princess Scraps (3)








0 comments: