About Me
My hobbies are PSP.
I love helping my friends who are starting with PSP.
Any similarity or resemblance to any other tutorial is purely coincidental and unintentional. Pls do not recopy my tutorials anywhere. Many thanks Susan.


Credit

Blinkie created by Rabid Designz. She does some amazing work ! Thanks so much Melissa.

Blinkie created by my long time friend tweety here. Thanks so much my friend :)
My blog was designed By Alika's Scraps. Thanks so much. You did an amazing job !

Leave Me A Message
Followers
My Blog List
Saturday, October 17, 2009
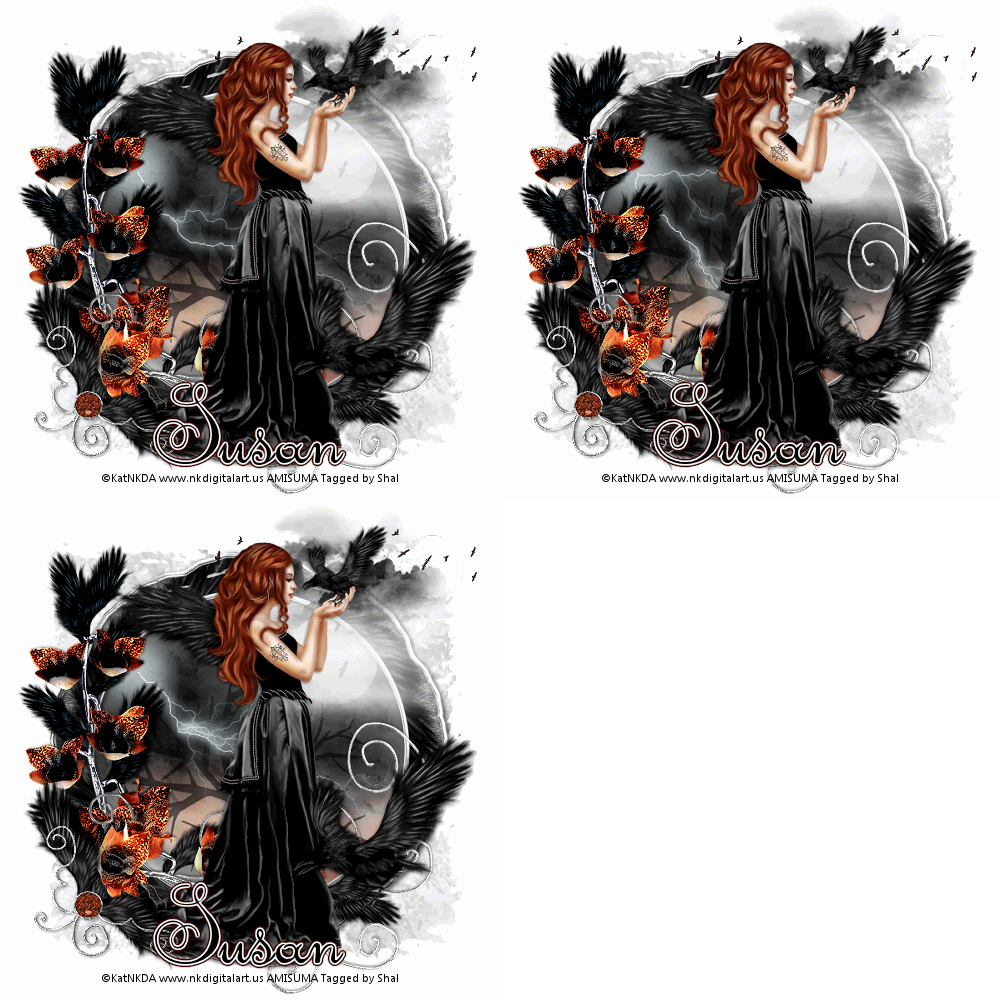
 Dark Night Tut
12:18 AM | Posted by
Shal |
 Edit Post
 Feel free to use my tutorial as a guide and
have fun giving it your own spin.
This tutorial assumes you have a working knowledge of PSP.
Needed Supplies & Filters :
Tube of Choice .. I am using the work of KatNKDA which you must have a license to use. Please do not use her work without purchasing through her store here. I am licensed through Artistic Minds Inc. but they are now closed.
Scrap Kit of Choice .. I have used a gorgeous PTU Kit from KatNKDA called Ravenclaw which was purchased through Artistic Minds Inc. who are now closed. The kit is currently unavailable.
Scrap Kit of Choice .. I have used a gorgeous PTU Kit from KatNKDA called Ravenclaw which was purchased through Artistic Minds Inc. who are now closed. The kit is currently unavailable.
Font of Choice .. I have used Pendulum.
Let's get started !
Open element30maskedbg (included in your scrap kit elements). New image 600x600. Floodfill with white. New layer, select all, copy and paste Paper 9 into selection. Select none.
New mask layer from image, element30maskedbg, invert mask data unchecked, and merge group. Duplicate layer, merge both mask layers down and resize 85%.
Copy and paste element 07 and resize 65%. Using your magic select the middle of your frame. Modify expand by 6. Copy and paste Paper 8, resize 50%, selections/invert and hit delete. Select none.
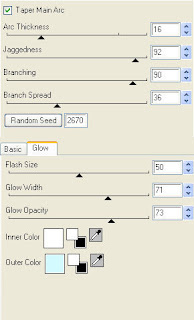
Duplicate the layer twice and rename your layers Lightning 1, 2 and 3. Select your first layer and apply lightning with the following settings.
 Pls note depending on where you want your lightning start, you will see on the preview of where the lightning will be applied, there is 2 lil circles with an X in them. You may move these about so that you can place where your lightning will start and finish. I usually like to position a lil inside my image that way it doesn't go over the edge of it.
Select your 2nd lightning layer and apply effect again hitting random seed.
Select your last lightning layer and apply effect again hitting random seed again. If you decide not to animate your tag, then just skip the duplicate twice and lightning portions of this tut.
Add drop shadow to your frame. I have used 2/2/40/4 throughout.
Copy and paste element 05, resize 40%, drop shadow, rotate left 90 and position on the bottom. Copy and paste element 03, resize 40%, drop shadow and position on the left side.
Copy and paste element 20, resize 30% and position top right.
Copy and paste full size tube, mirror and drop shadow.
Copy and paste element 14, resize 40%, drop shadow and position bottom left. Copy and paste element 10, resize 50%, drop shadow and position a lil higer on the bottom right. You may need to adjust where you position the bird depending on your name and font you use.
Resize 500 x 500. Add your copyright and name. I have used Pendulum size 72 with the following gradient glow and drop shadow.
If you are choosing not to animate, then you can save your tag.
To animate, close off Lightning Layer 2 & 3 (the lil eye icon in your layer palette), Edit/Copy Merged and paste as new animation in Animation Shop. Close off Lightning Layer 1 and open Lightning Layer 2, Edit/Copy Merged and paste after current frame in AS. Close off Lightning Layer 2 and open Lightning Layer 3, Edit/Copy Merged and paste after current frame in AS.
You may want to view your animation and decide if you wish to slow down the speed of your lightning. To do this Edit/Select All and then animation/frame properties. I have set mine for 30.
Save as a gif.
I hope you have enjoyed my tutorial.
Pls feel free to experiment and use my tutorial as a guide.
Please feel free to send me your results.
I'd love to see what you came up with.
Subscribe to:
Post Comments (Atom)
Labels
- 1$ Mini Kits (4)
- Angela Newman (7)
- Awards (10)
- Blog Trains (6)
- Caron Vinson (1)
- CU Items (8)
- Elias (3)
- Extras (6)
- FTU Scrap Kits (22)
- FTU Tutorials (39)
- Halloween (1)
- Irish Bitch Designs (2)
- KatNKDA (28)
- KiwiFire Storm (1)
- Maigan Lynn (6)
- Misc (1)
- News (98)
- Pinup Toons (1)
- PTU Scrap Kits (79)
- PTU Tutorials (245)
- Sweet Dream Scraps (3)
- Tags Using my Scraps (10)
- Tags Using My Tuts (13)
- Tuts Using My Kits; (63)
- Tuts Using My Kits; Tags Using my Scraps (3)
- verymany (2)
- Wicked Princess Scraps (3)


0 comments: