About Me
My hobbies are PSP.
I love helping my friends who are starting with PSP.
Any similarity or resemblance to any other tutorial is purely coincidental and unintentional. Pls do not recopy my tutorials anywhere. Many thanks Susan.


Credit

Blinkie created by Rabid Designz. She does some amazing work ! Thanks so much Melissa.

Blinkie created by my long time friend tweety here. Thanks so much my friend :)
My blog was designed By Alika's Scraps. Thanks so much. You did an amazing job !

Saturday, October 30, 2010
 October TART Award & May TART Award
7:54 PM | Posted by
Shal |
 Edit Post

I am so happy that one of my tags was selected for a TART Award this month. There was some awesome entries and if you are interested in joining all the fun, you can do so at MyTagArt here.
Here is my chosen entry for this month. You can find all the other gorgeous selections on the MyTagArt blog here.
Here is my chosen entry for this month. You can find all the other gorgeous selections on the MyTagArt blog here.


I forgot to post this one hehe. One my tags was also selected for a TART Award in May.
Here is my chosen entry for this month. You can find all the other gorgeous selections on the MyTagArt blog here.
Here is my chosen entry for this month. You can find all the other gorgeous selections on the MyTagArt blog here.

Wednesday, October 27, 2010
The Pumpkin Patch Tut
10:45 PM | Posted by
Shal |
Edit Post
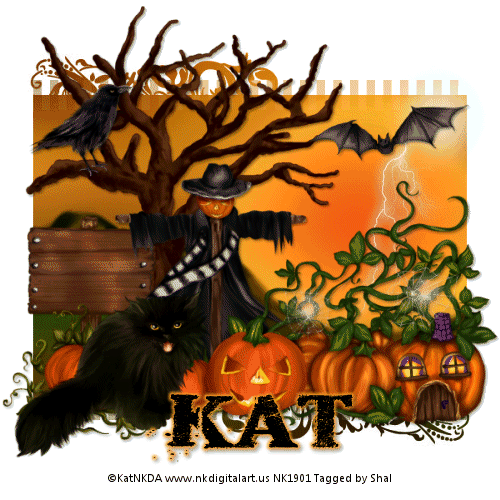
Feel free to use my tutorial as a guide and have fun giving it your own spin.
This tutorial assumes you have a working knowledge of PSP.
Needed Supplies & Filters :
Tube of Choice .. I am using the work of KatNKDA which you must have a license to use. Please do not use her work without purchasing through her store here.
Scrap Kit of Choice .. I have used a gorgeous PTU scrap kit by KatNKDA called "It's Pumpkin Time" which you can purchase through her store here.
Mask of Choice .. I haved WSL_Mask355 used which can be downloaded here.
Font of Choice .. I have used Dead Secretary
Let's get started
New image 600x600 and floodfill with white.
Copy and paste background 2 and resize 50%. New mask layer from image, WSL_Mask355, invert transparency unchecked. Merge group.
Duplicate the layer twice and rename your layers Lightning 1, 2 and 3. Select your first layer and apply lightning with the following settings.
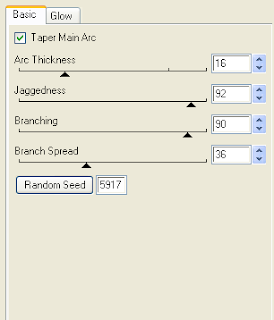
Pls note depending on where you want your lightning start, you will see on the preview of where the lightning will be applied, there is 2 lil circles with an X in them. You may move these about so that you can place where your lightning will start and finish. I usually like to position a lil inside my image that way it doesn't go over the edge of it.
Select your 2nd lightning layer and apply effect again hitting random seed.
Select your last lightning layer and apply effect again hitting random seed again. Select none. If you decide not to animate your tag, then just skip the duplicate twice and lightning portions of this tut.
Copy and paste Element 26, resize 30% & drop shadow. I have used 2/2/40/4 throughout. Position on the left hand side. Copy and paste Element 25, resize 30% twice & drop shadow. Position standing on one of the branches.
Copy and paste Element 2, resize 40% twice and drop shadow. Position bottom left hand corner.
Copy and paste Element 6, resize 40% twice & drop shadow. Position at the base of your tree. Copy and paste Element 1, resize 40% twice & drop shadow. Position bottom left hand corner.
Copy and paste the pumpkin house included with your cat tubes, resize 40% twice & drop shadow. Position bottom right hand corner.
Copy and paste Element 4, resize 40% twice, mirror & drop shadow. Position next to your pumpkin house tube.
Copy and paste your cat tube, resize 35% twice, mirror & drop shadow. Position in front of your pumpkins.
Copy and paste Element 27, resize 40% twice & drop shadow. Position top right hand side at the top of the sun.
At this point if you need to, resize your tag. I have used 500x500. Add your copyright and name. I have used Dead Secretary Size 48 black and then added a size 4 medium color #ffa127 gradient glow & drop shadow.
If you are choosing not to animate, then you can save your tag.
To animate, close off Lightning Layer 2 & 3 (the lil eye icon in your layer palette), Edit/Copy Merged and paste as new animation in Animation Shop. Close off Lightning Layer 1 and open Lightning Layer 2, Edit/Copy Merged and paste after current frame in AS. Close off Lightning Layer 2 and open Lightning Layer 3, Edit/Copy Merged and paste after current frame in AS.
You may want to view your animation and decide if you wish to slow down the speed of your lightning. To do this Edit/Select All and then animation/frame properties. I have set mine for 30.
Save as a gif.
I hope you have enjoyed my tutorial. Pls feel free to experiment and use my tutorial as a guide.
Sunday, October 24, 2010
Halloween Sales at Scrappin Warehouse !
3:31 PM | Posted by
Shal |
Edit Post

Halloween Sales at Scrappin Warehouse !
Drop by my store at Scrappin Warehouse to take advantage of a 50% off sale from October 23rd till October 31st .. making all my items 1.00 $ including my latest seasonal kits "Forever Thankful", "Chiller" & "Fall Lovers".
Match Me Sale at Wilma4ever !
3:26 PM | Posted by
Shal |
Edit Post

**W4E Featured Special Sale**
From Oct 18, - Oct 31, 2010 the following designers are having a match me sale:
Please note: The designer you purchase from will send you a coupon of their shop, please be sure you are in one of these shops only. This is not a store-wide Sale!
Bunchie's Bin
Creations By Rain
Debs Design
Designs By Digiscrapations
MammaLLamma Lisa Designs
Memory Lane Creations
MyTime Scraps
P&A Dezigns
Scrappin Wright
Stargazer Musings
Shal's World
Wilma4ever
All you have to do is shop in one of their shops. For every dollar you spend you will get a coupon in your email for the same amount you spend.
If you spend $2.00 you will get a coupon for $2.00. The more you spend the bigger the coupon amount.
Only participating designers. Please make sure you are shopping from one on our list. You must have a valid e-mail address or you won't get a coupon.
Excluded Buy My Store Deals.
Check the sales banner and front page of the store to see who is having a match me sale.
Have fun and drop by my store at Wilma4ever!
Saturday, October 23, 2010
Witchy Halloween Tut
7:01 PM | Posted by
Shal |
Edit Post

Feel free to use my tutorial as a guide and have fun giving it your own spin.
This tutorial assumes you have a working knowledge of PSP.
Needed Supplies & Filters :
Tube of Choice .. I am using the work of Ismael Rac which you must have a license to use. Please do not use his work without purchasing through here.
Scrap Kit of Choice .. I have used a gorgeous PTU Kit from Tyger's Tidbits called Halloweenies which can be purchased here.
Mask of Choice .. I haved used WSL_Mask221 which can be downloaded here.
Word Art of Choice .. I have used word art by Cupcake Sprinkles by Caitlin which can be downloaded here.
Font of Choice .. Haunted
Let's get started
New image 600x600 and floodfill with white.
New raster layer, select all, paste into selection Paper 24. Select none. New mask layer from image, WSL_Mask221, invert transparency unchecked, and merge group.
Repeat with Paper 16, resize 90% & mirror. Merge down both mask layers and resize 90%.
Copy and paste Element 55 & drop shadow. I have used 2/2/40/4 throughout.
Copy and paste Element 13, adjust/add noise/75%/gaussian mono checked & drop shadow. Position top left hand corner. Repeat with Element 14 and position bottom right hand corner.
Copy and paste Element 46, resize 50% & drop shadow.
Copy and paste Element 36 & resize 80%. Using your magic wand, select the center portion of your frame, selections modify/expand 5. Copy and paste Paper 1 below your frame layer, resize 50%, selections invert and hit delete. Select none & drop shadow your frame.
Copy and paste your tube, resize as necessary & drop shadow.
Copy and paste Element 48, resize 75% & drop shadow. Position along the bottom of your tube. Repeat with Element 51, resizing 65% this time and then mirror.
Copy and paste Element 29, resize 75% & drop shadow. Position top right hand corner of your frame.
Copy and paste Element 2 below your bow layer, resize 50% & drop shadow. Position so the spider is hanging from the bow.
Copy and paste Element 27, resize 65%, rotate left 15 & drop shadow. Position bottom left hand corner of your frame.
Copy and paste your word art, resize 50%, rotate left 15, add the following gradient glow & then drop shadow. Position top left hand corner.

X out white background, merge visible. Open white background, resize to your liking (I have used 500x500).
Add copyright and your name. I have used Haunted, Size 48, color black and added the same gradient glow and drop shadow as used with the wordart.
Save and you are done.
I hope you have enjoyed my tutorial. Pls feel free to experiment and use my tutorial as a guide.
Please feel free to send me your results. I'd love to see what you came up with.
Sunday, October 17, 2010
Immortal Tut
9:35 PM | Posted by
Shal |
Edit Post

Feel free to use my tutorial as a guide and have fun giving it your own spin.
This tutorial assumes you have a working knowledge of PSP.
Needed Supplies & Filters :
Tube of Choice .. I am using the work of KatNKDA which you must have a license to use. Please do not use her work without purchasing through her store here.
Scrap Kit of Choice .. I have used a gorgeous PTU scrap kit by KatNKDA called "Immortal" which you can purchase through her store here.
Mask of Choice .. I haved used WSL_Mask255 which can be downloaded here.
Font of Choice .. I have used Morpheus
Let's get started
New image 600x600 and floodfill with white.
New raster layer just above your background layer. Select all, copy and paste into selection Paper 13. Select none. New mask layer from image, WSL_Mask255, invert transparency unchecked. Merge group.
Copy and paste Element 15, resize 75% & drop shadow. I have used 2/2/40/4 throughout.
Copy and paste Element 114, resize 40% twice & drop shadow. Position top righ hand corner. Layer duplicate, mirror & flip.
Copy and paste Element 100, resize 40% twice & drop shadow. Position bottom centre.
Copy and paste Element 11 & resize 45% twice. Using your magic wand, select the center portion of your frame, selections modify/expand 5. Copy and paste Paper 8 below your frame layer, resize 40% twice, selections invert and hit delete. Copy and paste your tube, resize as necessary & hit delete. Select none, merge down your frame, tube & background layers, rotate left 5 & drop shadow. Position top left hand corner.
Copy and paste Element 69, resize 30% & drop shadow. Position on the left hand side of your frame. Copy and paste Element 118, resize 30% & drop shadow. Position so it appears the wolf charm is hanging from the jewel.
Copy and paste Element 83, resize 40% twice & drop shadow. Position bottom centre of your frame.
Copy and paste Element 56, resize 40% twice & drop shadow. Position bottom left hand corner. Repeat with Element 57, resizing 35% twice and position on top of your other leaves.
Copy and paste Element 50, resize 35% twice, rotate left 80 & drop shadow. Position the rose lying on your leaves. Layer duplicate, resize 85% and move over a bit of your other rose.
Copy and paste your full length tube, resize if necessary, drop shadow and position on the right hand side.
Copy and paste Element 65, resize 30% twice & drop shadow. Position bottom right hand corner.
X out white background, merge visible. Open white background, resize to your liking (I have used 500x500).
Add copyright and your name. I have used Morpheus, Size 60, color black and then added a size 5 fat color #770000 gradient glow, followed by a size 5 fat black gradient glow and then drop shadow.
Save and you are done.
I hope you have enjoyed my tutorial. Pls feel free to experiment and use my tutorial as a guide.
Please feel free to send me your results. I'd love to see what you came up with.
Wise Fall Tut
4:24 PM | Posted by
Shal |
Edit Post

Feel free to use my tutorial as a guide and have fun giving it your own spin.
This tutorial assumes you have a working knowledge of PSP.
Needed Supplies & Filters :
This tutorial assumes you have a working knowledge of PSP.
Needed Supplies & Filters :
Tube of Choice .. I am using the work of KatNKDA which you must have a license to use. Please do not use her work without purchasing through her store here.
Scrap Kit of Choice .. I have used a gorgeous PTU scrap kit by KatNKDA called "Almost Autumn" which you can purchase through her store here.
Mask of Choice .. I haved used one of KatNKDA's masks included in the kit (mask01PSP).
Font of Choice .. I have used Gwendolyn Bold
Let's get started
New image 600x600 and floodfill with white. New raster layer, select all, copy and paste into selection Paper 3. Select none.
Open mask01PSP.png in PSP. Layer/new mask layer from image/select your mask/source luminance & invert mask data checked. Merge group. Resize 110%.
Repeat with paper 8 but not resize.
Copy and paste Element 73, resize 25% & drop shadow. I have used 2/2/40/4 throughout. Position top left hand corner.
Copy and paste Element 72, resize 25%, mirror & drop shadow. Position bottom right hand corner.
Copy and paste Element 1 & resize 25%. Using your magic wand, select the center portion of your frame, selections modify/expand 5. Copy and paste Paper 15 below your frame layer, resize 20%, selections invert and hit delete. Select none, merge down your frame & background layers, rotate left 15 & drop shadow.
Copy and paste Element 22, resize 35% twice & drop shadow. Position bottom left hand corner.
Copy and paste Element 7 & resize 20%. Using your magic wand, select the center portion of your frame, selections modify/expand 5. Copy and paste Paper 4 below your frame layer, resize 20%, selections invert and hit delete. Select none, merge down your frame & background layers, rotate right 15 & drop shadow.
Copy and paste your tube & resize 40% twice.
Copy and paste Element 61, resize 35% & drop shadow. Position bottom right hand corner.
Copy and paste Element 2, resize 30% twice & drop shadow. Position bottom left hand corner of your last frame.
Copy and paste Element 37, resize 30%/50% & drop shadow. Position sitting on the leaves.
Copy and paste Element 4, resize 30% twice & drop shadow. Position bottom right hand corner. Copy and paste Element 3, resize 25% twice & drop shadow. Position next to your blue leaves.
Copy and paste Element 27, resize 25% twice & drop shadow. Position at the stem of your leaves.
Copy and paste Element 29, resize 25% & drop shadow. Position top right hand corner.
X out white background, merge visible. Open white background, resize to your liking (I have used 500x500).
Add copyright and your name. I have used Gwendolyn Bold, Size 60, color #702804 and then added noise (adjust/add noise/gaussian & mono checked/65%). I then added the following gradient glow and then drop shadow.

Save and you are done.
I hope you have enjoyed my tutorial. Pls feel free to experiment and use my tutorial as a guide.
Please feel free to send me your results. I'd love to see what you came up with.
Saturday, October 16, 2010
Forever Thankful Tagger Size Kit
8:00 PM | Posted by
Shal |
Edit Post

Forever Thankful Tagger Size Kit
This kit contains 25 papers (700x700 in size) & 97 elements. Elements include bead strings, bows, buttons, doodles, flairs, frames, ribbons, scarecrows, strings, word art and a gorgeous variety of fall themed elements that include fall vegetables, flower, leaves, nuts, pine cone, trees, and adorable fall critters .. owl, squirrel and turkey !
Perfect kit for the thanksgiving seasonl !
Perfect kit for the thanksgiving seasonl !
Currently available at in all stores !
Hocus Pocus Tut
7:10 PM | Posted by
Shal |
Edit Post

Feel free to use my tutorial as a guide and have fun giving it your own spin.
This tutorial assumes you have a working knowledge of PSP.
Needed Supplies & Filters :
Tube of Choice .. I am using the work of Joanne Schempp (http://schempp.us/) which you must have a license to use. Please do not use her work without purchasing through My Tag Art here.
Scrap Kit of Choice .. I have used a gorgeous PTU Kit from Scraps by Roo called Trick Witch which can be purchased here.
Template of Choice .. I have used Halloween Template 2 by Toxic Desirez which can be downloaded from her blog here.
Mask of Choice .. I haved used WSL_Mask264 which can be downloaded here.
Font of Choice .. CK Mystery
Let's get started
Open your template in PSP & delete credits. Resize canvas size 700x700 & floodfill background layer white.
New raster layer just above your background layer. Select all, copy and paste into selection Paper 10. Select none. New mask layer from image, WSL_Mask264, invert transparency unchecked. Merge group.
Select Square Left 2 layer, select all/float/defloat, copy and paste Paper 11, resize 65%, selections invert and hit delete. Select none and delete original Square Left 2 layer.
Repeat with Square Right 2 layer.
Add drop shadow to Doodle Back Right, Doodle Back Left, Glitter Square Left & Glitter Square Right layers. I have used 2/2/40/4 throughout.
Select Circle Left layer, select all/float/defloat, copy and paste Paper 10, resize 65%, selections invert and hit delete. Select none and delete original Circle Left layer.
Repeat with Circle Right layer. Drop shadow both circles.
Select Circle layer, select all/float/defloat, copy and paste Paper 12, selections invert and hit delete. Copy and paste your tube, resize as necessary and using your erase function, erase the bottom of your tube sticking out over the circle. Select none and delete original Circle layer.
Delete Star Scatter layer.
Drop shadow Glitter Circle, Words Back & Circle Stars Back layers.
Copy and paste element 20, resize 40% & drop shadow. Position on the left hand side of your circle.
Copy and paste element 50, resize 65% & drop shadow. Position hanging from the top left hand side of your circle. Copy and paste element 36, resize 40% & drop shadow. Position at the top of your hanging chain.
Copy and paste element 5 & drop shadow. Position bottom right hand corner.
Copy and paste element 32, resize 40% & drop shadow. Position next to your cauldron.
X out white background, merge visible. Open white background, resize to your liking (I have used 500x500).
Add copyright and your name. I have used CK Mystery, Size 48, color black and then added the following gradient glow and drop shadow.

Save and you are done.
I hope you have enjoyed my tutorial. Pls feel free to experiment and use my tutorial as a guide.
Please feel free to send me your results. I'd love to see what you came up with.
Forever Thankful Tut
3:12 PM | Posted by
Shal |
Edit Post

Feel free to use my tutorial as a guide and have fun giving it your own spin.
This tutorial assumes you have a working knowledge of PSP.
Needed Supplies & Filters :
Tube of Choice .. I am using the work of Barb Kermis (http://www.barbkermisdesigns.com ) which you must have a license to use. Please do not use her work without purchasing through My Tag Art here.
Photography of Choice .. I am using the work of Jenny Parson (www.jennyzdreamz.com) which you must have a license to use. Pls do not use her work without purchasing through My Tag Art here.
Scrap Kit of Choice .. I have used my latest scrap kit called Forever Thankful which is available for purchase at My Tag Art here.
Template of Choice .. I have used template 64 by Designs by Ali which can be downloaded from her blog here.
Mask of Choice .. I haved used WSL_Mask275 which can be downloaded here.
Font of Choice .. Waterbrush Rob
Let's get started
Open your template in PSP & delete credits. Resize canvas size 650x650, new raster layer, move to the bottom & floodfill with white.
New raster layer just above your backround layer. Select all, copy and paste into selection Paper 7. Select none. New mask layer from image, WSL_Mask275, invert transparency unchecked. Merge group.
Select Shape 3 layer, select all/float/defloat, copy and paste Paper 14, selections invert and hit delete. Select none and delete original Shape 3 layer.
Add drop shadow. I have used 2/2/40/4 throughout.
Select Shape 2 layer, select all/float/defloat, copy and paste Paper 3, selections invert and hit delete. Select none and delete original Shape 2 layer. Add drop shadow.
Repeat with Shape 1 layer.
Copy and paste Element 18, resize 75% & drop shadow. Position on the right hand side.
Select Frame 2 layer, select all/float/defloat, copy and paste your first image, selections invert and hit delete. Select none and delete original Frame 2 layer. I then added a size 5 fat color #f5a81e gradient glow and then drop shadow.
Repeat with a different image on Frame 1 layer.
Copy and paste Element 3, resize 65% & drop shadow. Position on the right hand side.
Copy and paste Leaf 13, resize 50%, mirror & drop shadow. Position bottom left hand corner.
Copy and paste Leaf 4, resize 40% & drop shadow. Position bottom right hand corner.
Copy and paste String 9 & drop shadow. Position along the bottom. Repeat with String 8 and mirror.
Copy and paste Element 13, resize 75% & drop shadow. Position bottom left hand side.
Copy and paste your scarecrow tube, resize 85%, mirror and dropshadow. Position between your 2 scarecrow frames.
Copy and paste Element 5, resize 30% & drop shadow. Position at the base of your tube next to the pumpkins.
Copy and paste Word Art 3, resize 85% & drop shadow. Position top right hand corner.
X out white background, merge visible. Open white background, resize to your liking (I have used 500x500).
Add copyright and your name. I have used Waterbrush Rob, Size 60, color #a3492a and then added a size 5 fat white gradient glow and then drop shadow.
Save and you are done.
I hope you have enjoyed my tutorial. Pls feel free to experiment and use my tutorial as a guide.
Please feel free to send me your results. I'd love to see what you came up with.
Saturday, October 9, 2010
YSA Birthday Sale !!! Shal's World .. all items 1$ !
11:03 AM | Posted by
Shal |
Edit Post
Your Scrap Addiction is a YEAR old as of Oct 1st. To celebrate there is a ton of specials, awesome sales, and great promotions. EVERYTHING in the store is on sale until at least Oct. 15th.Be sure to browse through everyone's products looking for the birthday presents. These are FREE gifts to you from the amazing designers to thank you all making YSA's first year a very successful one.Everything in the store is on sale for at least 25% off. Some of these deals will be gone come October 15th so hurry to take advantage of these deals today!!All my items are 50% off until October 20th .. making all my items 1.00$! Be sure to check them out here .. including my latest Halloween themed kit "Chiller" and my fall themed kit "Fall Lovers".
Wednesday, October 6, 2010
Autumn Life Tut
6:36 AM | Posted by
Shal |
Edit Post

Feel free to use my tutorial as a guide and have fun giving it your own spin.
This tutorial assumes you have a working knowledge of PSP.
Needed Supplies & Filters :
Tube of Choice .. I am using the work of Sue Miller (www.suemillerart.com) which you must have a license to use. Please do not use her work without purchasing through My Tag Art here.
This tutorial assumes you have a working knowledge of PSP.
Needed Supplies & Filters :
Tube of Choice .. I am using the work of Sue Miller (www.suemillerart.com) which you must have a license to use. Please do not use her work without purchasing through My Tag Art here.
Scrap Kit of Choice .. I have used a gorgeous PTU Kit from Designed by Stina called Forever Autumn which can be purchased here.
Mask of Choice .. I haved used WSL_Mask160 which can be downloaded here.
Font of Choice .. Waterbrush ROB
Let's get started
New image 600x600 and floodfill with white.
New raster layer, select all, paste into selection Paper 8. Select none. New mask layer from image, WSL_Mask160, invert transparency unchecked, and merge group. Resize 115%.
Repeat with Paper 9, skipping resize and then rotate right 20.
Copy and paste Deco 2, resize 75% and drop shadow. I have used 2/2/40/4 throughout. Position top right hand corner. Repeat with Deco 1 and position bottom left hand corner.
Copy and paste Flower 5, resize 75%, drop shadow and position towards the top. Layer duplicate, image flip and mirror.
Copy and paste Frame 3 and resize 65%. Using your magic wand, select the center portion of your frame, selections modify/expand 5. Copy and paste your image below your frame layer, selections invert and hit delete. Select none & drop shadow your frame.
Copy and paste Butterflies, resize 75%, drop shadow and position along the top of your frame.
Copy and paste Branch, resize 65%, mirror, drop shadow and position on the left hand side.
Copy and paste Greenery, resize 65%, mirror, drop shadow and position along the bottom of your frame.
Copy and paste Bow 7, resize 30%, drop shadow and position at the base of your branch.
Copy and paste Scarecrow, resize 40%, drop shadow and position next to your bow.
Copy and paste Pumpkin 1, resize 20%, drop shadow and position bottom right hand corner. Repeat with Pumpkin 2 and position next to your first pumpkin.
Copy and paste Broom, resize 75%, mirror, drop shadow and position on the right hand side.
Copy and paste Flower 1, resize 20%, drop shadow and position top left hand corner of your frame.
Copy and paste Word Art, resize 40% and position top right hand corner. I then added a size 3 medium white gradient glow and then drop shadow.
X out white background, merge visible. Open white background, resize to your liking (I have used 500x500).
Add copyright and your name. I have used Waterbrush ROB, Size 60, color #2d3304, and added the same gradient glow and drop shadow as used with the wordart.
Save and you are done.
I hope you have enjoyed my tutorial. Pls feel free to experiment and use my tutorial as a guide.
Please feel free to send me your results. I'd love to see what you came up with.


Saturday, October 2, 2010
My Tag Art Goes Pink for BCA & Trick or Treat Sales
2:43 AM | Posted by
Shal |
Edit Post

My Tag Art goes Pink for BCA Sale !
An excellent variety of BCA themed tubes, photos & scraps are currently on sale for the month of October at My Tag Art.

Trick or Treat Fall/Halloween Sale at My Tag Art !
It's that time of year and My Tag Art is featuring an amazing Trick or Treat Fall/Halloween themed sale for the whole month of October. Some haunting tubes, photos and scraps are included this spooky sale.
You can find my "Chiller", "Fall Lovers" & "Giving Thanks" kits on sale this month here, here and here.
Subscribe to:
Posts (Atom)
Kits & Tuts


Blogs I Love


