About Me
My hobbies are PSP.
I love helping my friends who are starting with PSP.
Any similarity or resemblance to any other tutorial is purely coincidental and unintentional. Pls do not recopy my tutorials anywhere. Many thanks Susan.


Credit

Blinkie created by Rabid Designz. She does some amazing work ! Thanks so much Melissa.

Blinkie created by my long time friend tweety here. Thanks so much my friend :)
My blog was designed By Alika's Scraps. Thanks so much. You did an amazing job !

Thursday, December 31, 2009
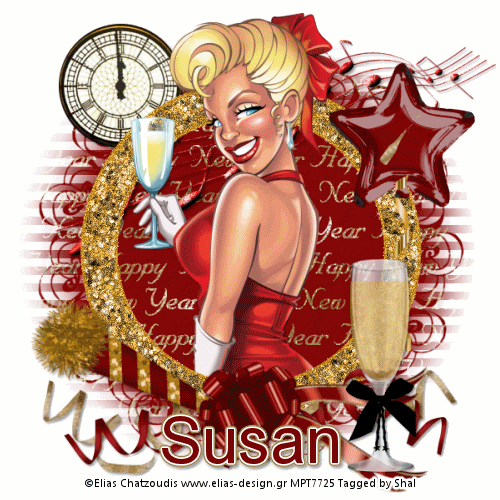
 Tut using my "Happy 2010" Kit
5:10 PM | Posted by
Shal |
 Edit Post

My dear friend Cheryl wrote this gorgeous tut using my "Happy 2010" kit. You can find the tut on her blog here.
Thanks so much Cheryl .. stunning !
Wednesday, December 23, 2009
Celebrating New Year Tut
10:00 PM | Posted by
Shal |
Edit Post
Feel free to use my tutorial as a guide and have fun giving it your own spin.
This tutorial assumes you have a working knowledge of PSP.
Needed Supplies & Filters :
Tube of Choice .. I am using the work of Elias Chatzoudis which you must have a license to use. Please do not use his work without purchasing through MPT here.
Scrap Kit of Choice .. I have used a gorgeous PTU kit from Digicats called Celebration which be purchased here.
Mask of Choice .. I have used WSL_Mask353 which can be downloaded from weescotslass here.
Font of Choice .. I have used Levenim MT.
Let's get started !
New Image 600x600 and floodfill with white. Open your mask in PSP.
New raster layer, select all and paste into selection Paper 20. New mask layer from image, WSL_Mask353, invert mask data unchecked, and merge group.
Copy and paste Round frame 5 & resize 90%. Duplicate twice and rename your layers frame 1, frame 2 & frame 3. On your first frame layer apply DSB Flux/Bright Noise 35%. On your 2nd frame layer, apply bright noise again, hitting mix twice. On your 3rd frame layer, apply again hitting mix 3 times. If you decide not to animate your tag, then just skip this part of the tutorial.
Using your magic wand, select the center portion of your frame, selections modify/expand 3. Copy and paste your tube below your frame layers, selections invert and hit delete. Select none. Copy and paste your tube again but this above your frame layers. Erase the bottom portion of your tube so it appears she is coming out of the frames.
Copy and paste Streamer 5c, resize 65%, rotate right 90 & drop shadow. I have used 2/2/40/4 throughout. Position bottom of your frame. Copy and paste Streamer 2b, rotate left 90 & drop shadow. Position as well bottom of your frame.
Copy and paste Streamer 5c, resize 65%, rotate right 90 & drop shadow. I have used 2/2/40/4 throughout. Position bottom of your frame. Copy and paste Streamer 2b, rotate left 90 & drop shadow. Position as well bottom of your frame.
Copy and paste Music element 02, resize 65% & drop shadow. Position just above your mask layer top right hand side.
Copy and paste Horn 2b, resize 50%, mirror, rotate right 25 and drop shadow. Position bottom left.
Copy and paste Bow 2, resize 50%, rotate left 90 and drop shadow. Position center bottom of your frame.
Copy and paste Glass 01, resize 35% & drop shadow. Position bottom right hand corner.
Copy and paste Clock, resize 50% & drop shadow. Position just above your mask layer, top left hand corner.
Copy and paste Balloon 5, resize 50% & drop shadow. Position right hand side.
At this point if you need to, resize your tag. I have used 500x500. Add your copyright and name. I have used Levenim MT 48 #7a0301 with the following gradient glow and then drop shadow.

If you are choosing not to animate, then you can save your tag.
To animate, close off Frame Layer 2 & 3 (the lil eye icon in your layer palette), Edit/Copy Merged and paste as new animation in Animation Shop. Close off Frame Layer 1 and open Frame Layer 2, Edit/Copy Merged and paste after current frame in AS. Close off Frame Layer 2 and open Frame Layer 3, Edit/Copy Merged and paste after current frame in AS. Save as a gif.
To animate, close off Frame Layer 2 & 3 (the lil eye icon in your layer palette), Edit/Copy Merged and paste as new animation in Animation Shop. Close off Frame Layer 1 and open Frame Layer 2, Edit/Copy Merged and paste after current frame in AS. Close off Frame Layer 2 and open Frame Layer 3, Edit/Copy Merged and paste after current frame in AS. Save as a gif.
I hope you have enjoyed my tutorial.
Please feel free to send me your results.
I'd love to see what you came up with.
Please feel free to send me your results.
I'd love to see what you came up with.
Party Girl 2010 Tut
6:27 PM | Posted by
Shal |
Edit Post

Feel free to use my tutorial as a guide and have fun giving it your own spin.
This tutorial assumes you have a working knowledge of PSP.
Needed Supplies & Filters :
Tube of Choice .. I am using the work of Keith Garvey which you must have a license to use. Please do not use his work without purchasing through MPT here.
Scrap Kit of Choice .. I have used a gorgeous PTU kit from Digicats called Party Girl which be purchased here.
Mask of Choice .. I have used WSL_Mask84 which can be downloaded from weescotslass here.
Font of Choice .. I have used Levenim MT.
Let's get started !
New Image 600x600 and floodfill with white. Open your mask in PSP.
New raster layer, select all and paste into selection Paper 17. New mask layer from image, WSL_Mask84, invert mask data unchecked, and merge group.
Copy and paste Music 3, resize 95% & drop shadow. I have used 2/2/40/4 througout.
Copy and paste Frame 10, resize 40% and rotate left 10. Move up and to the left. Layer duplicate, mirror and move down towards the right. See my image for placement.
Using your free hand selection tool, select an area the edge of your frame. If you prefer to leave the stars transparent, then use your magic wand and select the middle area of your frames and expand by 2.
For the top frame, copy and paste paper 18, selections invert & hit delete. Do not deselect. Copy and paste tube close up & hit delete. I have changed the blend mode to luminance legacy for my tube layer. Select none.
For the bottom frame, select again as you did for the first frame, copy and paste paper 23, selections invert & hit delete. Do not deselect. Copy and paste tube close up & hit delete. Select none. Drop shadow both frames.
Copy and paste full size tube, drop shadow and position left hand side.
Copy and paste Balloon 3, resize 50% and drop shadow. Position top right hand side. Repeat with Balloon 5 and position next to your first balloon.
Copy and paste Champagne bottle 5, resize 40% & drop shadow. Position bottom right hand corner. Copy and paste Champagne glass 5, resize 50% & drop shadow. Position next to you bottle.
Copy and paste Eye mask 3, resize 50%, rotate left 25 & drop shadow. Position where your 2 frames cross.
Copy and paste Noisemaker 1, resize 50% & drop shadow. Position bottom centre.
X out white background, merge visible.
Open white background, resize to your liking (I used 500x500).
Add copyright & add your name. I used Levenim MT size 48 #345e5e and added the following gradient glow and then drop shadow.

Save and you are done.
I hope you have enjoyed my tutorial.Please feel free to send me your results.
I'd love to see what you came up with.


Tuesday, December 22, 2009
Ringing in the New Year Tut
10:20 PM | Posted by
Shal |
Edit Post

Feel free to use my tutorial as a guide and
have fun giving it your own spin.
This tutorial assumes you have a working knowledge of PSP.
Needed Supplies & Filters :
Tube of Choice .. I am using the work of Tom Hoover which you must have a license to use. Please do not use his work without purchasing through MPT here.
Scrap Kit of Choice .. I have used a gorgeous PTU kit from Puddicat called Nathalie New Year's Ball which be purchased here.
Mask of Choice .. I have used WSL_Mask105 which can be downloaded from weescotslass here.
Font of Choice .. I have used Levenim MT.
Let's get started !
New Image 600x600 and floodfill with white. Open your mask in PSP.
New raster layer, select all and paste into selection Paper 9. New mask layer from image, WSL_Mask112, invert mask data unchecked, and merge group. Resize 110%.
Copy and paste Frame 2 & resize 75%. Using your magic wand, select the middle of your frame. Selections & modify expand 5. Copy and paste Paper 7, selections invert, hit delete and do no deselect. Move this layer below your frame layer. Copy and paste your tube & hit delete. Select none.
Copy and paste your tube again, but this time above your frame layer. Erase the bottom portion of your tube that covers your frame. Drop shadow your frame. I have used 2/2/40/4 throughout.
Copy and paste your tube again, but this time above your frame layer. Erase the bottom portion of your tube that covers your frame. Drop shadow your frame. I have used 2/2/40/4 throughout.
Copy and paste Doodle 2, resize 65% & drop shadow. Position top right hand corner, just above your mask layer. Layer duplicate and mirror.
Copy and paste Ribbon 3, resize 50% & drop shadow. Position bottom of your frame. Copy and paste Streamer 4, resize 75%, rotate right 75% & drop shadow. Position just above your ribbon.
Copy and paste Ribbon 3, resize 50% & drop shadow. Position bottom of your frame. Copy and paste Streamer 4, resize 75%, rotate right 75% & drop shadow. Position just above your ribbon.
Copy and paste Noisemaker 3, resize 65% & drop shadow. Postion left hand side of your frame. Copy and paste Glass 2, resize 50% & drop shadow. Position a lil to the left of your noisemaker. Copy and paste Champagne bottle 2, resize 50% & drop shadow. Position just on your glass and noisemaker. Reposition so that all elements are visible nicely. See my tag for placement.
Copy and paste Balloon 3, resize 50% & drop shadow. Position top left hand side hanging down to your glass.
Copy and paste Flower 5, resize 55% & drop shadow. Position right hand side of your frame. Copy and paste Flower 7, resize 50% & drop shadow. Position just above your other flower.
Copy and paste Hat, resize 50%, rotate right 45 & drop shadow. Position bottom right hand side just over the stems of your flowers.
X out white background, merge visible.
Open white background, resize to your liking (I used 500x500).
Add copyright & add your name. I used Levenim MT size 48 navy blue and added the following gradient glow and then drop shadow.

Add copyright & add your name. I used Levenim MT size 48 navy blue and added the following gradient glow and then drop shadow.

Save and you are done.
I hope you have enjoyed my tutorial.
Please feel free to send me your results.
I'd love to see what you came up with.
I hope you have enjoyed my tutorial.
Please feel free to send me your results.
I'd love to see what you came up with.
Monday, December 21, 2009
A New Award
8:53 PM | Posted by
Shal |
Edit Post

I received this award from Tori at Toris Tidbits as well as Dite at Dite's Haven.
Thanks so much ladies for thinking of me.
I'm supposed to reveal 10 things about me and then pass this on.
1. I live in Canada.
2. I'm a single mom of an amazing lil boy.
3. I've spent many Christmases in the states as my parents used to own a home in Florida.
4. Both my parents have passed away.
5. I am huge follower of reality tv.
3. I've spent many Christmases in the states as my parents used to own a home in Florida.
4. Both my parents have passed away.
5. I am huge follower of reality tv.
6. I'm addicted to Pepsi and drink it every day. A day without Pepsi equals a migraine.
7. I don't drink, smoke or drink coffee.
8. I used to be really creative with arts & crafts.
9. I skipped a grade in primary school.
10. Ignorant ppl drive me crazy !
I'm not sure I can come up with 10 ppl to pass this on to .. but nonetheless .. I'm passing this on to :
1 - tweety at tweety's Twilight tutorials
2 - Cheryl at Bright Starz tutorials
3 - Patty at Sunspottp's Place
4 - Sharon at Dolly's Tag World
Ring In The New Year PTU Scrap Kit
8:41 PM | Posted by
Shal |
Edit Post

Ring In The New Year PTU Scrap Kit
This New Year's themed kit has 15 papers & 67 elements.
Currently available at My Tag Art, Scrappin Warehouse, The Creativity Box, Wilma4ever & Your Scrap Addiction.
Tut using my "Ringing In 2010" Kit
8:38 PM | Posted by
Shal |
Edit Post

My dear friend Dite wrote this tut using my latest New Year's kit "Ringing In 2010".
You can find it here. Thanks so much Dite .. just gorgeous !
Ringing In 2010 PTU Scrap Kit
8:35 PM | Posted by
Shal |
Edit Post

Ringing In 2010 PTU Scrap Kit
This New Year's themed kit has 24 papers & 97 elements.
Currently available at My Tag Art, Scrappin Warehouse, The Creativity Box, Wilma4ever & Your Scrap Addiction.
Friday, December 18, 2009
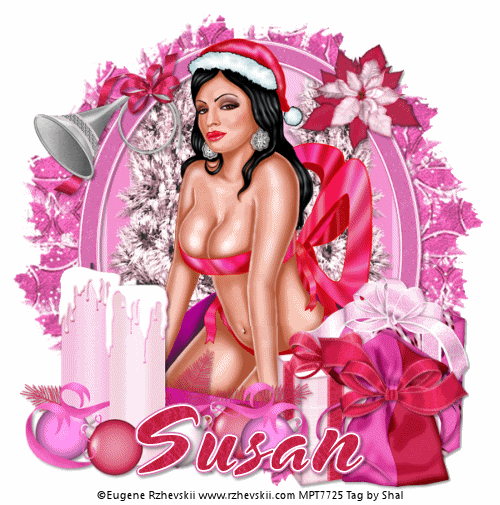
Pinkelcious Xmas Tut
9:40 AM | Posted by
Shal |
Edit Post
Feel free to use my tutorial as a guide and
have fun giving it your own spin.
This tutorial assumes you have a working knowledge of PSP.
Needed Supplies & Filters :
Tube of Choice .. I am using the work of Eugene Rzhevskii which you must have a license to use. Please do not use his work without purchasing through MPT here.
Scrap Kit of Choice .. I have used a gorgeous PTU kit from Puddicat called Joy’s Pinkelcious Xmas Dreams which be purchased here.
Mask of Choice .. I have used WSL_Mask112 which can be downloaded from weescotslass here.
Filters required ... Xenofex (Constellation) & Animation Shop
Font of Choice .. I have used Snowblind.
Let's get started !
New Image 600x600 and floodfill with white. Open your mask in PSP.
New raster layer, select all and paste into selection Paper 19. New mask layer from image, WSL_Mask112, invert mask data unchecked, and merge group. Resize 125%.
Duplicate twice and rename layers Mask 1, Mask 2 & Mask 3. On your first mask layer apply the following Xenofex/Constellation.

Apply the same Constellation to your next mask layer and hit random once. Apply again to your last mask layer hitting random twice. If you decide not to animate your tag, then just skip the duplicate twice.
Copy and paste Frame 3 & resize 75%. Using your magic wand, select the middle of your frame. Selections & modify expand 3. Copy and paste Paper 14, selections invert, hit delete and do no deselect. Move this layer below your frame layer. Copy and paste Tree 1, resize 75% and drop shadow. I have used 2/2/40/4 throughout. Position on the left side, layer duplicate and mirror. Hit delete. Copy and paste your tube, hit delete. Select none.
Copy and paste your tube again, but this time above your frame layer. Erase the bottom portion of your tube that covers your frame.
I have added the following gradient glow and then drop shadow to the frame.

Copy and paste Candle 1, resize 75% & drop shadow. Position bottom left.
Copy and paste Present 2, resize 75% & drop shadow. Position bottom right. Copy and paste Present 4, resize 50% and drop shadow. Position next to your other present. Copy and paste Bag 2, resize 40% & drop shadow. Position with your presents. Copy and paste Bow 9, resize 30% & drop shadow. Position on your bag.
Copy and paste Trumpet 2, resize 40% & drop shadow. Position top left hand side of your frame.
Copy and paste Poinsettia 1, resize 30% & drop shadow. Position top right hand corner of your frame.
At this point if you need to, resize your tag. I have used 500x500. Add your copyright and name. I have used Snowblind 72 using paper 7 as my pattern. I then added the same gradient glow and drop shadow as before.
If you are choosing not to animate, then you can save your tag.
To animate, close off Mask Layer 2 & 3 (the lil eye icon in your layer palette), Edit/Copy Merged and paste as new animation in Animation Shop. Close off Mask Layer 1 and open Mask Layer 2, Edit/Copy Merged and paste after current frame in AS. Close off Mask Layer 2 and open Mask Layer 3, Edit/Copy Merged and paste after current frame in AS. Save as a gif.
I hope you have enjoyed my tutorial.
Pls feel free to experiment and use my tutorial as a guide.
Please feel free to send me your results.
I'd love to see what you came up with.
Thursday, December 17, 2009
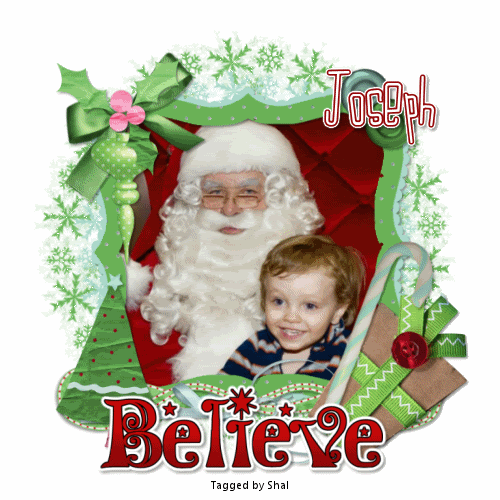
A Boy Believes Tut
10:35 PM | Posted by
Shal |
Edit Post
Feel free to use my tutorial as a guide and
have fun giving it your own spin.
This tutorial assumes you have a working knowledge of PSP.
Needed Supplies & Filters :
Photo of Choice .. The photo I am using is one of my own.
Scrap Kit of Choice .. I have used a gorgeous PTU scrapkit from Cora called Holiday Cheer, which you may purchase here.
Mask of Choice .. I have used Vix's vix_ChristmasMask6 which can be downloaded from her blog here.
Word Art of Choice .. I have used a great word art from Lori, which is available on her blog here.
Filters required ... Xenofex (Constellation)
Filters required ... Xenofex (Constellation)
Font of Choice .. I have used Jilly Nilly.
Let's get started !
New Image 600x600 and floodfill with white. Open your mask in PSP.
Copy and paste Paper 14. New mask layer from image, vix_ChristmasMask6, invert mask data unchecked, and merge group. Copy and paste Paper 13 and repeat mask. Resize this mask layer 85% and merge down both mask layers.
Duplicate twice and rename layers Mask 1, Mask 2 & Mask 3. On your first mask layer apply the following Constellation :

Apply the same Constellation to your next mask layer and hit random once. Apply again to your last mask layer hitting random twice. If you decide not to animate your tag, then just skip the duplicate twice.
Pls note .. since i'm doing this one for my lil man .. I decided to colorize my frame. I opened frame 7 in PSP, using the magic wand selected the pink area, adjust color balance/manual color correction from #f4779c to #6eb85f.
I then repeated this with the red area .. colorizing from #bc1036 tp #aaddcc. Rather than colorizing, you can also accomplish this the same way you do when you are using a template, select the area, add a new raster layer and floodfill. Repeat for 2nd area.
Copy and paste frame onto your project. Resize 65%. Using your magic wand, select the middle of your frame and selections/modify/expand 2. Copy and paste Paper 6, selections invert and hit delete. Do not deselect. Copy and paste photo of your choice, hit delete. Select none. Move both these layers below your frame layer. Drop shadow your frame. I have used 2/2/40/4 throughout.
Copy and paste Swoosh, resize 75% & drop shadow. Position bottom left of your frame. Layer duplicate and mirror.
Copy and paste Ribbon 7, resize 75% & drop shadow. Position bottom of your frame.
Copy and paste Ribbon 6, resize 50%, rotate left 20 & drop shadow. Position top left hand corner. Copy and paste Ornament 2, resize 50% & drop shadow. Position hanging from your bow. Copy and paste Holly, resize 50% & drop shadow. Position on your bow.
Copy and paste Gift 2, resize 50%, image mirror & drop shadow. Position bottom right corner. Copy and paste Candy cane 2, resize 65%, image mirror & rotate right 20. Drop shadow and position just above your gift.
Copy and paste Button 4, resize 35% & drop shadow. Position top right hand corner. Repeat with Button 3.
Copy and paste Tree, resize 35% & drop shadow. Position bottom left hand corner.
Copy and paste your word art and resize if necessary. I added a gradient glow size 3 white fat and drop shadow.
At this point if you need to, resize your tag. I have used 500x500. Add your copyright and name. I have used Jilly Nilly size 30 white with the following gradient glow and drop shadow.

If you are choosing not to animate, then you can save your tag.
To animate, close off Mask Layer 2 & 3 (the lil eye icon in your layer palette), Edit/Copy Merged and paste as new animation in Animation Shop. Close off Mask Layer 1 and open Mask Layer 2, Edit/Copy Merged and paste after current frame in AS. Close off Mask Layer 2 and open Mask Layer 3, Edit/Copy Merged and paste after current frame in AS. Save as a gif.
I hope you have enjoyed my tutorial.
Pls feel free to experiment and use my tutorial as a guide.
Please feel free to send me your results.
I'd love to see what you came up with.
Rac Happy New Year Tut
5:45 PM | Posted by
Shal |
Edit Post

Feel free to use my tutorial as a guide and
have fun giving it your own spin.
This tutorial assumes you have a working knowledge of PSP.
Needed Supplies & Filters :
Tube of Choice .. I am using the work of Ismael Rac which you must have a license to use. I am licensed through Artistic Minds Inc. but they are now closed. You can now find Ismael's artwork licensed through his own store. Pls do not use his work without purchasing through here.
Scrap Kit of Choice .. I have used a gorgeous PTU kit from Black Cat called New Year Cheer, which can be purchased at Artistic Minds Inc. here.
Mask of Choice .. I have used WSL_Mask84 from Weescotslass which can be downloaded here.
Template of Choice .. I have used Tamie's new year's template 4 which can be downloaded from her blog here.
Font of Choice .. I am using Gwendolyn Bold.
Let's get started !
Open your mask and template in PSP. Delete copyright, mask layer, text & star layers.
Adjust Canvas size 700 x 700. New raster layer, select all, paste into selection paper 20. New mask layer from image, WSL_Mask84, invert mask data unchecked, and merge group. Resize 115%. Resize all layers 600x600.
Select Glitter rectangle. Adjust color balance/manual color correction from #c0c0c0 to #c68601 & drop shadow. I have used 2/2/404/ throughout.
Select Rectangle, select all, float/defloat, copy and paste paper 19, selections invert, delete. Select none and delete original rectangle layer.
Select Glitter circle, adjust color balance/manual color correction from #ddd9d9 to #c68601 & drop shadow.
Select Circle, select all, float/defloat, copy and paste paper 19, selections invert, delete. Select none and delete original circle layer.
Select Half Circle, select all, float/defloat, copy and paste paper 20, selections invert, delete. Select none and delete original half circle layer.
Copy and paste tube. Drop shadow.
Select Small glitter circle, adjust color balance/manual color correction from #ddd9d9 to #c68601 & drop shadow.
Select Small Circle, select all, float/defloat, copy and paste paper 18, selections invert, delete. Select none and delete original small circle layer. Effects/texture effects/blinds 5/50 color black & horizontal checked.
Copy and paste Bubbles. Position on the left hand side. Layer duplicate & mirror. Position a lil higher.
Select Small glitter circle 2, adjust color balance/manual color correction from #ddd9d9 to #c68601 & drop shadow.
Select Small Circle 2, select all, float/defloat, copy and paste paper 12, selections invert, delete. Copy and paste tube and hit delete. Select none and delete original small circle 2 layer. Lower the opacity on your tube layer to 50%.
Select Glitter text, adjust color balance/manual color correction from white to #c68601.
Adjust add/remove noise uniform & monochrome checked 25% & drop shadow.
Select Text 2, select all, float/defloat, copy and paste paper 19, selections invert, delete. Select none and delete original text 2 layer.
Copy and paste Glass, resize 50% & drop shadow. Position left hand side, just next to your word art.
Copy and paste Magic wand 1, resize 40% & drop shadow. Position this layer on the right hand side just below your small circle layers.
Copy and paste Glitter, image mirror and position on the top right hand side just above your maks layer.
Copy and paste Gold bow, resize 40% & drop shadow. Position on your glass.
X out white background, merge visible.
Open white background, resize to your liking (I used 500x500).
Add copyright & add your name. I used Gwendolyn Bold size 72 #c78a08 and added the following gradient glow and then drop shadow.

Save and you are done.
I hope you have enjoyed my tutorial.
Please feel free to send me your results.
I'd love to see what you came up with
Friday, December 11, 2009
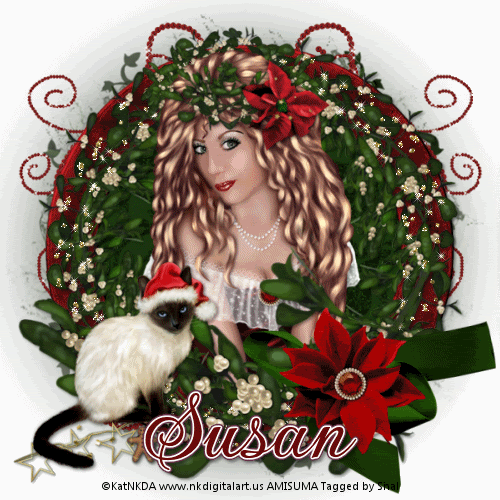
Santa's Mistress Tut
10:45 PM | Posted by
Shal |
Edit Post
Feel free to use my tutorial as a guide and have fun giving it your own spin.
This tutorial assumes you have a working knowledge of PSP.
Needed Supplies & Filters :
Tube of Choice .. I am using the work of KatNKDA which you must have a license to use. Please do not use her work without purchasing through her store here. I am licensed through Artistic Minds Inc. but they are now closed.
Scrap Kit of Choice .. I have used a gorgeous PTU Kit from KatNKDA called Santa's Mistress which was purchased through Artistic Minds Inc. who are now closed. The kit is currently unavailable.
Font of Choice .. I have used Gwendolyn Bold.
Let's get started !
New image 600x600. Floodfill with white. Copy and paste maskedbackdrop03.png.
Copy and paste Element 10. Using your magic select the middle of your frame. Modify expand by 3. Copy and paste Paper 3, selections/invert and hit delete. Do not deselect. Drag this layer below your frame layer.
Copy and paste katnkdaSantasMistress02 and hit delete. Select none.
Copy and paste your tube again, this time above your frame layer. Erase the bottom portion of your tube that is covering your frame. Drop shadow your frame. I have used 2/2/40/4 throughout.
Copy and paste Element 2, resize 85% & drop shadow. Drag this layer below your top tube layer.
Copy and paste Element14glitteroverlayframe. Duplicate the layer twice and rename your layers Glitter 1, 2 and 3. Select your first layer and Xenofex/Constellation with the following settings :

Apply the same Constellation to your next glitter layer and hit random once. Apply again to your last glitter layer hitting random twice. If you decide not to animate your tag, then just skip the duplicate twice.
Copy and paste Element 1, resize 85% & drop shadow. Position bottom of your frame.
Copy and paste Element 16, resize 75% & drop shadow. Position bottom right hand side.
Copy and paste Element 38, resize 50% & drop shadow. Position bottom right hand side just above your ribbon bow.
Copy and paste Kat_s_Pete_Scene4, resize 65% & drop shadow. Position bottom left hand side.
Copy and paste Element 20 just above your mask layer and position top right hand corner. Layer duplicate and mirror.
At this point if you need to, resize your tag. I have used 500x500. Add your copyright and name. I have used Gwendolyn Bold Size 72 color #650000 withthe following gradient glow and drop shadow.

If you are choosing not to animate, then you can save your tag.
To animate, close off Glitter Layer 2 & 3 (the lil eye icon in your layer palette), Edit/Copy Merged and paste as new animation in Animation Shop. Close off Glitter Layer 1 and open Glitter Layer 2, Edit/Copy Merged and paste after current frame in AS. Close off Glitter Layer 2 and open Glitter Layer 3, Edit/Copy Merged and paste after current frame in AS. Save as a gif.
I hope you have enjoyed my tutorial.
Pls feel free to experiment and use my tutorial as a guide.
Please feel free to send me your results.
I'd love to see what you came up with.
Wednesday, December 9, 2009
Xmas Is Near PTU Scrap Kit
2:41 PM | Posted by
Shal |
Edit Post

Xmas Is Near PTU Scrap Kit
This adorable Xmas themed kit has 18 papers, 76 elements and 2 alphas.
Currently available at My Tag Art, Scrappin Warehouse, The Creativity Box, Wilma4ever & Your Scrap Addiction.
Believe In The Magic Tut
1:20 PM | Posted by
Shal |
Edit Post

Feel free to use my tutorial as a guide and
have fun giving it your own spin.
This tutorial assumes you have a working knowledge of PSP.
Needed Supplies & Filters :
have fun giving it your own spin.
This tutorial assumes you have a working knowledge of PSP.
Needed Supplies & Filters :
Tube of Choice .. I am using the work of Ismael Rac which you must have a license to use. I am licensed through Artistic Minds Inc. but they are now closed. You can now find Ismael's artwork licensed through his own store. Pls do not use his work without purchasing through here.
Scrap Kit of Choice .. I have used a gorgeous PTU kit from Bits n Bobs called Christmas is Coming, which can be purchased exclusively at Artistic Minds Inc. here.
Mask of Choice .. I have used WSL_Mask84 which can be downloaded from weescotslass here.
Scrap Kit of Choice .. I have used a gorgeous PTU kit from Bits n Bobs called Christmas is Coming, which can be purchased exclusively at Artistic Minds Inc. here.
Mask of Choice .. I have used WSL_Mask84 which can be downloaded from weescotslass here.
Font of Choice .. I have used Snowblind.
Let's get started !
New Image 600x600 and floodfill with white. Open your mask in PSP. New raster layer, select all and paste into selection Paper 5.
New mask layer from image, WSL_Mask84, invert mask data unchecked, and merge group.
Copy and paste Element 12 and drop shadow. I have used 2/2/40/4 throughout. Copy and paste Element 13, image mirror & drop shadow.
Copy and paste your Tube, resize 85% & drop shadow. Depending on the tube you choose, for htis one, I erased a lil bit of the bottom of the tube that was covering the red ribbon frame.
Copy and paste Element 1 and drag this layer just above your mask layer. Position top right hand side. Layer duplicate and mirror.
Copy and paste Element 23, image mirror & drop shadow. Position bottom of your tube/frame.
Copy and paste Element 40, image flip & drop shadow. Position bottom right hand side.
Copy and paste Element 35, resize 85% & drop shadow. Position bottom right hand side above your ribbon/string.
Copy and paste Element 53, resize 75% & drop shadow. Position top right hand side. I have added the folllowing gradient glow and then drop shadow.

X out white background, merge visible.
Open white background, resize to your liking (I used 500x500).
Add copyright.
Add your name .. I used Snowblind, Size 72 color #447e00 and addedthe same gradient glow and drop shadow as before.
Save and you are done.
I hope you have enjoyed my tutorial. This kit has many great elements,
so pls feel free to experiment and use my tutorial as a guide.
Please feel free to send me your results.
I'd love to see what you came up with.
Monday, December 7, 2009
More tuts using my "Holly Jolly Christmas" & "Winter Blues" Kits
4:08 PM | Posted by
Shal |
Edit Post

My dear friend Dite wrote this tut using my latest Christmas kit "Holly Jolly Christmas".
You can find it here. Thanks so much Dite .. just gorgeous !

As well my dear friend Cheryl wrote this tut using my latest winter themed kit "Winter Blues".
You can find it here. Just beautiful .. thanks so much !
Tuesday, December 1, 2009
Holiday Train Freebie
9:32 AM | Posted by
Shal |
Edit Post

The holiday train has left the station. You can download my portion either on rapidshare or 4shared. Pls let me know if either link is not working properly.
The rest of the train stops can be found below.
Please keep in mind that every designer is located in different time zones,
and their links may not be yet posted.
http://oceanmystdesigns.blogspot.com/
http://nettesnightowlworks.blogspot.com/
http://twinkydezines.blogspot.com/
http://bitsnpiecesofqbd.blogspot.com/
http://desertbloomdesigns.blogspot.com/
http://barkingpenguinscraps.blogspot.com/
http://gothicinspirations.blogspot.com/
http://mimiscreationz.blogspot.com/
http://sgrowedesigns.blogspot.com/
http://caysdesigns.blogspot.com/
http://www.michelles-angels.blogspot.com/
http://www.fearlessangels.com/blog/
http://debeedezines.blogspot.com/
http://rosemadedesigns.blogspot.com/
http://karen9417.blogspot.com/
http://pattywraps.blogspot.com/
http://www.alikasscraps.blogspot.com/
http://www.pimpyourscrapbook.com/
http://pimpmytagswithscraps.com/blog/
http://pimp-your-tags.blogspot.com/
http://www.darksistersstore.blogspot.com/
http://darkpheonixquietcorner.blogspot.com/
http://saphirasworld.de/scrapdesign
http://ellanoir.blogspot.com/
http://www.addicted2scrapz.blogspot.com/
http://debscrapbooks.blogspot.com/
http://polkadotscraps.blogspot.com/
http://blueridgemeadows.blogspot.com/
http://blackcherryscraps.blogspot.com/
http://designedbystinaagain.blogspot.com/
http://humbuggraphicsgalore.blogspot.com/
http://digitalblueprint.blogspot.com/
http://tootypupscraps.blogspot.com/
http://www.sacredcreation.blogspot.com
http://digitalcreationsfrommillstreamcottage.blogspot.com/
http://jbs2designs.blogspot.com/
http://graphicsbypokadot.blogspot.com/
http://digiscrapations.blogspot.com/
http://created-by-jill.blogspot.com/
http://diteshaven.blogspot.com/
http://angelsdigiscrap.blogspot.com/
http://staceysdesigns.blogspot.com/
http://snackpackgu.blogspot.com/
http://ladyannesscraps.blogspot.com/
http://countryhollowcreations.blogspot.com/
http://stickykissesdesigns.blogspot.com/
http://graphicsbyliz.blogspot.com/
http://lifewithshal.blogspot.com/ <----- YOU ARE HERE!
http://dolphinlover09.blogspot.com/
http://creationzbyjo.blogspot.com/
http://www.dazzlingscraps.blogspot.com/
http://heavensdesignz.blogspot.com/
http://hippiedazescrappinstuff.blogspot.com/
http://bluebird-ddu.blogspot.com/
http://my-blog-creationsbyg.blogspot.com/
http://chilidesignzz.blogspot.com/
http://josdzigns.blogspot.com/
http://i-dont-give-a-scrap.blogspot.com/
http://maureenwatlingdesigns.blogspot.com/
http://www.charlieonline.it/TheGoodieTrain.htm
http://wenchdesigns .blogspot. com
http://nettesnightowlworks.blogspot.com/
http://twinkydezines.blogspot.com/
http://bitsnpiecesofqbd.blogspot.com/
http://desertbloomdesigns.blogspot.com/
http://barkingpenguinscraps.blogspot.com/
http://gothicinspirations.blogspot.com/
http://mimiscreationz.blogspot.com/
http://sgrowedesigns.blogspot.com/
http://caysdesigns.blogspot.com/
http://www.michelles-angels.blogspot.com/
http://www.fearlessangels.com/blog/
http://debeedezines.blogspot.com/
http://rosemadedesigns.blogspot.com/
http://karen9417.blogspot.com/
http://pattywraps.blogspot.com/
http://www.alikasscraps.blogspot.com/
http://www.pimpyourscrapbook.com/
http://pimpmytagswithscraps.com/blog/
http://pimp-your-tags.blogspot.com/
http://www.darksistersstore.blogspot.com/
http://darkpheonixquietcorner.blogspot.com/
http://saphirasworld.de/scrapdesign
http://ellanoir.blogspot.com/
http://www.addicted2scrapz.blogspot.com/
http://debscrapbooks.blogspot.com/
http://polkadotscraps.blogspot.com/
http://blueridgemeadows.blogspot.com/
http://blackcherryscraps.blogspot.com/
http://designedbystinaagain.blogspot.com/
http://humbuggraphicsgalore.blogspot.com/
http://digitalblueprint.blogspot.com/
http://tootypupscraps.blogspot.com/
http://www.sacredcreation.blogspot.com
http://digitalcreationsfrommillstreamcottage.blogspot.com/
http://jbs2designs.blogspot.com/
http://graphicsbypokadot.blogspot.com/
http://digiscrapations.blogspot.com/
http://created-by-jill.blogspot.com/
http://diteshaven.blogspot.com/
http://angelsdigiscrap.blogspot.com/
http://staceysdesigns.blogspot.com/
http://snackpackgu.blogspot.com/
http://ladyannesscraps.blogspot.com/
http://countryhollowcreations.blogspot.com/
http://stickykissesdesigns.blogspot.com/
http://graphicsbyliz.blogspot.com/
http://lifewithshal.blogspot.com/ <----- YOU ARE HERE!
http://creationzbyjo.blogspot.com/
http://www.dazzlingscraps.blogspot.com/
http://heavensdesignz.blogspot.com/
http://hippiedazescrappinstuff.blogspot.com/
http://bluebird-ddu.blogspot.com/
http://my-blog-creationsbyg.blogspot.com/
http://chilidesignzz.blogspot.com/
http://josdzigns.blogspot.com/
http://i-dont-give-a-scrap.blogspot.com/
http://maureenwatlingdesigns.blogspot.com/
http://wenchdesigns .blogspot. com
Sunday, November 29, 2009
Rac Let It Snow Tut
12:43 PM | Posted by
Shal |
Edit Post

Feel free to use my tutorial as a guide and
have fun giving it your own spin.
This tutorial assumes you have a working knowledge of PSP.
Needed Supplies & Filters :
Tube of Choice .. I am using the work of Ismael Rac which you must have a license to use. I am licensed through Artistic Minds Inc. but they are now closed. You can now find Ismael's artwork licensed through his own store. Pls do not use his work without purchasing through here.
Scrap Kit of Choice .. I have used a gorgeous PTU kit from Nikki called Winter Wonderland which be purchased here.
Mask of Choice .. I haved used montiblindsmask which can be downloaded from Monti's site here.
Font of Choice .. I am using Snowblind.
Let's get started !
Let's get started !
Open your mask in PSP. New image 600x600. Floodfill with white. New raster layer, select all, paste into selection Paper 8. New mask layer from image, montiblindsmask, invert mask data checked, and merge group. Resize 105%.
Copy and paste Snowframe 2 & resize 75%. Using your magic wand, select the middle of your ribbon frame. Selections & modify expand 3. Copy and paste Paper 2, selections invert, hit delete and do no deselect. Drag this layer beneath your ribbon frame layer. Copy and paste your tube closeup and hit delete. Select none. Change blend mode of tube layer to luminance. Drop shadow your ribbon frame. I have used 2/2/40/4 throughout.
Copy and paste Bow 2, resize 40% & drop shadow. Position top middle of your frame.
Copy and paste Bow 2, resize 40% & drop shadow. Position top middle of your frame.
Copy and paste Curly ribbon 2, resize 50% & drop shadow. Position at the bottom. Copy and paste Bead string 1, resize 50% & drop shadow. Position also at the bottom. Copy and paste String 2, resize 75%, rotate right 90 & drop shadow. Position also at the bottom.
Copy and paste Candy cane 2, resize 50% & drop shadow. Positon bottom right hand side.
Copy and paste Snow tree, resize 65% & drop shadow. Position bottom left hand side. Copy and paste Tree 2, resize 65% & drop shadow. Position next to your other tree.
Copy and paste your tube & drop shadow. Position next to your trees.
Copy and paste Word art 3, resize 35% & position top right hand side. I have added a size 3 fat white gradient glow and drop shadow.
X out white background, merge visible.
Open white background, resize to your liking (I used 500x500).
Add copyright & Add your name. I used Snowblind size 72 paper 8 as my background color and added the same gradient glow and drop shadow.
Save and you are done.
I hope you have enjoyed my tutorial.
Please feel free to send me your results.
I'd love to see what you came up with.

Subscribe to:
Posts (Atom)
Kits & Tuts


Blogs I Love


