About Me
My hobbies are PSP.
I love helping my friends who are starting with PSP.
Any similarity or resemblance to any other tutorial is purely coincidental and unintentional. Pls do not recopy my tutorials anywhere. Many thanks Susan.


Credit

Blinkie created by Rabid Designz. She does some amazing work ! Thanks so much Melissa.

Blinkie created by my long time friend tweety here. Thanks so much my friend :)
My blog was designed By Alika's Scraps. Thanks so much. You did an amazing job !

Leave Me A Message
Followers
My Blog List
Friday, August 27, 2010
 Mystery Fairy Tut
7:35 PM | Posted by
Shal |
 Edit Post
Feel free to use my tutorial as a guide and have fun giving it your own spin.
This tutorial assumes you have a working knowledge of PSP.
Needed Supplies & Filters :
Tube of Choice .. I am using the work of Caron Vinson which you must have a license to use. Please do not use her work without purchasing through CILM here.
Scrap Kit of Choice .. I have used a gorgeous scrapkit by Rieneke called Mystery which is available for purchase here.
Mask of Choice .. I haved used WSL_Mask352 by weescotslass which can be downloaded here.
Font of Choice .. Waterbrush ROB
Let's get started
New image 600x600 and floodfill with white. New raster layer, select all, paste into selection Paper 7. Select none. New mask layer from image, WSL_Mask352, invert transparency unchecked, and merge group.
Copy and paste Element 41 & drop shadow. I have used 2/2/40/4 throughout. Position towards the top. Layer duplicate and move down.
Copy and paste Element 65, resize 80% & drop shadow. Centre. Copy and paste Element 11, resize 75% & drop shadow. Position top centre. Copy and paste Element 37 & drop shadow. Centre.
Copy and paste Element 21, resize 65% & drop shadow. Position bottom right hand corner. Layer duplicate mirror.
Copy and paste Element 22, resize 65% & drop shadow. Position left hand side. Layer duplicate mirror. Trim bottom of stems.
Copy and paste Element 16, resize 65% & drop shadow. Position on the left hand side. Copy and paste Element 66, resize 50%, mirror & drop shadow. Position so it appears butterfly is holding the clock chain.
Copy and paste your tube. Resize if necessary & drop shadow.
Copy and paste Element 85, resize 65% & drop shadow. Position on the right hand side.
Copy and paste Element 74, resize 85% & drop shadow. Position along the bottom. Copy and paste Element 71, resize 85%, rotate left 15 & drop shadow. Position as well along the bottom.
Copy and paste Element 59, resize 75%, rotate left 90 & drop shadow. Position flowers starting from the bottom left hand corner.
Copy and paste Element 73, resize 65% & drop shadow. Position bottom right hand corner.
X out white background, merge visible. Open white background, resize to your liking (I have used 500x500).
Add copyright and your name. I have used Waterbrush ROB, Size 48, color #7b295a and then some noise (adjust add noise/uniform mono checked/50) and a size 4 fat color #b7cad2 gradient glow and then drop shadow.
Save and you are done.
I hope you have enjoyed my tutorial. Pls feel free to experiment and use my tutorial as a guide.
Please feel free to send me your results. I'd love to see what you came up with.
 Fall Mousekin Tut
6:14 PM | Posted by
Shal |
 Edit Post
Feel free to use my tutorial as a guide and have fun giving it your own spin.
This tutorial assumes you have a working knowledge of PSP.
Needed Supplies & Filters :
Tube of Choice .. I am using the work of Jennifer Nilsson (http://www.jenniferlnilsson.com) which you must have a license to use. Please do not use her work without purchasing through My Tag Art here.
Scrap Kit of Choice .. I have used my latest scrap kit called Fall Lovers which is available for purchase at My Tag Art here.
Mask of Choice .. I haved used WSL_Mask350 by weescotslass which can be downloaded here.
Font of Choice .. Waterbrush ROB
Let's get started
New image 600x600 and floodfill with white. New raster layer, select all, paste into selection Paper 18. Select none. New mask layer from image, WSL_Mask350, invert transparency unchecked, and merge group.
Copy and paste Frame 6 and resize 65%. Using your magic wand, select the center portion of your frame, selections modify/expand 6. Copy and paste Paper 6 below your frame layer, selections invert and hit delete. Select none.
Merge down the frame and background layer and rotate right 20. Drop shadow your frame. I have used 2/2/40/4 throughout.
Copy and paste Element 7, resize 75% & drop shadow. Position top left corner. Layer duplicate mirror/flip.
Copy and paste Frame 8 and resize 65%. Using your magic wand, select the center portion of your frame, selections modify/expand 6. Copy and paste Paper 13 below your frame layer, resize 65%, selections invert and hit delete. Do not deselect.
Copy and paste below your frame your tube & resize if required. Layer duplicate and drag this layer above your frame. On the tube layer below you frame, hit delete. Select none. Select the tube layer above your frame and erase the bottom/side portion of the tube so it appears to be coming out of your frame. Drop shadow your frame.
Copy and paste Ribbon 1, resize 75%, rotate right 90 & drop shadow. Position along the bottom of your frame.
Copy and paste String 3, resize 85%, rotate right 90 & drop shadow. Position along the bottom of your frame.
Copy and paste String 5, resize 85% rotate left 90 & drop shadow. Position along the bottom of your frame as well. Layer duplicate & rotate right 90. Position along the right hand side of your frame.
Copy and paste Element 3, resize 65% & drop shadow. Position on the right hand side. Copy and paste Element 15, resize 65% & drop shadow. Position on the bottom right hand corner.
Copy and paste Element 2, resize 75% & drop shadow. Position on the left hand side. Copy and paste Element 13, resize 65%, mirror & drop shadow. Position on the bottom left hand corner.
Copy and paste Element 17, resize 50% & drop shadow. Position bottom centre.
X out white background, merge visible. Open white background, resize to your liking (I have used 500x500).
Add copyright and your name. I have used Waterbrush ROB, Size 60, color #642b06 and then added a size 3 fat color #c7a344 gradient glow and then drop shadow.
Save and you are done.
I hope you have enjoyed my tutorial. Pls feel free to experiment and use my tutorial as a guide.
Please feel free to send me your results. I'd love to see what you came up with.
Thursday, August 26, 2010
 5 days left for Shal's World Summer Bundle !
11:13 PM | Posted by
Shal |
 Edit Post
5 days left for Shal's World Summer Bundle
This bundle contains 3 summer themed tagger size kits. Including in this bundle are my Fun In The Sun, Out to Sea and A Pirate's Life tagger size kits.
Currently available at My Tag Art, Scrappin Warehouse, The Creativity Box, Wilma4ever & Your Scrap Addiction.
This bundle contains 3 summer themed tagger size kits. Including in this bundle are my Fun In The Sun, Out to Sea and A Pirate's Life tagger size kits.
Currently available at My Tag Art, Scrappin Warehouse, The Creativity Box, Wilma4ever & Your Scrap Addiction.
 Fall Lovers Tagger Size Kit
10:59 PM | Posted by
Shal |
 Edit Post
Fall Lovers Tagger Size Kit
This kit contains 25 papers (700x700 in size) & 97 elements. Elements include bows, buttons, doodles, flairs, frames, ribbons, strings and a gorgeous variety of fall themed elements that include leaves, flowers, nuts, pine cone, window frame, and the most gorgeous fall themed posers !
Perfect kit to fall in love with fall !
Perfect kit to fall in love with fall !
Currently available at My Tag Art, Scrappin Warehouse, The Creativity Box, Wilma4ever & Your Scrap Addiction.
Sunday, August 22, 2010
 Treat For You Tut
7:20 PM | Posted by
Shal |
 Edit Post
Feel free to use my tutorial as a guide and have fun giving it your own spin.
This tutorial assumes you have a working knowledge of PSP.
Needed Supplies & Filters :
Tube of Choice .. I am using the work of Keith Garvey which you must have a license to use. Please do not use his work without purchasing through My PSP Tubes here.
Scrap Kit of Choice .. I have used a gorgeous PTU Kit from KatNKDA called Ladies Night which can be purchased here.
Template of Choice .. I have used template 294 by Missy which can be downloaded from her blog here.
Mask of Choice .. I haved used WSL_Mask83 which can be downloaded here.
Font of Choice .. Waterbrush ROB
Let's get started
Open your template in PSP & delete credits, pixel words, suckers & raster 1 layers. Resize canvas size 700x700 & floodfill background layer with white.
New raster layer/ Select all, copy and paste into selection Paper 27. Select none. New mask layer from image, WSL_Mask83, invert transparency unchecked. Merge group. Layer duplicate and merge down both mask layers.
Select Oval layer, select all/float/defloat, copy and paste Paper 19, selections invert and hit delete. Copy and paste element 01 (see my tag for placement) & hit delete. Change blend mode to luminance for the eye layer. Merge down eye layer with new oval layer. Select none and delete original Oval layer.
I then added the following gradient glow and drop shadow. I have used 2/2/40/4 throughout.
Select Glittered oval layer, select all/float/defloat, copy and paste Paper 11, selections invert and hit delete. Select none and delete original Glittered oval layer. Add gradient glow & drop shadow.
Select Circle 1 layer. Adjust/add noise/random mono checked/50% & then drop shadow.
Select Circle 2 layer, select all/float/defloat, copy and paste Paper 27, resize 75%, selections invert and hit delete. Select none and delete original Circle 2 layer. Add gradient glow & drop shadow.
Select Shape layer and change color to black (adjust color balance/manual color correction/from original color to black). Then add gradient glow & drop shadow.
Select Heart layer and change color to black. Then add the same noise, gradient glow & drop shadow as before.
Select Small heart/Glittered hearts layers and change color from pink to #9b71c0.
Select Word art layer and add the following gradient glow and then drop shadow.
Copy and paste Element 35, resize 55%, rotate right 90 & drop shadow. Position nicely over your circle area on the right hand side. See my tag for placement.
Copy and paste Element 20 above mask layer & add gradient glow & then drop shadow.
At this point I decided to resize to 500x500. If you prefer you can wait till the end to do this and resize the rest of the elements accordingly.
Copy and paste Tube, resize 85% & drop shadow. Position on the right hand side.
Copy and paste Element 18, resize 40% & drop shadow. Position bottom left hand side.
Copy and paste Element 16 below your tube layer, resize 30% & drop shadow. Position at the top of your circle. Copy and paste Element 29, resize 40% & drop shadow. Position on your other bow.
Add copyright and your name. I have used Waterbrush ROB Size 72 black and then added the first gradient glow we used and then drop shadow.
Save and you are done.
I hope you have enjoyed my tutorial. Pls feel free to experiment and use my tutorial as a guide.
Please feel free to send me your results. I'd love to see what you came up with.
Tuesday, August 17, 2010
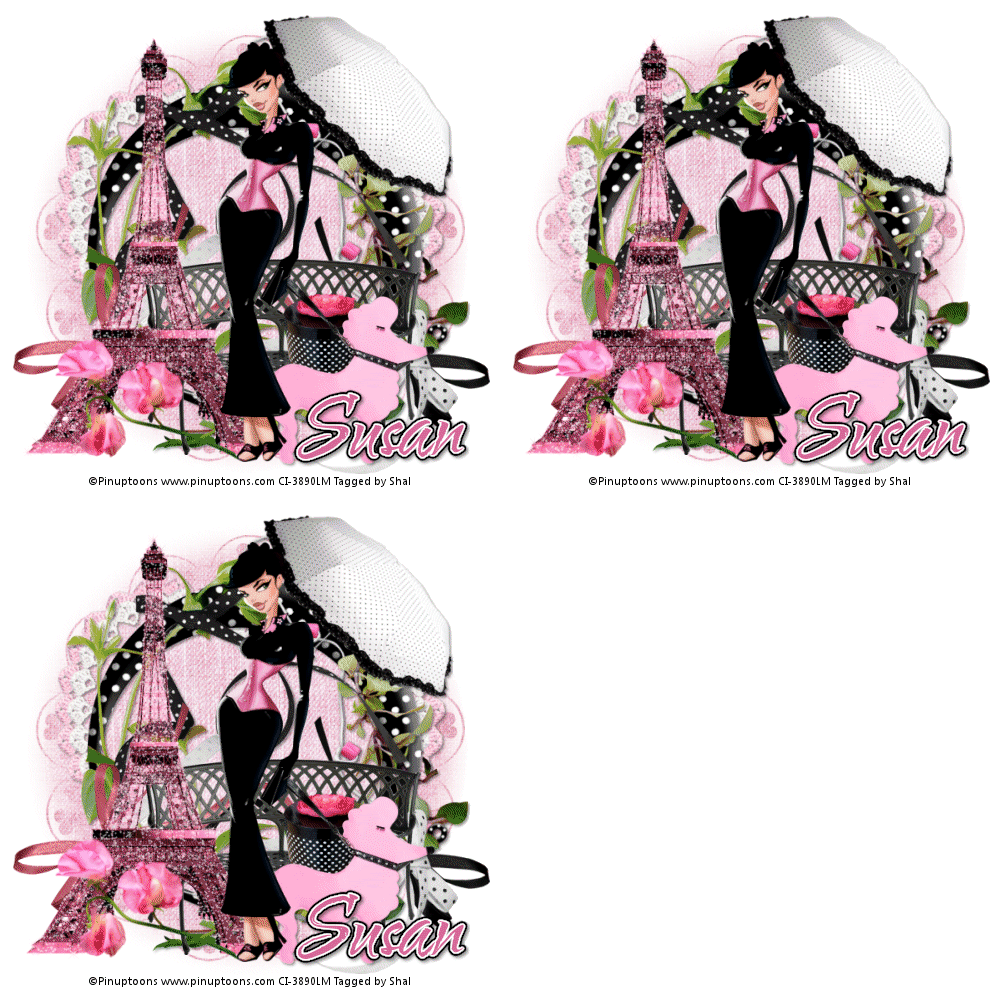
 Paris Chic Tut
2:21 AM | Posted by
Shal |
 Edit Post
Feel free to use my tutorial as a guide and have fun giving it your own spin.
This tutorial assumes you have a working knowledge of PSP.
Needed Supplies & Filters :
Tube of Choice .. I am using the work of Pinuptoons which you must have a license to use. Please do not use their work without purchasing through CILM here.
Scrap Kit of Choice .. I have used one of my PTU scrapkit by Heartfelt Perfections called Paris Chic which can be purchased here.
Mask of Choice .. I haved used WSL_Mask352 which can be downloaded here.
Word Art of Choice .. I have used word art by Cupcake Sprinkles by Caitlin which can be downloaded here.
Font of Choice .. Waterbrush ROB
Filters of Choice .. Xenofex/Constellation & Eye Candy/Gradient Glow (Optional)
Let's get started
New image 600x600 and floodfill with white. New raster layer, select all, paste into selection Paper 1. Select none. New mask layer from image, WSL_Mask352, invert transparency unchecked, and merge group. Layer duplicate and merge down both mask layers.
Copy and paste Lace frame 2 & resize 65%. Copy and paste Deco frame & resize 80%. Copy and paste Vine 2 & resize 65%.
Copy and paste Polka dot ribbon 3 & resize 75%. Position at the top of your frame.
Copy and paste Ribbon 2 & resize 75%. Position along the bottom on the right hand side. Copy and paste Ribbon & resize 75%. Position along the bottom on the left hand side. Trim ends of your ribbons if you like.
Copy and paste Polka dot ribbon 2 & resize 75%. Position along the bottom on the right hand side.
Copy and paste Bench & resize 65%. Position bottom right hand side. Copy and paste Hat box & resize 40% twice. Position the hat box on the bench.
Copy and paste Poodle wristlet & resize 40%. Position bottom right hand corner.
Copy and paste your tube & resize as required. Position so it appears that the hand is holding the poodle leash.
Copy and paste Umbrella below your tube layer & resize 65%. Position top right hand corner.
Copy and paste Eiffel tower pink & resize 75%. Position on the left hand side.
Duplicate twice and rename your layers Tower 1,2 and 3. On your first Tower layer apply the following Xenofex/Constellation.
Apply the same effects to your next Tower layer and hit random once. Apply again to your last Tower layer hitting random twice. Select none. If you decide not to animate your tag, then just skip the duplicate twice.
Copy and paste Pink flower 3, resize 30% & rotate left 20. Position along the bottom of your Eiffel tower.
At this point if you need to, resize your tag. I have used 500x500. Add your copyright and name. I have used Waterbrush ROB, size 60, color #d76a9a and added the following gradient glow and then drop shadow (2/2/40/4).
If you are choosing not to animate, then you can save your tag.
To animate, close off Tower Layer 2 & 3 (the lil eye icon in your layer palette), Edit/Copy Merged and paste as new animation in Animation Shop. Close off Tower Layer 1 and open Tower Layer 2, Edit/Copy Merged and paste after current frame in AS. Close off Tower Layer 2 and open Tower Layer 3, Edit/Copy Merged and paste after current frame in AS.
I slowed down my animation a bit by selecting all/animation/frame properties 15.
Save as a gif.
I hope you have enjoyed my tutorial.
Pls feel free to experiment and use my tutorial as a guide.
Please feel free to send me your results.
I'd love to see what you came up with.
Monday, August 16, 2010
 Tut using my "Fun In The Sun" Kit
1:20 AM | Posted by
Shal |
 Edit Post
My dear friend tweety has done it again and wrote this gorgeous tut using my Fun In The Sun kit. Thanks so much my friend. You always do such an amazing job. Tutorial can be found here.
Sunday, August 15, 2010
 Dazzle Tut
9:05 PM | Posted by
Shal |
 Edit Post
Feel free to use my tutorial as a guide and have fun giving it your own spin.
This tutorial assumes you have a working knowledge of PSP.
Needed Supplies & Filters :
Tube of Choice .. I am using the work of Lacy Clagg (www.lacyclagg.com) which you must have a license to use. Please do not use her work without purchasing through My Tag Art here.
Scrap Kit of Choice .. I have used a gorgeous FTU scrap kit by Addictive Pleasures called Edward which you can download here.
Mask of Choice .. I haved used WSL_Mask83 by weescotslass which can be downloaded here.
Font of Choice .. Satanick Regular
Filters of choice .. Xenofex/Constellation & Eye Candy/Gradient Glow (both optional)
Let's get started
New image 600x600 and floodfill with white. New raster layer, select all, paste into selection Paper 4. Select none. New mask layer from image, WSL_Mask83, invert transparency unchecked, and merge group.
Add the following Xenofex/Constellation effect for a lil sparkle.
Let's get started
New image 600x600 and floodfill with white. New raster layer, select all, paste into selection Paper 4. Select none. New mask layer from image, WSL_Mask83, invert transparency unchecked, and merge group.
Add the following Xenofex/Constellation effect for a lil sparkle.
Copy and paste Frame 4 and resize 75%. Using your magic wand, select the center portion of your frame, selections modify/expand 8. Copy and paste Paper 1 below your frame layer, selections invert and hit delete. Select none.
Drop shadow your frame. I have used 2/2/40/4 throughout.
Copy and paste Ivy 3 & drop shadow. Position on the left hand side. Layer duplicate & mirror.
Copy and paste Tree 2, resize 75% & drop shadow. Centre. Copy and paste Rosearch, resize 75% & drop shadow. Centre as well.
Copy and paset Leaves 2, resize 75% & drop shadow. Position on the left hand side. Layer duplicate & mirror.
Copy and paste Ivy 2 & drop shadow. Position along the bottom.
Copy and paste your tube, resize as necessary and drop shadow. Centre.
Copy and paste Leaves 3, resize 75% & drop shadow. Position bottom left hand side. Copy and paste Flower, resize 40% & drop shadow. Position on your left. Copy and paste Butterfly 2, resize 50% & drop shadow. Position bottom left corner just above your flower/leaf.
Copy and paste Butterfly, resize 65% & drop shadow. Position top right hand corner.
Copy and paste Candles, resize 50% & drop shadow. Position bottom right hand corner.
Copy and paste Glassbutton, resize 50% & drop shadow. POsition top left hand corner.
X out white background, merge visible. Open white background, resize to your liking (I have used 500x500).
Add copyright and your name. I have used Satanick Regular, Size 48, color #4d0303 and then added a noise effect (adjust/add remove noise/uniform monochrome checked/35%) and the following gradient glow and drop shadow.
Save and you are done.
I hope you have enjoyed my tutorial. Pls feel free to experiment and use my tutorial as a guide.
Please feel free to send me your results. I'd love to see what you came up with.
Sunday, August 8, 2010
 Grab Your Party Hat Tut
5:31 PM | Posted by
Shal |
 Edit Post
Feel free to use my tutorial as a guide and have fun giving it your own spin.
This tutorial assumes you have a working knowledge of PSP.
Needed Supplies & Filters :
Tube of Choice .. I am using the work of Jennifer Nilsson (http://www.jenniferlnilsson.com) which you must have a license to use. Please do not use her work without purchasing through My Tag Art here.
Scrap Kit of Choice .. I have used a gorgeous PTU Kit from Connies Creative Chaos called My Party which can be purchased here.
Template of Choice .. I have used template 40 by Missy which can be downloaded from her blog here.
Mask of Choice .. I haved used WSL_Mask221 which can be downloaded here.
Word art of Choice .. I have used word art from Create with TLC which can be downloaded here.
Font of Choice .. CarattereROB
Let's get started
Open your template in PSP & delete credits. Resize canvas size 600x600 & floodfill background layer with white.
New raster layer/ Select all, copy and paste into selection Paper 2. Select none. New mask layer from image, WSL_Mask221, invert transparency unchecked. Merge group.
Select Larger Circle layer, select all/float/defloat, copy and paste Paper 3, selections invert and hit delete. Select none and delete original Larger Circle layer. I then added the following gradient glow and then drop shadow. I have used 2/2/40/4 throughout.
Select Small Circle layer, select all/float/defloat, copy and paste Paper 2, selections invert and hit delete. Select none and delete original Small Circle layer. Add gradient glow and drop shadow.
Copy and paste Balloon 1 & Balloon 5 and add drop shadow. Position in the top left hand corner.
Select Larger heart layer and adjust color from the gray to #f299d3. I did this by using adjust color/manual color correction from the gray to desired color.
I then added a lil noise by adjust/add noise/gaussian mono checked/50% & then gradient glow and drop shadow.
Select Smaller heart layer and adjust color from the gray to #a56abc and then drop shadow.
Select Dotted line layer and adjust color from the gray to #4a88c1.
Copy Tube, resize accordingly & drop shadow.
Copy and paste Candy 5 & drop shadow. Position on the left hand side.
Copy and paste Ribbon 1, resize 65% & drop shadow. Position at the top of your circle layers.
Copy and paste Polka 4, resize 65% & drop shadow. Position along the bottom of your tube.
Copy and paste Ribbon 7, resize 50% & drop shadow. Position at the end of your ribbon.
Select Small hearts layer and adjust color from the gray to #4a88c1. I then added the same noise, gradient glow and drop shadow as used previously. Move down your hearts a bit if need be.
Copy and paste Fun 2 just above your mask layer, resize 65%, rotate left 30 & drop shadow. Position top right hand corner.
Copy and paste your Word art, resize 40% twice and add gradient glow and drop shadow.
X out white background, merge visible. Open white background, resize to your liking (I used 500x500).
Add copyright and your name. I have used CarattereRob size 36 black.
Save and you are done.
I hope you have enjoyed my tutorial. Pls feel free to experiment and use my tutorial as a guide.
Please feel free to send me your results. I'd love to see what you came up with.
Monday, August 2, 2010
 Summer Bundle Tagger Size Kits
3:26 PM | Posted by
Shal |
 Edit Post
This bundle contains 3 summer themed tagger size kits. Including in this bundle are my Fun In The Sun, Out to Sea and A Pirate's Life tagger size kits.
Currently available for 3.00$ until the end of August at :
My Tag Art
Scrappin Warehouse
The Creativity Box
Wilma4ever
Your Scrap Addiction
My Tag Art
Scrappin Warehouse
The Creativity Box
Wilma4ever
Your Scrap Addiction
Subscribe to:
Posts (Atom)
Labels
- 1$ Mini Kits (4)
- Angela Newman (7)
- Awards (10)
- Blog Trains (6)
- Caron Vinson (1)
- CU Items (8)
- Elias (3)
- Extras (6)
- FTU Scrap Kits (22)
- FTU Tutorials (39)
- Halloween (1)
- Irish Bitch Designs (2)
- KatNKDA (28)
- KiwiFire Storm (1)
- Maigan Lynn (6)
- Misc (1)
- News (98)
- Pinup Toons (1)
- PTU Scrap Kits (79)
- PTU Tutorials (245)
- Sweet Dream Scraps (3)
- Tags Using my Scraps (10)
- Tags Using My Tuts (13)
- Tuts Using My Kits; (63)
- Tuts Using My Kits; Tags Using my Scraps (3)
- verymany (2)
- Wicked Princess Scraps (3)


