About Me
My hobbies are PSP.
I love helping my friends who are starting with PSP.
Any similarity or resemblance to any other tutorial is purely coincidental and unintentional. Pls do not recopy my tutorials anywhere. Many thanks Susan.


Credit

Blinkie created by Rabid Designz. She does some amazing work ! Thanks so much Melissa.

Blinkie created by my long time friend tweety here. Thanks so much my friend :)
My blog was designed By Alika's Scraps. Thanks so much. You did an amazing job !

Tuesday, September 27, 2011
 Happy Haunting Tut
12:31 AM | Posted by
Shal |
 Edit Post

Feel free to use my tutorial as a guide and have fun giving it your own spin.
This tutorial assumes you have a working knowledge of PSP.
Needed Supplies :
Tube of Choice .. I am using the work of Acyd Reflux which you must have a license to use. Please do not use this work without purchasing through SNC here.
Scrap Kit of Choice .. I have used a SNC forum exclusive by me called "Happy Haunting". The kit is FTU but you must be a member of the forum to be able to download it here.
Mask of Choice .. I have used WSL_Mask119 which can be downloaded here.
Font of Choice .. Blood Feast
Let's get started
New image 600x600 and floodfill with white. New raster layer, select all, paste into selection Paper 2. Select none. New mask layer from image, WSL_Mask119, invert transparency unchecked, and merge group.
Copy and paste Splatter 3, resize 65% & drop shadow. Position top left hand corner. I have used 2/2/40/4 throughout. Repeat with Splatter 2 and position bottom right hand corner.
Copy and paste Element 8, adjust/add remove noise/add noise/random monochrome checked/50% & position top right hand corner.
Copy and paste Frame 3 and resize 40%. Using your magic wand, select the center portion of your frame, selections modify/expand 5. Copy and paste Paper 7 below your frame layer, resize 65%, selections invert and hit delete. Select none and drop shadow your frame.
Merge down your frame with its background layer & rotate left 10. Position a lil to top left hand side. Layer duplicate and mirror. Position a little to the bottom right hand side.
Copy and paste your 1rst tube, resize as necessary & drop shadow. Position on the left hand side.
Copy and paste Element 3, resize 65% & drop shadow. Position so it appears to be hanging from the web. Copy and paste Element 14, resize 85% & drop shadow. Position left of centre.
Copy and paste Element 15, resize 75% & position top left hand corner. Copy and paste Element 18, resize 65% & drop shadow. Position top right hand corner as well.
Copy and paste your 2nd tube, resize as necessary & drop shadow.
Copy and paste Word Art 2, resize 40%, rotate left 5 & drop shadow. Position top right hand corner. Repeat with Word Art 4, rotating right 5 & position next to your other Word Art.
X out white background, merge visible. Open white background, resize to your liking (I have used 500x500).
Add copyright and name on your tag. I have used Blood Feast, Size 48, color black and then added the same noise effect as used previously, followed by this gradient glow & drop shadow.

Save and you are done.
I hope you have enjoyed my tutorial.
Pls feel free to experiment and use my tutorial as a guide
Sunday, September 18, 2011
Time for Fall Tut
6:24 PM | Posted by
Shal |
Edit Post

Feel free to use my tutorial as a guide and have fun giving it your own spin.
This tutorial assumes you have a working knowledge of PSP.
Needed Supplies :
Tube of Choice .. I am using the work of Ismael Rac which you must have a license to use. Please do not use his work without purchasing through here.
Scrap Kit of Choice .. I have used a adorable PTU Kit from Stargazer Musings called "Fall Ever Friends" which can be purchased here.
Mask of Choice .. I haved used WSL_Mask275 & WSL_Mask328 which can be downloaded here.
Font of Choice .. CLB Thanksgiving
Let's get started
New image 600x600 and floodfill with white. New raster layer, select all, paste into selection Paper 3. Select none. New mask layer from image, WSL_Mask275, invert transparency unchecked, and merge group.
On your first mask layer only, adjust/add remove noise/add noise/uniform monochrome checked/25%.
Repeat with Paper 19 and using mask WSL_Mask328. Layer duplicate and merge down both green layers.
Repeat with Paper 22 and using mask WSL_Mask328. Layer duplicate, merge down both yellow layers and mirror.
Copy and paste Lace Frame 1 and resize 65%. Using your magic wand, select the center portion of your frame, selections modify/expand 5. Copy and paste Paper 39 below your frame layer, selections invert and hit delete.
Drop shadow your frame. I have used 2/2/40/4 throughout. Merge down your frame with it's background. I then added the following Xenofex/Constellation effect.
Copy and paste Tag with String 1, resize 50% & drop shadow. Position top right hand side. Copy and paste Old Clock, resize 40% and drop shadow. Position top right hand corner so it appears the tag is hanging from behind the clock.
Copy and paste Bow 6, resize 50% & drop shadow. Position bottom left hand corner. Copy and paste your tube, resize as necessary and drop shadow.
Copy and paste Glitter Leaves 1, resize 50%, rotate left 90 & drop shadow. Position along the bottom of your frame. Copy and paste Ribbon 1, resize 65% & drop shadow. Position along the bottom.
Copy and paste Ribbon 2, resize 65% & drop shadow. Position along the left hand side of your frame. Repeat with Ribbon 4, rotate left 90 and position with your other ribbon. Copy and paste Glitter Leaves 2, resize 50% & drop shadow. Position as well on the left hand side of your frame.
Copy and paste Note Sheet 1, resize 40%, rotate right 15 & drop shadow. Position botton left hand corner. Copy and paste Lock 1, resize 50% & drop shadow. Position bottom left hand corner on your note sheet. Repeat with Old Key 1 and position on your lock.
Copy and paste Butterfly 1, resize 30% & drop shadow. Position top left hand corner.
X out white background, merge visible. Open white background, resize to your liking (I have used 500x500).
Add copyright and name on your tag. I have used CLB Thanksgiving, Size 60, color #482d36 and then added the same noise effect as used previously, followed by this gradient glow & drop shadow.
Save and you are done.
I hope you have enjoyed my tutorial.
Pls feel free to experiment and use my tutorial as a guide
This tutorial assumes you have a working knowledge of PSP.
Needed Supplies :
Tube of Choice .. I am using the work of Ismael Rac which you must have a license to use. Please do not use his work without purchasing through here.
Scrap Kit of Choice .. I have used a adorable PTU Kit from Stargazer Musings called "Fall Ever Friends" which can be purchased here.
Mask of Choice .. I haved used WSL_Mask275 & WSL_Mask328 which can be downloaded here.
Font of Choice .. CLB Thanksgiving
Let's get started
New image 600x600 and floodfill with white. New raster layer, select all, paste into selection Paper 3. Select none. New mask layer from image, WSL_Mask275, invert transparency unchecked, and merge group.
On your first mask layer only, adjust/add remove noise/add noise/uniform monochrome checked/25%.
Repeat with Paper 19 and using mask WSL_Mask328. Layer duplicate and merge down both green layers.
Repeat with Paper 22 and using mask WSL_Mask328. Layer duplicate, merge down both yellow layers and mirror.
Copy and paste Lace Frame 1 and resize 65%. Using your magic wand, select the center portion of your frame, selections modify/expand 5. Copy and paste Paper 39 below your frame layer, selections invert and hit delete.
Drop shadow your frame. I have used 2/2/40/4 throughout. Merge down your frame with it's background. I then added the following Xenofex/Constellation effect.

Copy and paste Tag with String 1, resize 50% & drop shadow. Position top right hand side. Copy and paste Old Clock, resize 40% and drop shadow. Position top right hand corner so it appears the tag is hanging from behind the clock.
Copy and paste Bow 6, resize 50% & drop shadow. Position bottom left hand corner. Copy and paste your tube, resize as necessary and drop shadow.
Copy and paste Glitter Leaves 1, resize 50%, rotate left 90 & drop shadow. Position along the bottom of your frame. Copy and paste Ribbon 1, resize 65% & drop shadow. Position along the bottom.
Copy and paste Ribbon 2, resize 65% & drop shadow. Position along the left hand side of your frame. Repeat with Ribbon 4, rotate left 90 and position with your other ribbon. Copy and paste Glitter Leaves 2, resize 50% & drop shadow. Position as well on the left hand side of your frame.
Copy and paste Note Sheet 1, resize 40%, rotate right 15 & drop shadow. Position botton left hand corner. Copy and paste Lock 1, resize 50% & drop shadow. Position bottom left hand corner on your note sheet. Repeat with Old Key 1 and position on your lock.
Copy and paste Butterfly 1, resize 30% & drop shadow. Position top left hand corner.
X out white background, merge visible. Open white background, resize to your liking (I have used 500x500).
Add copyright and name on your tag. I have used CLB Thanksgiving, Size 60, color #482d36 and then added the same noise effect as used previously, followed by this gradient glow & drop shadow.

Save and you are done.
I hope you have enjoyed my tutorial.
Pls feel free to experiment and use my tutorial as a guide
Wonderful creations from Misfits
1:07 AM | Posted by
Shal |
Edit Post
Wow what a surprise ! My lil tut site was selected for this week's Tut with a twist challenge at Creative Misfits ! So I thought I would take the time to share some of the amazing creations misfits have done using my tuts !
Dazzle Tut by adelema

Your Smile Tut by Foxglove

Golden Fae Tut by ParisStarr

Seeing Stars Tut by Sandra

Naughty Tut by Tammy Kat

Autumn Leaves Tut by ladyt57


The Shades of Autumn Collaboration at Twilight Scraps
12:49 AM | Posted by
Shal |
Edit Post

The Shades of Autumn Collaboration
Free with $10 in store purchase
Free with $10 in store purchase
The Shades of Autumn Collaboration was put together by several of our very talented designers. There is a total of 22 products inside this collab totalling a HUGE 350mg. They mostly all Personal Use kits but there is some Commercial Use pack. Please be sure to read the terms by each designer and read the previews so you know which of the products is PU or CU.
Thank you for supporting Twilight Scraps!!
Thank you for supporting Twilight Scraps!!

Summer's End Tagger Size Kit
12:26 AM | Posted by
Shal |
Edit Post

This kit contains 25 papers (800x800 in size) & 84 elements. Elements include beaded strings, bows, beach chairs, doodles, flowers, frames, ribbons, strings & word art. Also included is a great variety of beach/sea themed elements including beach gear, seashells, chest, beach treats, palm tree and so much more.
Your last stab at the fun and sunshine of summer as we crawl into fall !
Your last stab at the fun and sunshine of summer as we crawl into fall !
Available now at Heartfelt Perfections, Twilight Scraps & Wilma4ever.
Tuesday, September 13, 2011
All Hollows Eve Tut
7:35 PM | Posted by
Shal |
Edit Post

Feel free to use my tutorial as a guide and have fun giving it your own spin.
This tutorial assumes you have a working knowledge of PSP.
Needed Supplies & Filters :
Tube of Choice .. I am using the work of Barbara Jensen which you must have a license to use. Please do not use this work without purchasing through SNC here.
This particular image is an exclusive available only through SNC.
Scrap Kit of Choice .. I have used a gorgeous PTU Kit from F?Yew called Octobers End which can be purchased here.
Mask of Choice .. I haved used WSL_Mask84 which can be downloaded here.
Font of Choice .. Blood Feast
Filters of Choice .. Xenofex/Lightning
Let's get started
New image 600x600 and floodfill with white. New raster layer, select all, paste into selection Paper 8. Select none. New mask layer from image, WSL_Mask84, invert transparency unchecked, and merge group. Resize 115%.
Copy and paste Glitter Splat 1, resize 75% & position towards the top. Layer duplicate and flip.
Copy and paste Paperframe 1 and resize 75%. Using your magic wand, select the center portion of your frame, selections modify/expand 5. Copy and paste Paper 10 below your frame layer, selections invert and hit delete.
Duplicate this layer twice and rename your layers Lightning 1, 2 and 3. Select your first layer and apply lightning with the following settings.
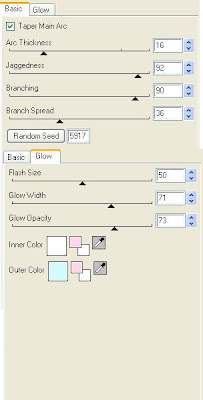
Pls note depending on where you want your lightning to start, you will see on the preview of where the lightning will be applied, there is 2 lil circles with an X in them. You may move these about so that you can place where your lightning will start and finish. I usually like to position a lil inside my image that way it doesn't go over the edge of it.
Select your 2nd lightning layer and apply effect again hitting random seed.
Select your last lightning layer and apply effect again hitting random seed again. Select none. If you decide not to animate your tag, then just skip the duplicate twice and lightning portions of this tut.
Drop shadow your frame. I have used 2/2/40/4 throughout. Copy and paste Glitter Splat 1 & resize 75%.
Copy and paste Glitter Ribbon 1, resize 75% & drop shadow. Position along the right hand side of your frame. Layer duplicate and rotate left 90. Position along the top of your frame.
Copy and paste Ribbon Flower, resize 50% & drop shadow. Position top right hand corner of your frame.
Copy and paste your tube, resize as necessary & drop shadow.
Copy and paste Devil Heart 3, resize 50% & drop shadow. Position bottom left hand corner.
Copy and paste Flower 2, resize 20% & drop shadow. Position top right hand corner of your frame onr your Ribbon Flower. Repeat with Flower 1.
Copy and paste Word Art, resize 65% & drop shadow. Position top right hand corner.
At this point if you need to, resize your tag. I have used 500x500. Add your copyright and name. I have used Blood Feast, Size 48, black and then added a size 8 fat color #f5753f gradient glow and then drop shadow.
If you are choosing not to animate, then you can save your tag.
To animate, close off Lightning Layer 2 & 3 (the lil eye icon in your layer palette), Edit/Copy Merged and paste as new animation in Animation Shop. Close off Lightning Layer 1 and open Lightning Layer 2, Edit/Copy Merged and paste after current frame in AS. Close off Lightning Layer 2 and open Lightning Layer 3, Edit/Copy Merged and paste after current frame in AS.
You may want to view your animation and decide if you wish to slow down the speed of your lightning. To do this Edit/Select All and then animation/frame properties. I have set mine for 30.
Save as a gif.
I hope you have enjoyed my tutorial. Pls feel free to experiment and use my tutorial as a guide.
Please feel free to send me your results. I'd love to see what you came up with.
Sunday, September 11, 2011
Rise & Shine Tut
9:33 PM | Posted by
Shal |
Edit Post

Feel free to use my tutorial as a guide and have fun giving it your own spin.
This tutorial assumes you have a working knowledge of PSP.
Needed Supplies :
Tube of Choice .. I am using the work of Pinup Toons which you must have a license to use. Please do not use this work without purchasing through CDO here. I am licensed through CILM which is now closed.
Scrap Kit of Choice .. I have used a adorable FTU Kit from Kim's Korner called "On The Farm" which can be downloaded here.
Mask of Choice .. I haved used WSL_Mask326 which can be downloaded here.
Font of Choice .. 2 Peas Barn Door & TheNautiGal
Let's get started
New image 600x600 and floodfill with white. New raster layer, select all, paste into selection Paper 14. Select none. New mask layer from image, WSL_Mask326, invert transparency unchecked, and merge group.
Repeat with Paper 15, rotate right 15 and resize 90%.
Copy and paste Frame 3 and resize 75%. Using your magic wand, select the center portion of your frame, selections modify/expand 3. Copy and paste Paper 4 below your frame layer, resize 75%, selections invert and hit delete. Copy and paste Chicken Wire and hit delete.
Copy and paste Barn, resize 65%, position on the right hand side and hit delete. Copy and paste Tree 1, resize 65%, position on the left hand side and hit delete. Copy and paste Rooster 2, position towards the bottom and hit delete.
Select none. Drop shadow your frame. I have used 2/2/40/4 throughout.
Copy and paste Flower 3, resize 75% & drop shadow. Position on the left hand side. Repeat with Flower 1, resizing 50% & positioning next to your first flower. Repeat with Flower 2, resizing 40% & positioning this time on the right hand side.
Copy and paste Hay, resize 75% & drop shadow. Position along the bottom. Copy and paste Wheel, resize 40% & drop shadow. Position bottom left hand corner.
Copy and paste your tube, resize as necessary & drop shadow. Position on the left hand side so that you can see enough of your farm scene.
Copy and paste Rooster 1, resize 30% & drop shadow. Position bottom right hand corner. Repeat with Hen 3.
Using 2 Peas Barn Door Font, Size 48, Color #c56e1f, I typed out Rise & Shine. I then added the following gradient glow and then drop shadow. Position top right hand corner.
X out white background, merge visible. Open white background, resize to your liking (I have used 500x500).
Add copyright and name on your tag. I have used TheNautgal, Size 72, color #c56e1f and then added the same gradient glow & drop shadow as with the word art.
Save and you are done.
I hope you have enjoyed my tutorial.
Pls feel free to experiment and use my tutorial as a guide.
This tutorial assumes you have a working knowledge of PSP.
Needed Supplies :
Tube of Choice .. I am using the work of Pinup Toons which you must have a license to use. Please do not use this work without purchasing through CDO here. I am licensed through CILM which is now closed.
Scrap Kit of Choice .. I have used a adorable FTU Kit from Kim's Korner called "On The Farm" which can be downloaded here.
Mask of Choice .. I haved used WSL_Mask326 which can be downloaded here.
Font of Choice .. 2 Peas Barn Door & TheNautiGal
Let's get started
New image 600x600 and floodfill with white. New raster layer, select all, paste into selection Paper 14. Select none. New mask layer from image, WSL_Mask326, invert transparency unchecked, and merge group.
Repeat with Paper 15, rotate right 15 and resize 90%.
Copy and paste Frame 3 and resize 75%. Using your magic wand, select the center portion of your frame, selections modify/expand 3. Copy and paste Paper 4 below your frame layer, resize 75%, selections invert and hit delete. Copy and paste Chicken Wire and hit delete.
Copy and paste Barn, resize 65%, position on the right hand side and hit delete. Copy and paste Tree 1, resize 65%, position on the left hand side and hit delete. Copy and paste Rooster 2, position towards the bottom and hit delete.
Select none. Drop shadow your frame. I have used 2/2/40/4 throughout.
Copy and paste Flower 3, resize 75% & drop shadow. Position on the left hand side. Repeat with Flower 1, resizing 50% & positioning next to your first flower. Repeat with Flower 2, resizing 40% & positioning this time on the right hand side.
Copy and paste Hay, resize 75% & drop shadow. Position along the bottom. Copy and paste Wheel, resize 40% & drop shadow. Position bottom left hand corner.
Copy and paste your tube, resize as necessary & drop shadow. Position on the left hand side so that you can see enough of your farm scene.
Copy and paste Rooster 1, resize 30% & drop shadow. Position bottom right hand corner. Repeat with Hen 3.
Using 2 Peas Barn Door Font, Size 48, Color #c56e1f, I typed out Rise & Shine. I then added the following gradient glow and then drop shadow. Position top right hand corner.

X out white background, merge visible. Open white background, resize to your liking (I have used 500x500).
Add copyright and name on your tag. I have used TheNautgal, Size 72, color #c56e1f and then added the same gradient glow & drop shadow as with the word art.
Save and you are done.
I hope you have enjoyed my tutorial.
Pls feel free to experiment and use my tutorial as a guide.
Wednesday, September 7, 2011
Be A Good One Tut
2:31 PM | Posted by
Shal |
Edit Post

Feel free to use my tutorial as a guide and have fun giving it your own spin.
This tutorial assumes you have a working knowledge of PSP.
Needed Supplies :
Tube of Choice .. I am using the work of Barbara Jensen which you must have a license to use. Please do not use this work without purchasing through SNC here.
This particular image is an exclusive available only through SNC.
Scrap Kit of Choice .. I have used gorgeous FTU Kit from Fantasy Moments called "Mystic Gothic" which can be downloaded here.
Mask of Choice .. I have used WSL_Mask84 which can be downloaded here.
Word Art of Choice .. I have used word art by Tina Chambers which can be downloaded here.
Font of Choice .. Jayne Print
Let's get started
New image 600x600 and floodfill with white. New raster layer, select all, paste into selection Paper 7. Select none. New mask layer from image, WSL_Mask84, invert transparency unchecked, and merge group. Resize 110%.
Adjust/add remove noise/add noise/uniform monochrome checked/25%. Copy and paste Element 2, resize 75%, rotate right 45 & drop shadow. I have used 2/2/40/4 throughout. Position starting at the top left hand corner.
Copy and paste Element 58 & resize 70%. Using your magic wand, select the center portion of your frame, selections modify/expand 2. Copy and paste Paper 8 below your frame layer, resize 75%, selections invert and hit delete. Copy and paste Element 22, resize 75% & hit delete. Select none & drop shadow your frame.
Copy and paste Element 19, resize 50% & drop shadow. Position on the left hand side of your frame.
Copy and paste Element 66, resize 65%, rotate left 15 & drop shadow. Position on the left hand side. Layer duplicate, resize 75% and position just below.
Copy and paste Element 27, resize 50% & drop shadow. Position at the base of your black roses.
Copy and paste your tube. Position a lil to the right of centre and drop shadow.
Copy and paste Element 2, resize 50% & drop shadow. Position along the bottom. Copy and paste Element 77, resize 40% & drop shadow. Position bottom right hand corner.
Copy and paste your word art of choice & resize as required. I then added the following gradient glow & then drop shadow.

X out white background, merge visible. Open white background, resize to your liking (I have used 500x500).
Add copyright and name on your tag. I have used Jayne Print, Size 48, color black and the added the same gradient glow and drop shadow as on the word art.
Save and you are done.
I hope you have enjoyed my tutorial.
Pls feel free to experiment and use my tutorial as a guide.
Friday, September 2, 2011
Golden Moments Tut
8:14 PM | Posted by
Shal |
Edit Post
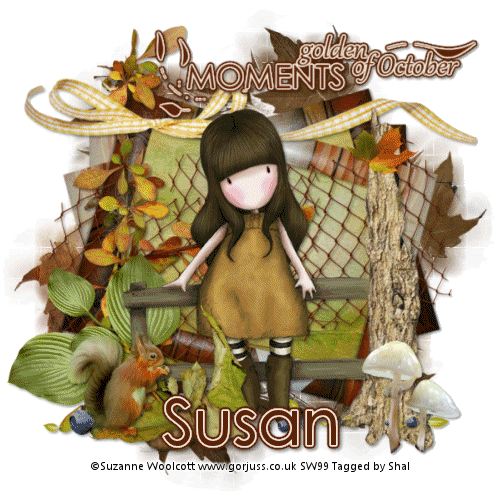
Feel free to use my tutorial as a guide and have fun giving it your own spin.
This tutorial assumes you have a working knowledge of PSP.
Needed Supplies :
Tube of Choice .. I am using the work of Suzanne Woolcott which you must have a license to use. Please do not use her work without purchasing through here.
Scrap Kit of Choice .. I have used a gorgeous PTU Kit from Wilma4ever called Subtle Autumn which can be purchased here.
Mask of Choice .. I have used WSL_Mask328 which can be downloaded here.
Word art of Choice .. I have used Autumn Word art by Stepko which can be downloaded here.
Font of Choice .. Levenim MT
Let's get started
New image 600x600 and floodfill with white. New raster layer, select all, paste into selection Paper 4. Select none. New mask layer from image WSL_Mask328, invert transparency unchecked, and merge group. Layer duplicate and merge down both mask layers.
Copy and paste Element 18 & resize 60%. Using your magic wand, select the center portion of your frame, selections modify/expand 5. Copy and paste Paper 2 below your frame layer, resize 50%, selections invert and hit delete. Select none & drop shadow your frame. I have used 2/2/40/4 throughout. Merge down your frame with the green background layer.
Layer duplicate and rotate left 15. Layer duplicate and mirror.
Copy and paste Element 5, resize 65% & drop shadow.
Copy and paste Element 19, resize 65%, mirror and drop shadow. Position on the left hand side. Copy and paste Element 6, resize 50% & drop shadow. Position bottom left hand corner.
Copy and paste Element 12, resize 65%, rotate right 45 and drop shadow. Position along the top of your top frame.
Copy and paste your tube and drop shadow.
Copy and paste Element 10, resize 75% & drop shadow. Position on the right hand side. Copy and paste Element 50, resize 65% & drop shadow. Position along the bottom. Repeat with Element 33, resizing 30% and position at the base of your tree.
Copy and paste Element 39, resize 40% & drop shadow. Position bottom left hand corner a little towards centre. Copy and paste Element 36, resize 25%, mirror & drop shadow. Position bottom left hand corner.
Copy and paste your word art and resize 65%. Adjust color balance/manual color correction from black to #5b230a. I then added the following gradient glow and then drop shadow.

Copy and paste Element 31, resize 30% and position at the top of your tree like this.

Duplicate 4 times and rename your layers Leaf 1, 2, 3, 4 and 5. Leaf layer 1 will remain as is. Select Leaf layer 2 and move it down a bit .. see my image for idea of placement. You will repeat doing this with your Leaf layers 3, 4 and 5. The idea is to place your leaves so it appears to be falling down to the ground. Pls make certain that you do this in order so that your Leaf layer 1 is the leaf at the top of your tree and that your Leaf layer 5 is the one at the ground.


If you are choosing not to animate your tag, then just skip adding and duplicating the leaf layers.
At this point if you need to, resize your tag. I have used 500x500. Add your copyright and name.
I have used Levenim MT, Size 60, color #5b230a and then added the same gradient glow and drop shadow as on the word art.
If you are choosing not to animate, then you can save your tag.
To animate, close off Leaf layers 2-5 (the lil eye icon in your layer palette), Edit/Copy Merged and paste as new animation in Animation Shop. Close off Leaf Layer 1 and open Leaf Layer 2, Edit/Copy Merged and paste after current frame in AS. Close off Leaf Layer 2 and open Leaf Layer 3, Edit/Copy Merged and paste after current frame in AS. Do the same with Leaf Layers 4 and 5.
In Animation Shop, select all/animation/frame properties/display time 35. If you want to see what it will look like, view/animation. If you are not happy with the speed of the falling leaf edit/undo frame properties and redo the display speed.
Save as a gif.
I hope you have enjoyed my tutorial.
Pls feel free to experiment and use my tutorial as a guide.
Please feel free to send me your results.
I'd love to see what you came up with.
Subscribe to:
Posts (Atom)
Kits & Tuts


Blogs I Love


