About Me
My hobbies are PSP.
I love helping my friends who are starting with PSP.
Any similarity or resemblance to any other tutorial is purely coincidental and unintentional. Pls do not recopy my tutorials anywhere. Many thanks Susan.


Credit

Blinkie created by Rabid Designz. She does some amazing work ! Thanks so much Melissa.

Blinkie created by my long time friend tweety here. Thanks so much my friend :)
My blog was designed By Alika's Scraps. Thanks so much. You did an amazing job !

Leave Me A Message
Followers
My Blog List
Sunday, May 15, 2011
 Making Waves Tut
5:07 PM | Posted by
Shal |
 Edit Post
Feel free to use my tutorial as a guide and have fun giving it your own spin.
This tutorial assumes you have a working knowledge of PSP.
Needed Supplies :
Tube of Choice .. I am using the work of Maigan Lynn (www.maiganlynnart.blogspot.com) which you must have a license to use. Please do not use her work without purchasing through My Tag Art here.
Scrap Kit of Choice .. I have used a FTU Kit that I made exclusively for My Tag Art's MerMay celebration. The kit is available to My Tag Art forum members here and then just visit the Exclusive TART Freebies area.
Mask of Choice .. I have used WSL_Mask79 & WSL_Mask366 which can be downloaded here.
Word art of Choice .. I have used word art from Alegna Designs which you can download here.
Font of Choice .. TheNauticalGal ROB
Filters of Choice .. Mura's Meister/Copies
Let's get started
New image 600x600 and floodfill with white. New raster layer, select all, paste into selection Paper 3. Select none. New mask layer from image, WSL_Mask79, invert transparency unchecked, and merge group. Resize 110%.
Repeat with Paper 2 and this time using mask WSL_Mask366. Resize 110%.
Copy and paste Splat 1 & resize 50%. Position top left hand corner. Layer duplicate and position bottom right hand corner. You may want to reposition these a bit once you have more layers on your tag.
Copy and paste Frame 3 & resize 55%. Using your magic wand, select the center portion of your first frame, selections modify/expand 5. Copy and paste Paper 7 below your frame layer, resize 65%, selections invert and hit delete. Select none. Drop shadow your frame. I have used 2/2/40/4 throughout.
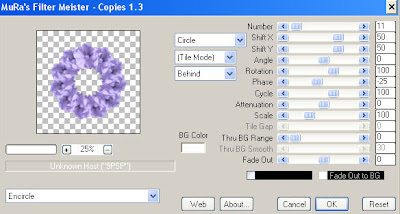
Copy and paste Hibiscus 2 and resize 40%. Apply the following Mura's Meister/Copies setting and then drop shadow.

Copy and paste Element 16, resize 75% & drop shadow. Position on the right hand side of your frame. Repeat with Element 17, resizing 65% & position next to your other palm tree.
Copy and paste Element 14, resize 65% & drop shadow. Position at the base of your palm trees.
Copy and paste your tube and drop shadow. Position a lil to the left of your palm trees.
Copy and paste Ribbon 6, resize 65%, rotate right 90, mirror & drop shadow. Position on the bottom left hand side. Copy and paste Ribbon 7, resize 50%, rotate right 90 & drop shadow. Position on your other ribbon.
Copy and paste Element 5, resize 50% & drop shadow. Position bottom right hand corner. Repeat with Element 4 and position on your shells. Repeat with Element 19 and position top right hand corner flying over the palm trees.
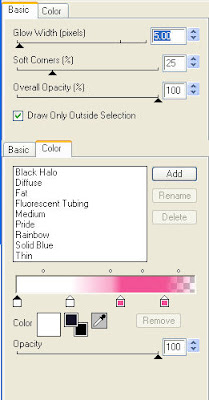
Copy and paste Word art and resize 40% twice. Adjust color balance/manual color correction from black to #3c1e5d. Adjust/add remove noise/uniform monochrome checked/50%. I then added the following gradient glow & then drop shadow.

X out white background, merge visible. Open white background, resize to your liking (I have used 500x500).
Add copyright and name on your tag. I have used TheNauticalGal ROB, size 72, color #3c1e5d and then added the noise, gradient glow & drop shadow as with the word art.
Save and you are done.
I hope you have enjoyed my tutorial. Pls feel free to experiment and use my tutorial as a guide.
This tutorial assumes you have a working knowledge of PSP.
Needed Supplies :
Tube of Choice .. I am using the work of Maigan Lynn (www.maiganlynnart.blogspot.com) which you must have a license to use. Please do not use her work without purchasing through My Tag Art here.
Scrap Kit of Choice .. I have used a FTU Kit that I made exclusively for My Tag Art's MerMay celebration. The kit is available to My Tag Art forum members here and then just visit the Exclusive TART Freebies area.
Mask of Choice .. I have used WSL_Mask79 & WSL_Mask366 which can be downloaded here.
Word art of Choice .. I have used word art from Alegna Designs which you can download here.
Font of Choice .. TheNauticalGal ROB
Filters of Choice .. Mura's Meister/Copies
Let's get started
New image 600x600 and floodfill with white. New raster layer, select all, paste into selection Paper 3. Select none. New mask layer from image, WSL_Mask79, invert transparency unchecked, and merge group. Resize 110%.
Repeat with Paper 2 and this time using mask WSL_Mask366. Resize 110%.
Copy and paste Splat 1 & resize 50%. Position top left hand corner. Layer duplicate and position bottom right hand corner. You may want to reposition these a bit once you have more layers on your tag.
Copy and paste Frame 3 & resize 55%. Using your magic wand, select the center portion of your first frame, selections modify/expand 5. Copy and paste Paper 7 below your frame layer, resize 65%, selections invert and hit delete. Select none. Drop shadow your frame. I have used 2/2/40/4 throughout.
Copy and paste Hibiscus 2 and resize 40%. Apply the following Mura's Meister/Copies setting and then drop shadow.

Copy and paste Element 16, resize 75% & drop shadow. Position on the right hand side of your frame. Repeat with Element 17, resizing 65% & position next to your other palm tree.
Copy and paste Element 14, resize 65% & drop shadow. Position at the base of your palm trees.
Copy and paste your tube and drop shadow. Position a lil to the left of your palm trees.
Copy and paste Ribbon 6, resize 65%, rotate right 90, mirror & drop shadow. Position on the bottom left hand side. Copy and paste Ribbon 7, resize 50%, rotate right 90 & drop shadow. Position on your other ribbon.
Copy and paste Element 5, resize 50% & drop shadow. Position bottom right hand corner. Repeat with Element 4 and position on your shells. Repeat with Element 19 and position top right hand corner flying over the palm trees.
Copy and paste Word art and resize 40% twice. Adjust color balance/manual color correction from black to #3c1e5d. Adjust/add remove noise/uniform monochrome checked/50%. I then added the following gradient glow & then drop shadow.

X out white background, merge visible. Open white background, resize to your liking (I have used 500x500).
Add copyright and name on your tag. I have used TheNauticalGal ROB, size 72, color #3c1e5d and then added the noise, gradient glow & drop shadow as with the word art.
Save and you are done.
I hope you have enjoyed my tutorial. Pls feel free to experiment and use my tutorial as a guide.
Subscribe to:
Post Comments (Atom)
Labels
- 1$ Mini Kits (4)
- Angela Newman (7)
- Awards (10)
- Blog Trains (6)
- Caron Vinson (1)
- CU Items (8)
- Elias (3)
- Extras (6)
- FTU Scrap Kits (22)
- FTU Tutorials (39)
- Halloween (1)
- Irish Bitch Designs (2)
- KatNKDA (28)
- KiwiFire Storm (1)
- Maigan Lynn (6)
- Misc (1)
- News (98)
- Pinup Toons (1)
- PTU Scrap Kits (79)
- PTU Tutorials (245)
- Sweet Dream Scraps (3)
- Tags Using my Scraps (10)
- Tags Using My Tuts (13)
- Tuts Using My Kits; (63)
- Tuts Using My Kits; Tags Using my Scraps (3)
- verymany (2)
- Wicked Princess Scraps (3)
Blog Archive
-
▼
2011
(172)
-
▼
May
(13)
- Beach Babe Tut
- Summer Themed Tagger Size Kits
- Floral Garden Tagger Size Kit
- Welcome On Board Tut
- Life's A Beach Tut
- Making Waves Tut
- Love of Fun Tut
- Birthday Bash at Twilights Scraps !
- Ongoing Mother's Day & NSD sale !
- Tuts using my "Easterific" & "Lil Boys/Lil Girls ...
- Beauty Tut
- My Backyard Tut
- Sticky Sweet Tut
-
▼
May
(13)


0 comments: